


Using ZIMS to help prepare for your
AZA Accreditation
AZA Accreditation Supplement
Revised 12 June 2026
Introduction
The ZIMS application can help make your AZA accreditation process easier by helping you gather information for your application and provide answers to questions during your site visit. Some of the accreditation questions can be answered directly by downloading/ printing information from ZIMS in the form of reports or exports. ZIMS helps you easily gather information you will need to answer questions in the requested format (narrative, provided form, etc.).
How to use this document:
This document follows the AZA Accreditation Standards & Related Policies (2026) document, and outlines ways in which ZIMS can be used to answer specific points.
Only sections within the standards that can be assisted with ZIMS will be included.
Each section in this document will correspond to the numbered section within the accreditation standards for ease.
Contents
1. Animal Welfare, Care and Management
1.3.1 Institutional Collection Plan
1.4.0 Evidence of having a zoological records management system
1.4.13 AZA Studbook-Managed Species
1.5 Animal Welfare, Care and Well-being
1.5.0 Assessing animal welfare and wellness
1.5.7 Species' appropriate physical environments
1.5.9 Water Quality Monitoring
1.5.10 Temporary, seasonal and traveling animals
1.5.11 Deaths during transport
1.6 Enrichment and Husbandry Training
1.6.3 Documenting Enrichment Activities
1.6.4 Documenting Training Activities
2.0.4 Complete Medical Records
1. Animal Care, Wellbeing, & Management
This section outlines the ways ZIMS can assist your accreditation process within Section 1 – Animal Care, Wellbeing, & Management.
1.3 Documents and Policies
1.3.1 Institutional Collection Plan
“The institution must follow an Institutional Collection Plan (ICP). The ICP must be re-evaluated and updates at minimum every 5 years”.
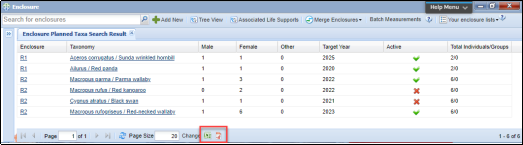
ICPs can be documented in ZIMS by capturing plans for each exhibit within the Planned Taxa grids in the Enclosure module. In the below example, we planned to add black swans (Cygnus atratus) and red kangaroos (Macropus rufus) in 2021, and add Parma wallabies (Macropus parma) and red-necked wallabies (Macropus rufogriseus) in 2022.
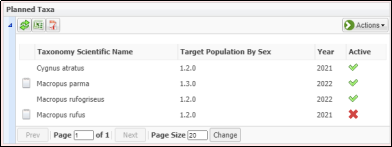
The plans for black swans, Parma wallabies and red-necked wallabies are still active, but we can see the plan for red-kangaroos has been marked inactive due to the enclosure not being suitable. A note was added to the plan to document this.
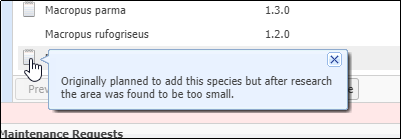
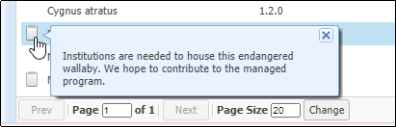
Notes can also be added to document why you wish to add a specific species, as we see here with the Parma wallabies.
Once you have recorded your planned taxa for your enclosures, you can run a report within ZIMS to search for all your planned taxa.
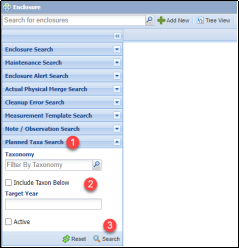
Within the Enclosure module search box, navigate to Planned Taxa Search (1). Search for specific species, taxa groups or plan years (2), or leave the search criteria blank to bring up all planned taxa entered in ZIMS. Click Search to run the search (3).
This will bring up a list of your planned taxa (filtered by your search criteria). You can export this list to Excel or PDF by clicking on the buttons highlighted.
Read more here:
1.3.2 Transaction Records
“Records must be maintained for all transactions involving acquisition, transfer, euthanasia or reintroduction of animals to and from the institution and must include the terms of transaction”.
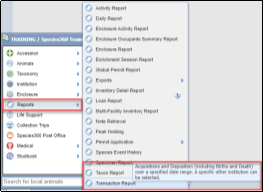
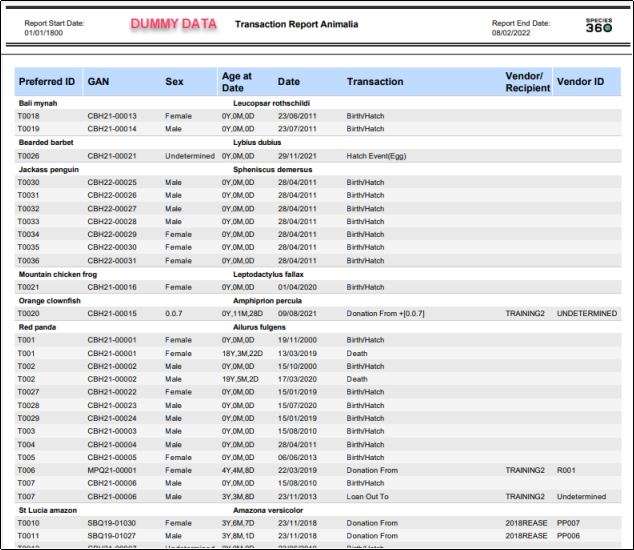
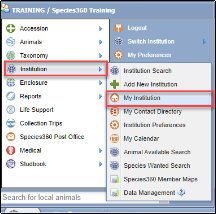
You can quickly export a list of transactions (acquisitions and dispositions, including births and deaths) for your institution by running the Transaction Report. This report is found in the Start Menu, under Reports, Transaction Report.
First, choose the scope of your report (1). You can choose to include both groups and individual records, or just groups or just individuals. You can also choose to include pre-births (egg & fetus). You can run the report for the animalia taxonomy, which will bring up all transactions for your zoo within the data range, or you can choose to limit by taxa and enclosure to look at a specific area of your zoo. You can also choose to look at transactions related to a specific party or location.
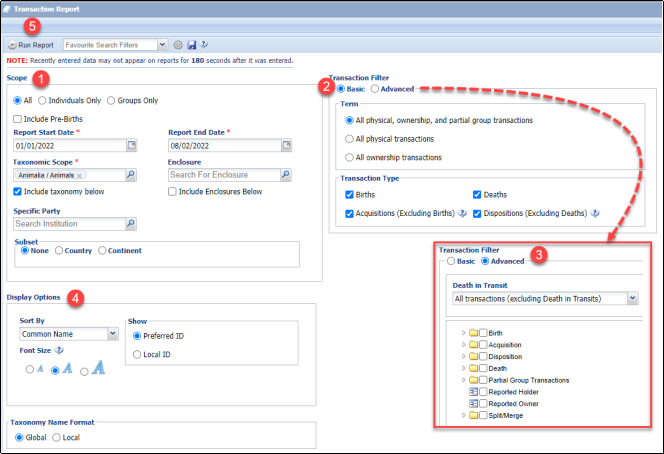
Next you need to set transaction filters for your report. Basic (2) lets you choose whether to include all births, all deaths, all acquisitions and all dispositions, and physical or ownership transactions. Advanced filters (3) allow you to choose specific types of birth, death, acquisition and disposition, for example partial group transactions, or egg deaths.
Finally you need to set your display options (4), or leave them as default. You can choose to sort your results by taxa, ID or type, and whether you want to use Local or Global taxonomy. Once you have set all of your filters, click Run Report (5) at the top of your screen.
Here is an example report for the training data set. Our report is grouped by taxonomy to show the transactions for each species.
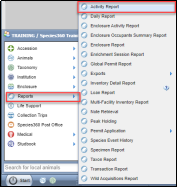
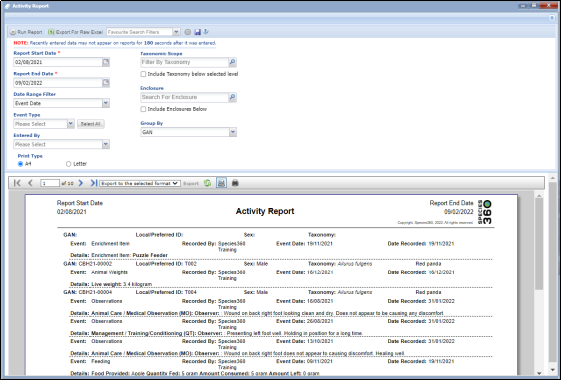
To export a list of deaths detailing whether the death was natural or euthanasia, an Activity Report can be used. The Activity Report is found in the Start Menu, under Reports, Activity Report.
In the search criteria, set Event Type to Deaths, then select any other filters you wish to run. You can run the report, and then export to PDF, or you can click Export for Raw Excel if you want to run some quick formatting to highlight the natural vs euthanasia deaths.
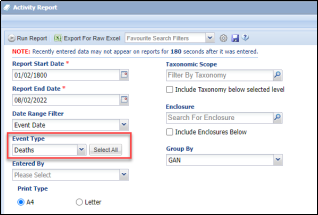
Here is an example Activity Report Excel export for deaths (some columns have been removed from this example). You can see in column I that ZIMS uses the standard term: Deaths:Natural/Non-euthanasia, Deaths:Euthanasia, management, Deaths:Euthanasia, medical, Deaths:Euthanasia, etc.

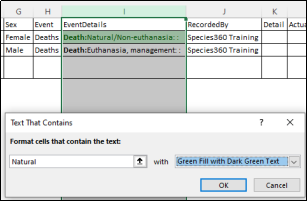
You can use conditional formatting in Excel to highlight cells containing specific words.
First, highlight column I (1), click Conditional Formatting (2), click Highlight Cell Rules (3) and choose Text that Contains… (4).

In the pop-up, type in the text you want to highlight, and choose the color you would like to highlight in. You can also use ‘More Rules…’ in the conditional formatting menu to use rules such as ‘does not contain’ to highlight anything but a natural death.
Read more here:
1.3.2 Non-AZA Transactions
“Provide a list of all animal transactions with non-AZA accredited facilities over the last five years.” – AZA Accreditation/Certification Questionnaire
Run a Transaction report for ‘Acquisitions from another institution’ and ‘Dispositions to another institution’ within the last 5 year period.

Then Export to Excel.
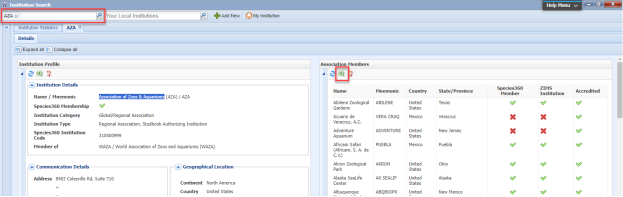
In ZIMS, open the Institution Search and Search for ‘AZA’ in Global institutions. Open the Association Members tab to expand and click the Excel logo to export the members list to Excel.
In Excel you will now have two spreadsheets, one with a list of AZA members and another with your Transaction report.
In the Transaction report spreadsheet, add two columns and title them;
- AZA accredited?
- Mnemonic
In the AZA member spreadsheet; Copy (Ctrl + C) the list of Mnemonics, and paste (Ctrl + V) them into the Mnemonic column that was newly created in the Transaction report spreadsheet.
Now all the information is on one spreadsheet you can use a formula to complete the empty ‘AZA accredited?’ column.
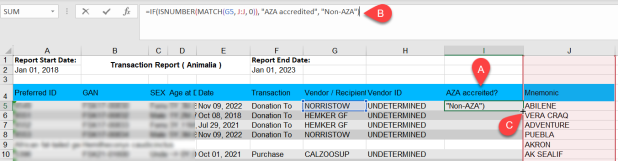
A) You want to populate this column to say whether a Vendor/Recipient that was involved in a Transaction with you, was AZA accredited or Non-AZA. To do this you will type a formula into the first cell under this column title.
B) The formula you will use is:
=IF(ISNUMBER(MATCH (select the first cell in Vendor/Recipient list, Select the column which the Mnemonics are in, 0)), “AZA accredited”, “Non-AZA”)
Which will look like this:
=IF(ISNUMBER(MATCH(G5, J:J, 0)), "AZA accredited", "Non-AZA")
In this example, if the value in cell G5 can be found in column J of the spreadsheet, the formula will output "AZA accredited." If the value is not found, the cell will populate with Non-AZA.
C) Hover over the bottom right corner of the cell you input the formula into, and a ‘+’ icon will appear. Double click this and the all the other cells in this column will apply the formula.
Note: To delete the formulas but keep the results; Copy Column I (AZA accredited?) and Paste Values only  in the same location. You can now delete Column J (Mnemonic column) without affecting the values in Column I.
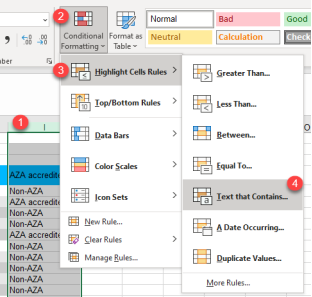
You can use conditional formatting in Excel to highlight cells containing specific words.
First, highlight the ‘AZA accredited?’ column (1), click Conditional Formatting (2), click Highlight Cell Rules (3) and choose Text that Contains… (4).
In the pop-up, type in the text you want to highlight, and choose the color you would like to highlight in.
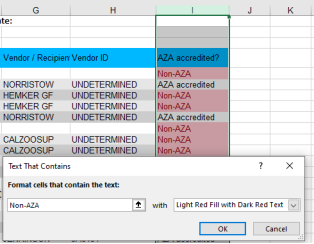
You now have a list of all Acquisitions and Dispositions from AZA and Non-AZA accredited institutions in the last 5 years for your institution, with Non-AZA highlighted for ease of viewing.
1.3.2 Permit Records
“Copies of all relevant permits, etc. must be maintained”.
Though you store your permits and documentation externally to ZIMS, you can still use ZIMS to bring up a list of all permit numbers stored in the system. Within the Start Menu, click Institution, My Institution, to open up your institution in the institution module.
The permits section within your institution lists all the permits you have recorded. You can use the search form to filter specific permits, and you can export your list of permits to Excel of PDF by clicking on the export buttons.

Read more here:
1.4 Records
1.4.0 Evidence of having a zoological records management system
“The institution must show evidence of having a zoological records management system for managing animal records, veterinary records, and other relevant information”.
Demonstrate you use ZIMS to manage your zoological records, either by showing your records in ZIMS, or by exporting reports. As a ZIMS user, and member of Species360, you are helping to improve animal care and welfare, and inform species conservation through global data.
1.4.1 Animal Inventory
“An animal inventory must be compiled at least once a year and include data regarding animals added and removed from the institution’s collection whether by birth, transfer, death or introduction to the wild”.
There are two types of inventory report that can be run in ZIMS, the Inventory Summary Report, and the Inventory Detail Report.
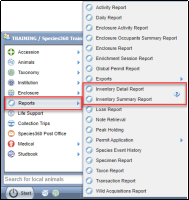
The Inventory Summary Report provides a six column inventory, detailing the number of animals at the start date and end date, and details the number of births, acquisitions, deaths and dispositions during that time period. The report can be run for individuals only, or for individuals and groups. You can also choose to include any group split/merges in the acquisition and disposition columns.
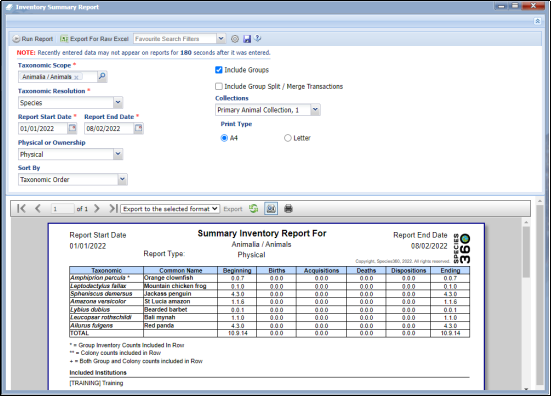
The Inventory Detail Report provides the same six column inventory, but gives you the option to include or exclude animals in or out on loan. In addition to the six columns in the Summary Report, the Detail Report also has a change column. When the report displays, it splits each species into the separate rows: Owned And Onsite, In On Loan, Out On Loan, Groups and Colonies. You can also choose to display CITES and IUCN information on your inventory for added value.
Note that group animals in/out on loan will not display in the In On Loan or Out On Loan Columns.
Another way to see your animals in or out on loan is to run a Loan Report. The Loan Report is accessed from the Start Menu, under Reports, Loan Report.
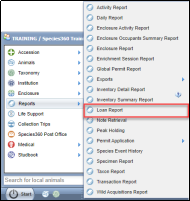
The Loan Report lists the details for each animal In on Loan or Out on Loan. You will need to run the report once for animals In on Loan, and again for animals Out on Loan.

Read more here:
1.4.3 Animal Identifiers
“Animals must be identifiable, whatever practical, and have corresponding ID numbers.”
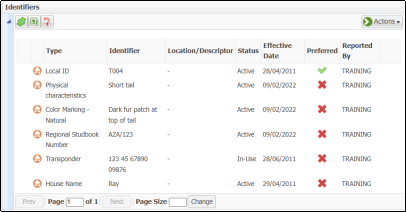
Animal identifiers can be recorded in the Identifiers grid on an animals record. Identifiers can be physical identifiers, such as tags, bands, markings and transponders, or logical identifiers, such as house names, studbook numbers and passport numbers.
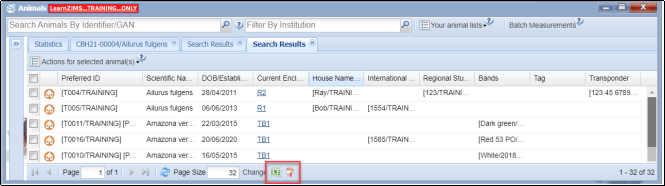
You can view identifiers for multiple animals in Animal Search Results by customizing the columns to display the required identifiers. You can export the list by clicking the Export to Excel button.
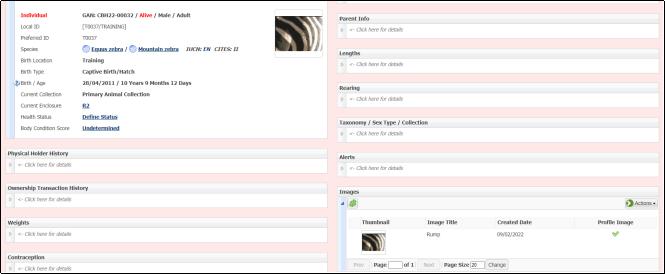
Another useful identifier is making use of the Images section in an animal record. You can use this grid to record identifying images, such as markings or characteristics. You can also set the picture as the profile picture for the record for quick identification, for example this zebra’s strip pattern.
Read more here:
1.4.4 Records Storage
“A disaster preparedness and business continuity plan should be in place for vital animal and veterinary records, and those that have long-term or permanent retention requirements.”
Complete details on data backup, redundancy, and retention
available here
.
1.4.10 Current Records
“Animal records must be kept current.”
Husbandry and Enclosure Records
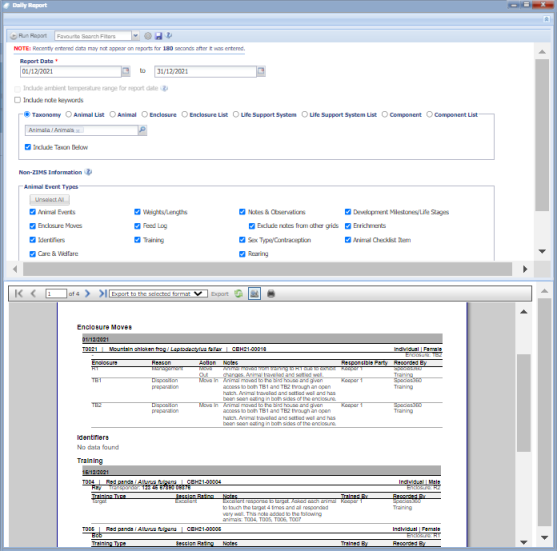
You can use Daily Activity to show how current your Husbandry and Enclosure records are. You can find Daily Activity from the Start Menu > New Features > Daily Activity.
Daily Activity displays all entries added to ZIMS in the animal husbandry record, including transactions, weights, notes and observations. You can export information for a specific date range (no more than 31 days at a time), taxonomic scope, enclosure or specific record type. You can also export the report to raw Excel.
The raw excel report is organized by record type and each record type is displayed separately on a new sheet in the spreadsheet.
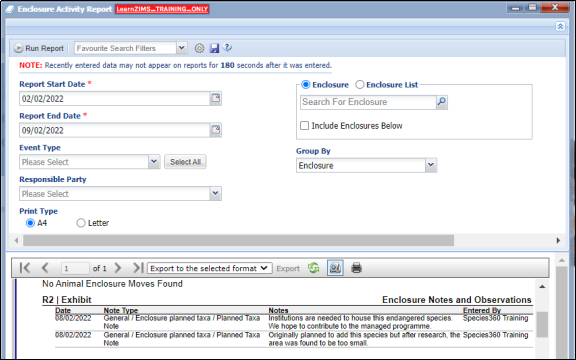
Daily Activity also displays information recently entered into the Enclosure modules. Choose to run the report for all enclosure or specific enclosures. You can export the report to raw Excel.
Medical Records
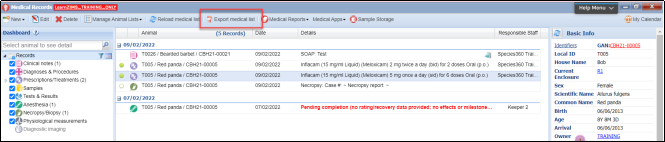
To display how up to date your medical records are you can choose to display the medical dashboard, which shows the most recent medical entries, or to run and export a ***** report.
The medical dashboard displays entries from the past 7 days by default. You can change the filter if you wish to increase or decrease the date range, and you can export the list by clicking Export Medical List.
Read more here:
1.4.12 Records Sharing
“When a specimen is transferred to another institution, all data for that animal within the zoological records management system, including any historical data from previous holding institutions, must be transferred with the animal to assure the receiving institution can provide the best possible care”.
Sharing with other ZIMS institutions
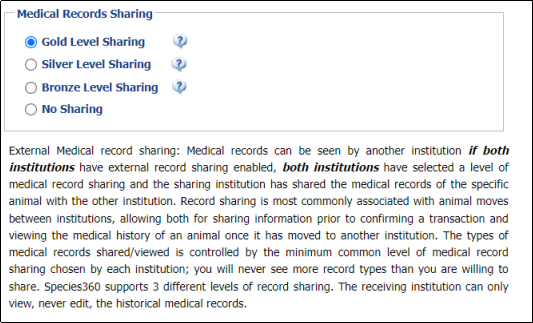
In ZIMS you can easily share an animal’s husbandry or medical records with another ZIMS institution. You can share a single record through the animals module, or a whole taxon (e.g. species or class) through the institution module. In order for another ZIMS institution to be able to view your medical records, they must have the same level of sharing (Gold, Silver, Bronze, No sharing). These medical sharing preferences can be found in Institutional Preferences, under ZIMS Accessibility and Features.
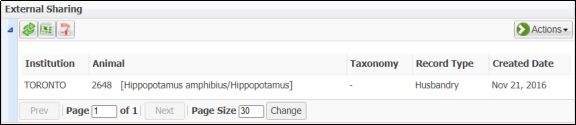
You can share a single record from an animal record in the External Sharing grid within the Detail tab.
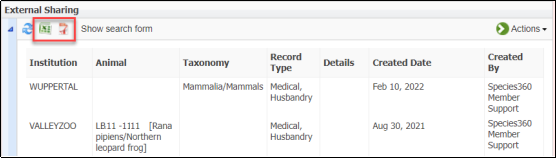
You can share records for a whole taxon, e.g., for an entire species or class, or share a single record within the External Sharing grid in the My Institution tab in the Institution module. This grid will display all records your institution has shared. You can also export your full list of shared records to Excel of PDF by clicking on the export buttons.
Sharing with non-ZIMS institutions
ZIMS records cannot be shared with other records management systems, but data can be exported to send to those collections.
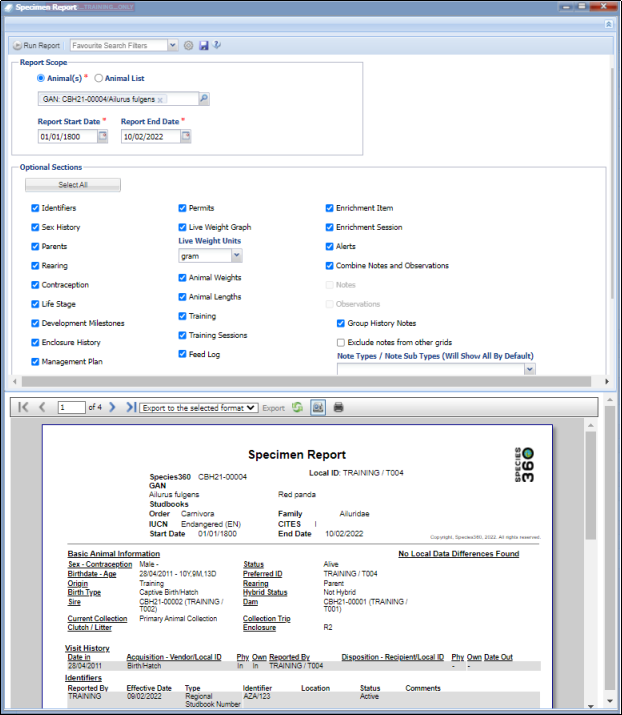
You can run a Specimen Report to extract all husbandry information added to the animal. The Specimen Report can be found under the Start Menu, Reports, Specimen Report, or it can be accessed from an animal record by clicking Actions on the Details tab.
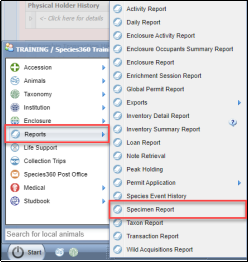

The specimen report allows you to select which information you would like to extract in your report, including basic animal information such as birth/hatch dates, parents, identifiers, and more detailed information such as notes & observation, training sessions and feed logs. Once run, the report can be exported to various formats, including PDF, which you can then send on to the receiving institution.
You can export a complete medical history from the Medical module by running a Complete Medical History report, or by exporting the medical dashboard for an animal.
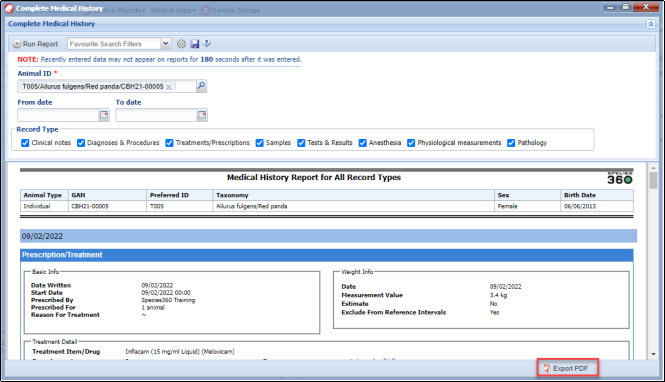
The Complete Medical History report is found in the Start Menu, under Medical, Medical Reports, Complete Medical History, or within the Medical module under Reports,
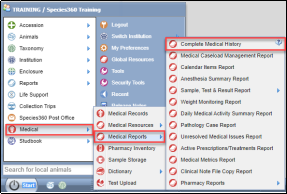
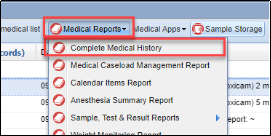
You can only run the Complete Medical History report for one animal at a time. You can select which sections of the medical record to extract if you only need to share part of the report. You can also limit the report to specific dates, for example if you only need to extract the past year. When you have run the report, you can click the Export PDF button to download the report to send on.
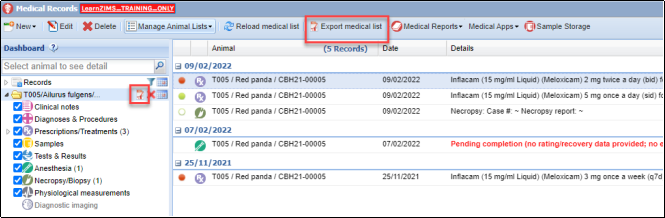
You can also download a full medical history from the Medical Dashboard. When in Medical, search for your specific animal, make sure any filters have been removed if you want to send the full record, then click Export Medical List, or click the PDF icon next to the animal ID.
Read more here:
- External Record Sharing ZIMS Help Document
- Medical Record Sharing ZIMS Help Document
- Husbandry Reports ZIMS Help Document
- Medical Reports ZIMS Help Document
- Medical Dashboard ZIMS Help Document
1.4.13 AZA Studbook-Managed Species
“For AZA studbook-managed species, all data that is required to manage these programs effectively must be submitted to Species360 for use in ZIMS for Studbooks”.
By accessioning your animals into ZIMS, and recording data on these animals, including birth/hatch information, parents, rearing and contraception, you are fulfilling your requirements for section 1.4.13.
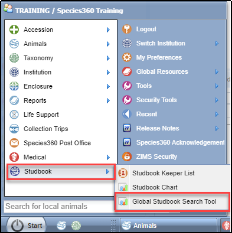
To view which species you hold which are part of AZA studbook-managed species, you can use the Global Studbook Search Tool. The Global Studbook Search Tool is found in the Start Menu, under Studbooks, Global Studbook Search Tool.
In the Search on the left, enter your institution in the Taxonomy Held By box, and AZA in the scope to bring up a list of species at your institution which are held in AZA studbooks. If required, you can export the list to PDF or Excel. 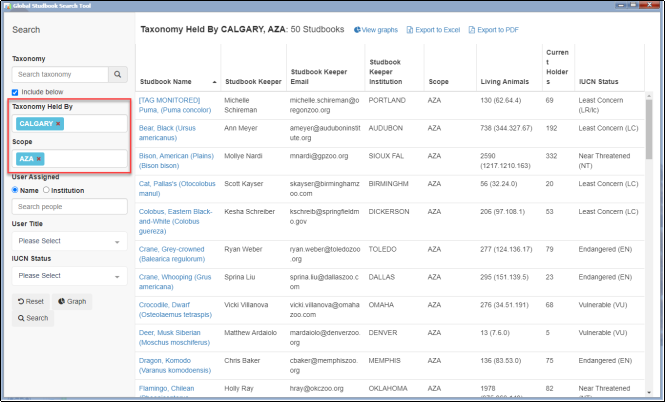
Read more here:
1.5 Animal Care, Wellbeing, and Welfare Science
1.5.0 Assessing animal wellbeing
“The institution must have a process for assessing animal wellbeing via welfare assessments”.
Note: under the revised 1.5.0, welfare assessments must be conducted at least annually for all animals, and the process must capture the impact of significant life events or changes in the animal’s environment. ZIMS Care and Welfare lets you record assessments on this cadence and export the evidence by animal or for your whole collection.
If you use the Care and Welfare module for assessing welfare and wellness, you can demonstrate your use and export data in a range of ways. The Care and Welfare module is found in the Start Menu under Animals, Care and Welfare.

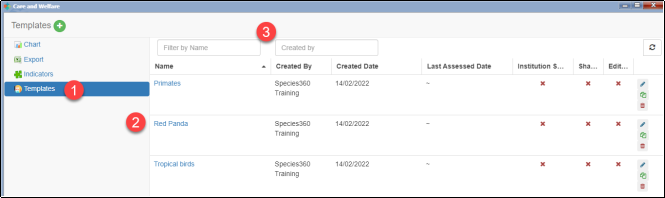
Within the Care and Welfare module, clicking Templates on the left panel (1) will show a list of all templates you have set up (2). Search the templates (3) to filter your list, or click on the blue name (2) to demonstrate the welfare and wellness indicators you are monitoring.
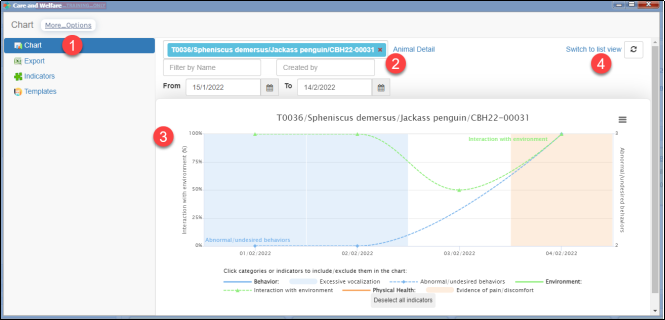
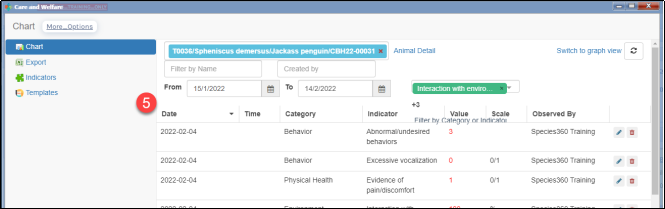
To view recorded data within the module, click on Chart (1) and search for the animal you wish to view (2), along with any date filters. All recorded data for that animal and timeframe will appear in the graph (3). Alternatively, click Switch to List view (4) to view all the data in a list (5).
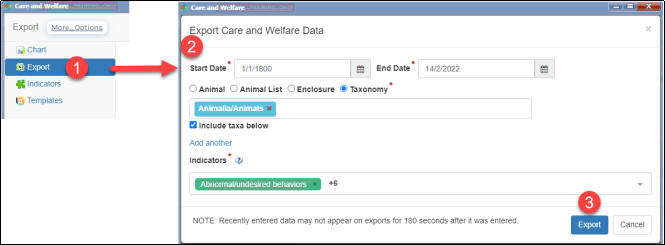
To export care and welfare data, choose Export from the left panel (1), fill in your search criteria (2), then click Export (3) to export the data to excel.
If you want to export all data entered into Care and Welfare, set the start date to 1/1/1800, set the Taxonomy to Animalia/Animals, and select all your indicators.

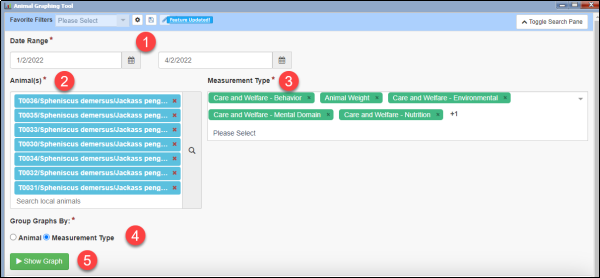
Outside of the Care and Welfare module, you can also view and export your data in the Animal Graphing Tool. The Animal Graphing Tool is found in the Start Menu under Tools, Animal Graphing Tool.

The Animal Graphing Tool lets you graph multiple animals at the same time to compare their welfare and wellness. Choose your date range (1) and your animals (2). In the Measurement Type (3), choose all of the Care and Welfare categories. Then, because we have chosen multiple animals, we can choose to group the graphs by Animal or Measurement Type (4). We have chosen Measurement Type here to compare the indicators across multiple animals. Click Show Graph (5) to run.
Each indicator is displayed in its own graph, as we chose to group graphs by Measurement Type. Click on the hamburger icon  on each graph to export the data to excel or export the graph as a picture.

Read more here:
1.5.7 Within the animal’s habitat, there should be particular emphasis on species appropriate physical environments.
“ Within the animal’s habitat, there should be particular emphasis on species appropriate physical
environments including weather, temperature, sound, vibration, light, and air and water quality.
Explanation: Animals should be protected or provided accommodation from inclement
weather. Animals should be able to regulate cold and heat stress throughout the year, with
special attention paid to climate-mismatches between the native environment of the animal
and the zoo or aquarium environment. Animals should be protected from excessive or
disturbing sensory inputs including excessive noise and vibration. Animals should receive
lighting suitable to their biology throughout the 24-hour and annual periods, with
consideration for providing dark periods at night and attention given to animals and
environments where light needs to be provided artificially. Animals should be provided with
suitable air quality and water quality. Animals participating in presentations or programs
outside of their primary habitat must be provided protection from inappropriate physical
environments as per above during programs and transport to and from programs.”.
Environmental measurements can be recorded on aquatic and terrestrial enclosures, life supports and components. Measurements can then be exported via the Environmental Quality Graph .
Read more here:
1.5.9 Water Quality Monitoring
“The institution must have a regular program of monitoring water quality for fish, marine mammals, and other aquatic animals. A written record must be maintained to document long-term water quality results and chemical additions”.
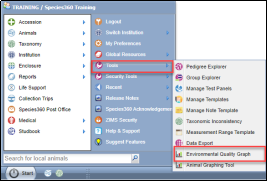
You can graph or export your water quality data easily using the Environmental Quality Graph to demonstrate your regular monitoring program. The Environmental Quality Graph can be found in the Start Menu under Tools, Environmental Quality Graph
Choose your date range (1) and your enclosures, life supports or components (2). You can use the magnifier glass to search for items here, or look for entities under a specific responsible party. Choose your Measurement Types (3) then choose to either Show Graph, or Export straight to Excel.
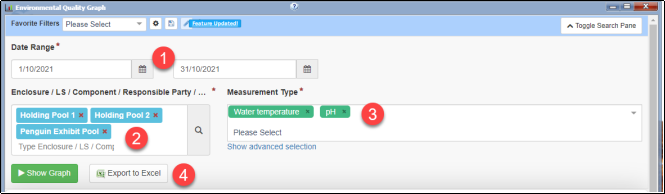
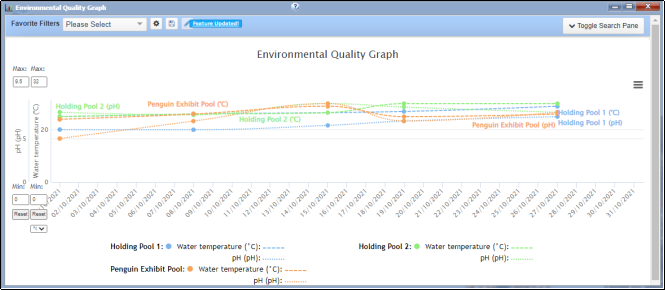
Show Graph:
Export to Excel: 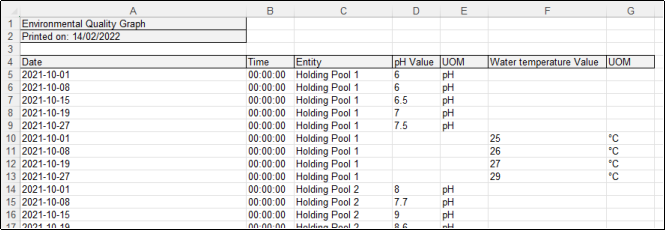
Read more here:
1.5.10 Temporary, seasonal and traveling animals
“Temporary, seasonal and traveling live animal exhibits, programs, or presentations (regardless of ownership or contractual arrangements) must be presented and maintained at the same level of care as the institution’s permanent resident animals”.
You can choose to record temporary, seasonal and traveling live animals in ZIMS, either under your main institution (if appropriate) or as a separate Global or Local Collection.
If you use a global collection, your animals and data will contribute to the global dataset, e.g. global reference intervals and weights. If you choose to use a Local collection, the animals and data can only be seen or used by your institution.
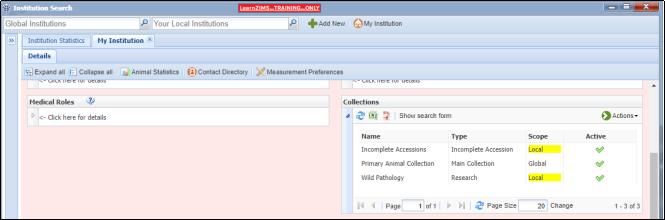
Collections can be created and managed within the Collections grid in the Institution module.
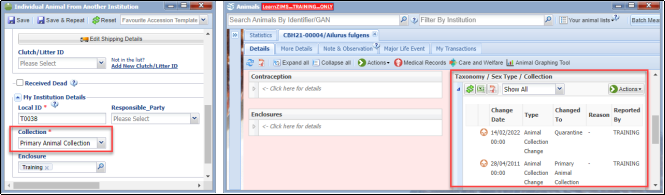
When you accession an animal, you need to state which collection the animal is being accessioned into. You can then move animals in and out of collections within the Taxonomy/Sex Type/Collection grid within the animal record.
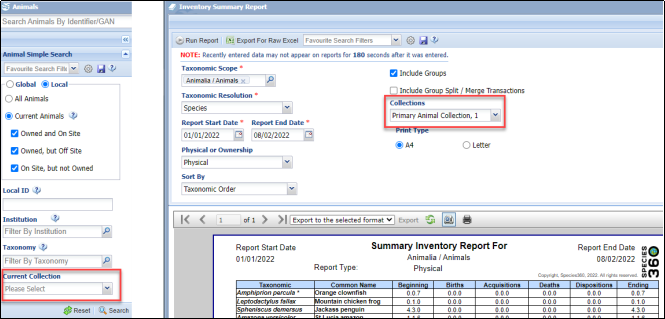
If you use separate collections, you can choose to include or exclude these animals in reports or searches anywhere you see the “Collections” filter box, for example below in the Animal Search and in the Inventory Summary Report.
Read more here:
1.5.11 Deaths during transport
“Animal transportation must be conducted in a manner that is safe, well-planned and coordinated, and minimizes risk to the animal(s), employees, and general public.”
ZIMS can help demonstrate the number of deaths that have occurred during transport at your institution. Run a Transaction Report, set the scope details, select the advanced filter, include ‘Only transactions that were Death In Transit’, and select ‘Disposition’ and ‘Acquisition’ as the transaction type and Run Report.
This generates a report that can be exported, which includes any deaths that occurred during any imports or exports from your institution when a Death In Transit has been recorded.
Read more here:
1.6 Enrichment and Husbandry Training
1.6.3 Documenting Enrichment Activities
“Enrichment activities must be documented and evaluated, and program refinements should be made based on the results, if appropriate. Records must be kept current”.
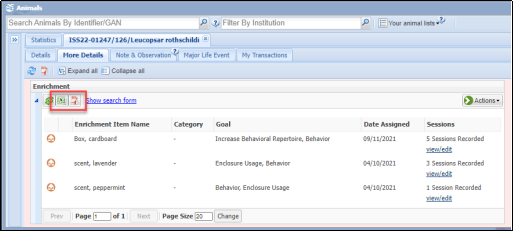
Enrichment can be recorded on an animals record within the Enrichment grid. Here you can assign items to an animal/group, and add sessions to record an animals interaction when the enrichment is provided. You can view the sessions for each item by clicking View/Edit for that item. You can export the enrichment items and sessions for a record by clicking the export to PDF or Excel buttons.
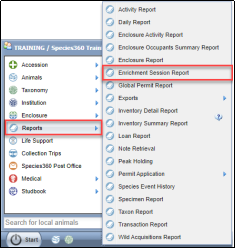
You can export the enrichment items and sessions for your whole collection by running the Enrichment Sessions Report. This report can be found in the Start Menu under Reports, Enrichment Sessions Report.
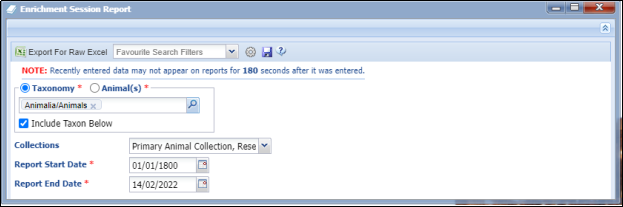
To run the report for all the enrichment sessions added, set the Taxonomy to Animalia/Animals and set the Start Date to 01/01/1800.
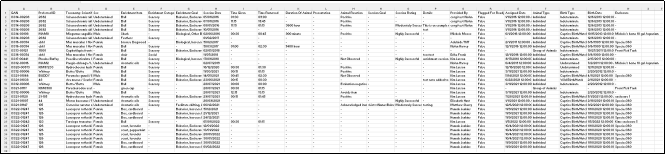
The report exports all enrichment sessions given, detailing the item as well as the goal, reaction, staff and much more.
Read more here:
1.6.4 Documenting Training Activities
“The institution should follow a formal written animal training program that facilitates husbandry, science, and veterinary procedures and enhances the overall health and well-being of the animals”.
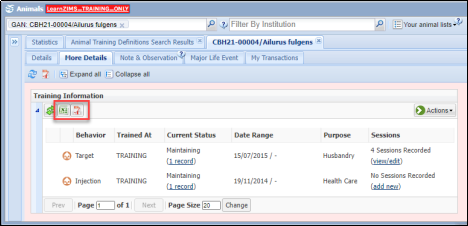
Training can be recorded on an animals record within the Training grid. Here you can assign training programs to an animal/group, and add sessions to record an animals daily training session. You can view the sessions for each program by clicking View/Edit for that program. You can export the training programs and sessions for a record by clicking the export to PDF or Excel buttons.
Read more here:
1.7 Commercial Collectors
“Institutions that acquire aquatic animals from the wild must make a good faith effort to determine that collecting procedures are done in a sustainable manner”.
“Institutions dealing with commercial collectors must determine that the collectors are properly permitted to conduct legal collections of animals (including aquatic animals) from the wild”.
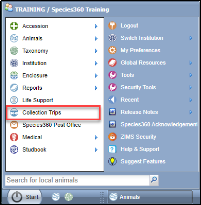
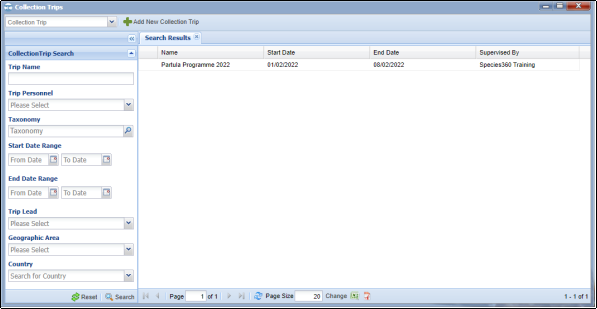
You can record the details of any wild animal collections under Collection Trips. Collection trips are managed within the Collection Trips module, found in the Start Menu.
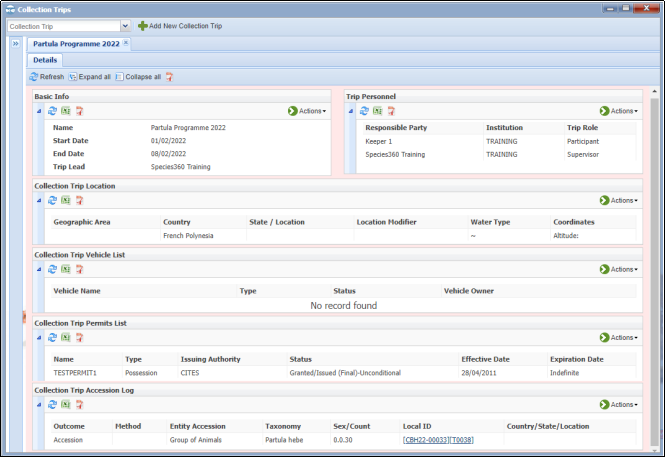
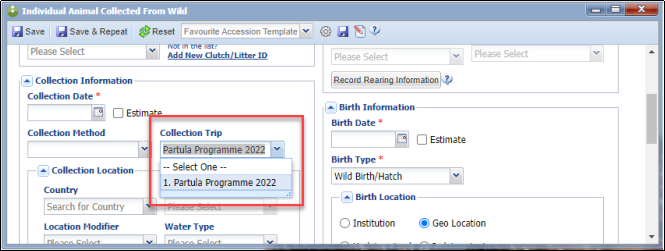
With each Collection Trip, you can record the staff involved, locations, vehicles, associated permits and also animals collected.

You can also assign animals to your collection trip when accessioning.
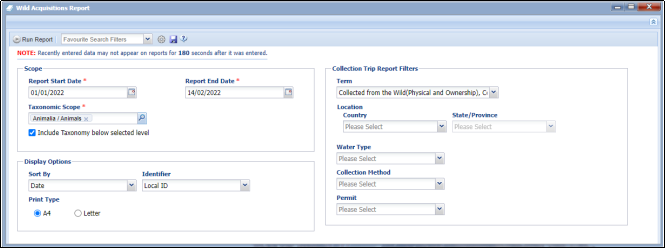
You can export a list of all wild caught animals in your institution using the Wild Acquisitions Report. This report can be found in the Start Menu, under Reports, Wild Acquisitions Report.
The Wild Acquisitions Report can be filtered to show animals from specific taxonomy, between date ranges, or from a specific collection trip or type of collection trip.
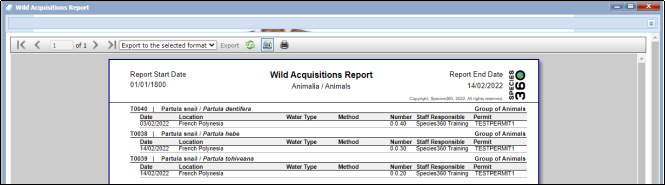
Once run, the report can exported to various formats.

Read more here:
1.8 SSP
1.8.1 SSP Participation
“The institution must participate in every SSP that pertains to an animal within their collection. The institution may indicate at what level it desires to participate in each SSP”.
See 1.4.13 for searching for AZA SSP species at your institution.
Back to Topics
2. Veterinary Care
This section outlines the ways ZIMS can assist your accreditation process within Section 2 – Veterinary Care.
2 Veterinary Care Program
2.0.4 Complete Medical Records
“Complete medical records must be maintained on all animals in the collection that have received veterinary attention”.
See 1.4.10 for animal records.
Back to Topics
2.0.7 Mortality Trends
“Trends in the overall health and mortality of the animals should be monitored and evaluated over time to strengthen the preventive medicine program.”
ZIMS provides tools to track Relevant Death Information (i.e. mortality) using the Morbidity and Mortality Analysis report, found in the Start Menu > Medical > Medical Resources > Morbidity and Mortality Analysis.

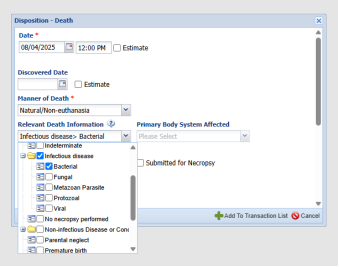
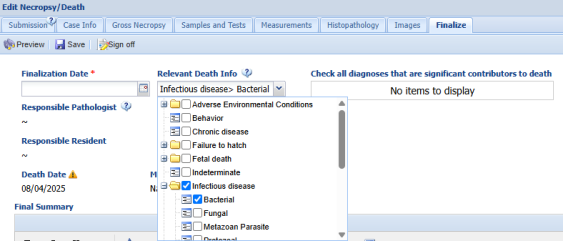
To view Relevant Death Information graphs for animals in your institution, you must first record this information when recording a Death transaction or through the Necropsy record.
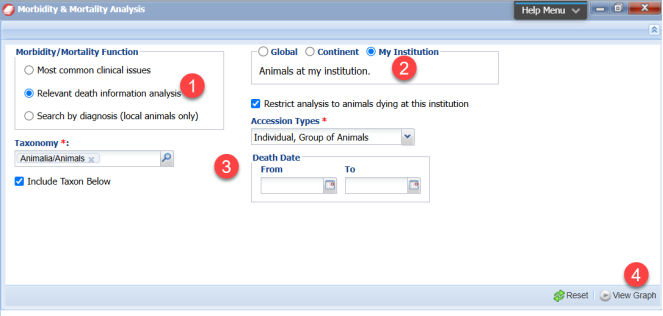
To track Relevant Death Information at your institution, open the Morbidity and Mortality Analysis report, select Relevant Death Information Analysis and set the scope to My Institution. Apply filters for taxonomy and date range, and then View Graph.
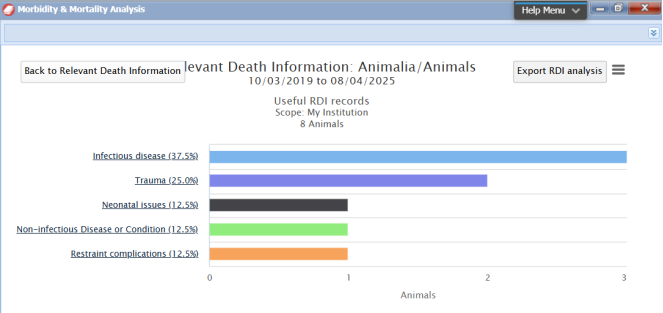
A graph showing useful Relevant Death Information (RDI) records will be generated. Click on the graph to see further breakdowns of certain categories.
Read more here:
2.5 Necropsy
2.5.1 Necropsies
“Deceased animals should be necropsied to determine the cause of death for tracking morbidity and mortality trends to strengthen the program of veterinary care and meet SSP-related requests”.
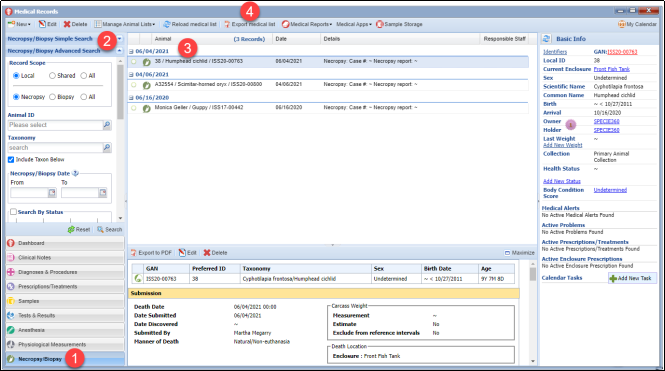
A full list of Necropsies can be found within the Medical module. Within the dashboard, click Necropsy/Biopsy at the bottom of the screen (1). Choose to run a Necropsy/Biopsy Simple Search or a Necropsy/Biopsy Advanced Search (2). A full list of necropsies matching your search will appear in the center screen (3). If you want to export the full necropsies in your list, click Export Medical List.

Read more here:
3.0 Conservation
This section outlines the ways ZIMS can assist your accreditation process within Section 3 - Conservation.
3.3 Participation/Support
3.3.1 SAFE Participation
“The institution should participate in every SAFE program that pertains to an animal within their”.
See 1.4.13 for searching for AZA SSP species at your institution.
Revised 12 June 2026