


ZIMS Medical Dashboard
The "main application" for ZIMS Medical
Topics
Navigating the Medical Dashboard
Exporting the Medical Dashboard
Navigating the Medical Dashboard
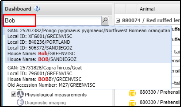
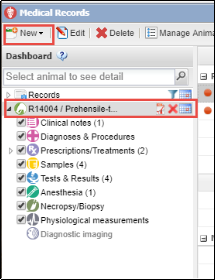
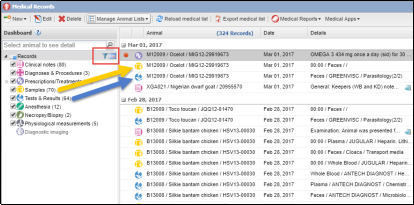 When you open the Medical Records module, the Medical Dashboard will display. The most recent entries will display in the middle. The left-hand side indicates how many of each type of record are included. Note how the icons allow you to easily spot different record types. You can easily find the Samples records by looking for the yellow Samples beaker icon. You can easily find the Tests & Results records by looking for the blue microscope icon.
The date range default is for the past 7 days but you can change it using the filter and calendar icons to the right of Records. In this example there is no animal in focus.
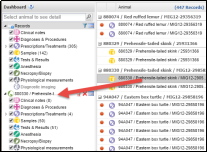
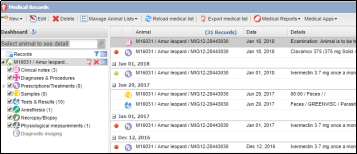 When an animal record is in focus, the date range defaults to the life of the animal. Using the filter and calendar icons, you can also adjust this to your desired date range. The left side controls the selection of the records you want to view. There are eight active topics you can select from. In the screen below we have checked to view all of the record types.
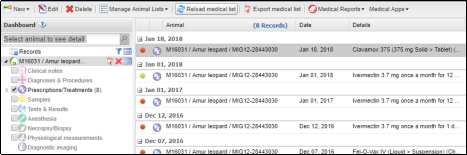
Below we have checked only Prescriptions/Treatments from the left panel. Only this topic is now displayed with the most recent date at the top.
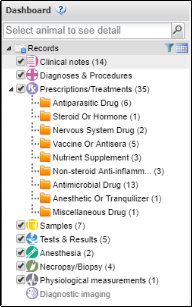 Note that the Prescriptions/ Treatment topic itself can be expanded to further filter your main dashboard display.
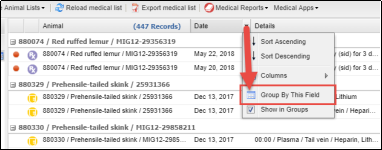 You can group the records in the dashboard by the Animal, Date or Responsible Staff columns by selecting the down arrow to the right of the topic and selecting the Group By This Field option.
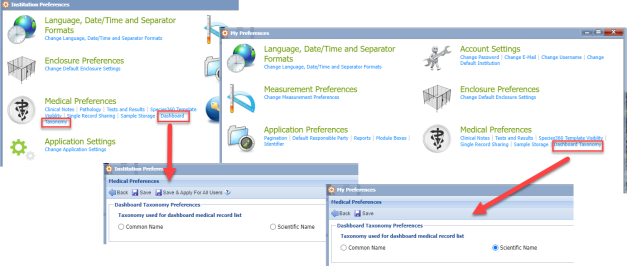
You can choose to have the medical dashboard display either the common name or the scientific name for all your animals.
You can set this for yourself by going to My Preferences Medical Preferences Dashboard Taxonomy, or your Local Admin can set the preference for the whole institution in Institution Preferences Medical Preferences Dashboard taxonomy.
 When a record is selected from the list, the lower center panel becomes a preview pane for the information recorded. To view the entire entry, select the Maximize button.
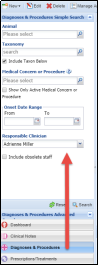
At the bottom of the Dashboard are the Searches for the various topics. Selecting one (here we selected Diagnosis & Procedures) will open a screen where you can select your desired filters for the topic. Remember to select the Reset button if you are running another search in the same module type to clear any recent filters selected.
There are three ways to open the medical records for a specific animal or group. First, type in the GAN, Local ID, or other identifier such as transponder into the search field.
 Second, by selecting a record from the main dashboard you can drag and drop it over to the left hand dashboard.
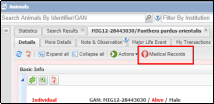 In addition, you can access the medical records directly from the Husbandry animal record.
When the animal medical record is in focus, the right side displays the Basic Information which shows a quick overview of the animal. The information is as of the current date. The information in the top half of the box (1-6) is sourced from the Husbandry module of ZIMS, and the lower half is sourced from the Medical module.
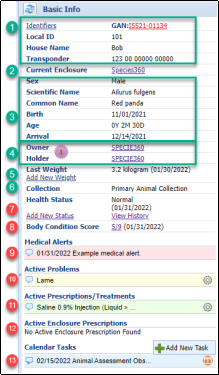
- Commonly used identifiers (Local ID, House Name etc.) will display first. You can click the ‘Identifiers’ link to see a full list of identifiers and details, or click the GAN to navigate to the animal record.
- The Current Enclosure is a hyperlink which will take you to the Enclosure record.
- Sex, Taxonomy, Birth Date, Age and Arrival are displayed.
- The Owner and Holder are hyperlinks which will take you to the Institution record.
The number in the medallion indicates the number of institutions that have held the animal. Selecting it displays a graph of shared records.
- The Last Weight shows the last weight entered fo this animal. It may be sourced from the Husbandry module or it may have been entered directly into the Medical module. The Unit of Measure will always be the UOM selected in your Preferences, regardless of what UOM was entered for the weight, and converted if required. You can quickly add a new weight by clicking the Add New Weight hyperlink.
- Collection helps indicate how the animal is managed in ZIMS for Husbandry, whether in the main animal collection, or a local quarantine collection.
-
The
Health Status
shows the most recent Health Status recorded. You can quickly add a new Health Status, or view the full Health Status history for this record by clicking on the hyperlinks or add a new health status by clicking on the + option:
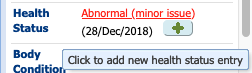
- Body Condition Score shows the most recent Body Condition Score. You can click on the score to see the full history for this record and add a new score.
- Medical Alerts are a special type of clinical note that contain critical information regarding the animal. The Note Types appear when you select Notes/Examinations/Report Entry. These Alerts are different than the Animal Alerts in the Husbandry Calendar as they usually indicate on-going Alerts for the care of the animal. Hover over the left side bubble to see an active link to the full text of the Alert.
- Active Problems are currently unresolved medical issues (see Diagnosis and Procedures ) for this animal. Hover over the left side bubble to see more details. Click on the wheel icon to Edit the record, associate it with other records, resolve the problem, or delete the problem.
- Active Treatments/Prescriptions are those that are currently active or on-going for the animal. Use the wheel icon to Edit, Terminate, Close or Delete the treatment.
- Active Enclosure Prescriptions are active prescriptions which have been assigned to the enclosure, for example water treatments for a tank of fish.
- Calendar Tasks allow you to see scheduled calendar events such as medical procedures, sample collection or treatment for this animal/group. This summary of calendar tasks will only show the upcoming 30 days and will be limited to 3 calendar tasks.
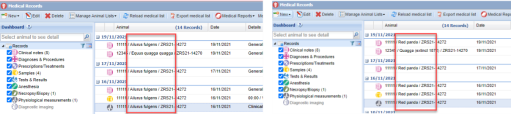
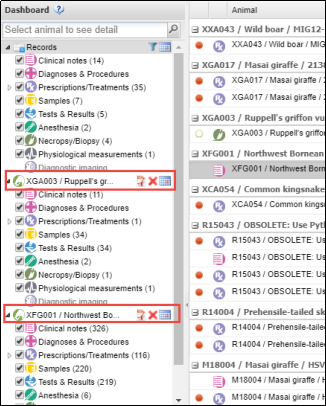 You can keep multiple records open at the same time for ease of comparison. Your open records will display as a list on the left side of the dashboard. You can expand and collapse by using the arrows. Using the right-hand side icons, you can export to pdf, remove the animal from your list of open records, or filter the records by date.
Adding a New Medical Record
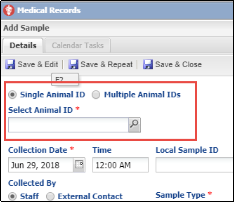
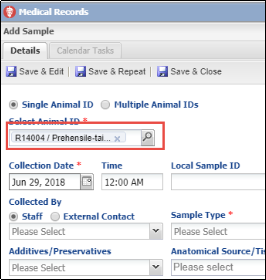
There are three ways to add a new medical record. First, if you do not already have an animal record open, from the left-hand Dashboard select New and make your record type selection. It will take you to the appropriate screen to add the medical record and you will select the animal (or Multiple Animals if available) by typing in an identifier or using the lookup feature.
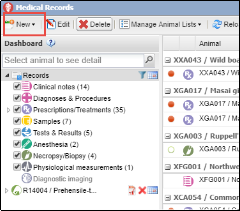
Second, if you have an animal record open on the left-hand Dashboard, selecting New and the required topic will open the screen with the Animal ID prefilled.
Third, from the Main Dashboard you can also highlight a record and select New and the required topic. The screen will open with the Animal ID prefilled.
To save data entry time take advantage of the shortcut (hot) keys that are available for adding new medical records.

Exporting the Medical Dashboard
There are two different ways to export data from the Medical Dashboard. Both export functions are found in the Export menu
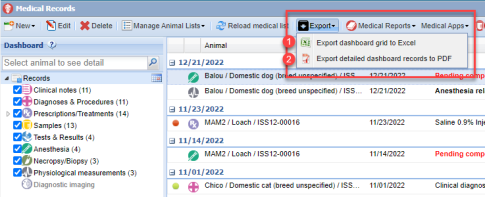
- Export dashboard grid to Excel
Choosing option 1 – ‘Export dashboard grid to Excel’ will download the dashboard data into an excel grid. The excel file will show the data from the columns as they appear on the dashboard, with a few extra columns such as whether the item was marked significant, or the status of the animal (e.g. Active Medical Issue).

Use this export to sort and analyze the dashboard list outside of ZIMS.
This functionality is only available for the dashboard view when:
- Viewing records for select dates (default is 7 days)
- Viewing records for a specific animal record,
- Viewing the search results for Diagnosis & Procedures or Prescriptions searches
Note – This export will export local records only. This is inline with current data sharing and data privacy policies.
- Export detailed dashboard records to PDF
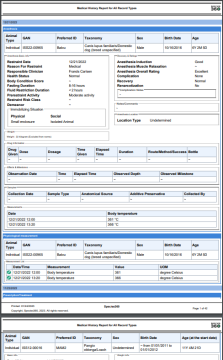
Choosing option 2 – ‘Export detailed dashboard records to PDF’ will download all the medical records within the screen to PDF.
The PDF will display all the information for each medical record, one after another.
Revised 5 March 2025
It is the mission of Species360 to facilitate international collaboration in the collection and sharing of information on animals and their environments for zoos, aquariums and related organizations.
www.Species360.org – Global Information Serving Conservation