


HUSBANDRY LOG TEMPLATE
The Husbandry Log Template allows you to create a template that captures your workload. It saves data entry time and helps you remember all your tasks.
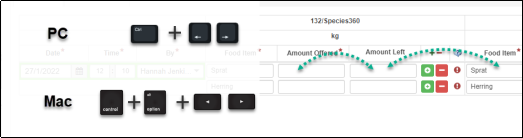
Keyboard shortcuts help you easily move through data entry screens, using: Ctrl+ arrow keys (Ctrl+Alt+arrow keys on Apple computers). Additionally, templates are responsive design friendly so you can use tablets and phones.
We recommend Chrome as your browser.
Topics:
- Granting Access to Husbandry Log Templates
- Where to find Husbandry Log Templates
- Create a new Husbandry Log Template
- Edit or Delete a Husbandry Log Template
- Using Husbandry Log Template s
- Viewing Saved Records and Checklist Items
- Editing or Deleting Records from a Husbandry Log Template
- Video Overview of HTL Features
- Create a Template ‘live’ in ZIMS
- Additional Template Features Available in Aquarist Daily Log
Husbandry Log Templates can be designed to meet a variety of requirements for data entry.
- Aquarist - Enter enclosure measurements, feed logs and life support maintenance checks and compare them to your latest entries at a glance.
- Keeper – Easily add Notes to the animals in your care without having to go into each record. Use the Animal Checklist Item to make sure you check all animals daily.
- Night Keeper – Use the Enclosure Checklist Item option to make sure you don’t miss checking an exhibit or a lock.
- Life Support Engineer - Track measurements and maintenance records on exhibits, life support systems and components. Check off routine system inspections.
-
Animal trainer - Enter multiple behaviors, enrichment items, and feed logs for an animal session.
Granting Access to Husbandry Log Templates
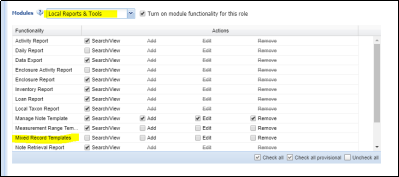
To access to the HLT templates, you will need access to the ‘Mixed Record Templates’ option in the role editor. If you do not see the templates ask your Local Admin them to your Role.
Under Start>My Institution> Husbandry Roles> Local Reports & Tools: Mixed Record Templates:
Where to find Husbandry Log Templates
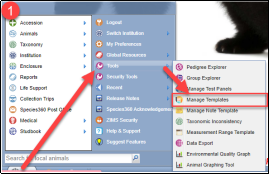
Husbandry Log Templates are found within Manage Templates, access via Start > Tools > Manage Templates (1), or through the ‘Batch Measurements’ button on the Animals, Enclosure, or Life Support modules (2).

You can click here on a mobile device to access the mobile friendly version: https://training.species360.org/HLT (note, we recommend setting up templates on the desktop and using mobile to due data entry). When using mobile version, note the ‘log off’ option is under the Help Menu.
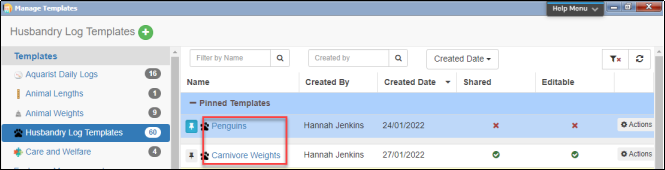
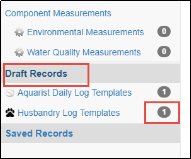
Once in the Manage Templates screen, click on Husbandry Log Templates in the list of template types (1) to view all your Husbandry Log Templates. The Local Admin will see all of the HLTs created, other users will only see those which have been shared.
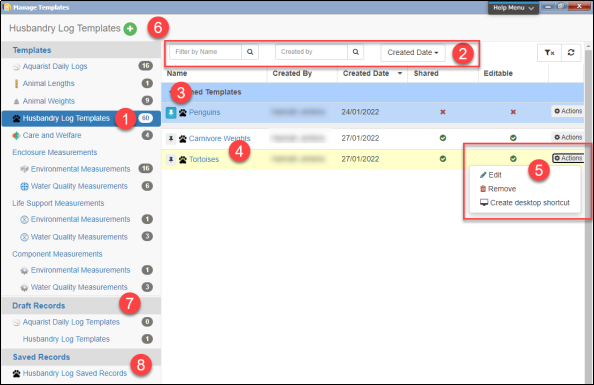
- Click Husbandry Log Templates in the Templates list to see the HLTs for your institution. You can see the total number created.
- Filter your list of templates by Name, Creator or Date Created.
- Pin your favorite or most used templates for easy access. This is just for you and won’t affect other users.
- Click on the blue name of the Template to open the template in data entry mode.
- Use the Actions menu to edit and delete HLTS, and to add desktop shortcuts for easy access.
- Click the green + to create a new HLT.
- View, complete or delete any saved draft records.
- Search for and view your saved entries.
Creating a new HLT template
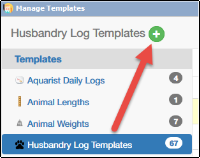
To create a new HLT template, in Manage Templates select Husbandry Log Templates and click the Add New (green +) icon.
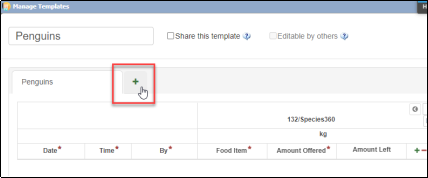
The templates are very flexible and can be set up however you like. You can have one sheet per animal with all the tasks you need to perform. Or, you can have one sheet by tasks with all the animals or enclosures you need to perform the tasks on. For this example, we are creating a Husbandry Log Template to record information on our penguin’s food consumption and their exhibit. Below is the first screen you will see when creating a new template.
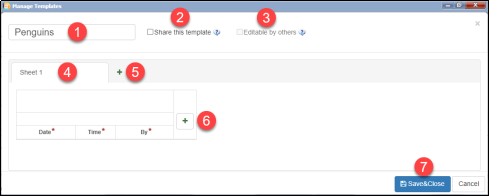
- First, name the template so that you can identify which one it is. The name should be unique for your institution.
-
You can opt to share this template with other users in your institution.
Note, sharing allows other users to see and use the template individually and it allows them to view records entered via that template by others under saved records area. This does not permit a template to be collaboratively edited by two or more users. - You can opt to let other users in your institution edit this template.
- Name the sheet as desired, e.g. “Weights” or by the animal’s ID.
- To add extra tabs click the green + next to the first tab.
- To add information to your sheet, select the “+” icon within the sheet.
- Click Save & Close when you are happy with your template.
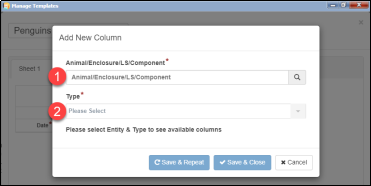
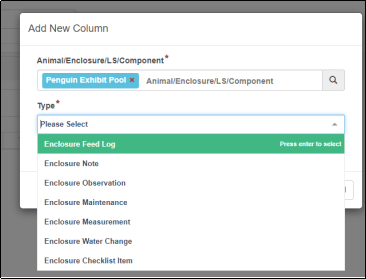
When you click the green + within the sheet to add information, a pop-up box will appear where you can choose your entity (1) and type of information to add (2).
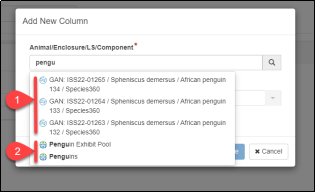
To select your entity, you can search for animal identifiers, taxonomy or enclosures, life supports or component names for your local animals. The entity field is a type-ahead menu, here we have typed “pengu” which has brought up a list of the African penguin’s in our collection (1), and also the Penguin Exhibit Pool and Penguins enclosures (2).
Once you have selected your first entity, the entity type will be set (e.g. either animal, enclosure, life support or component). If you wish to add more entities of the same type (e.g. 3 animals), you can continue to add them. If you want to add more entities of a different type (e.g. 1 animal and 1 enclosure), you will need to complete the entry for your animal, and then add another entry for your enclosure. For example, in the previous screenshot I can choose all three penguins, but I cannot choose a penguin and the Penguin Exhibit Pool enclosure.
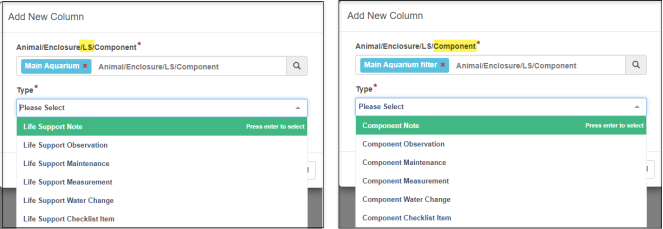
Depending on whether you have chosen animals, enclosures, life supports or components in your list, your list of Type options will change. Below are the list of options depending on your entity types:
Animal: Enclosure:
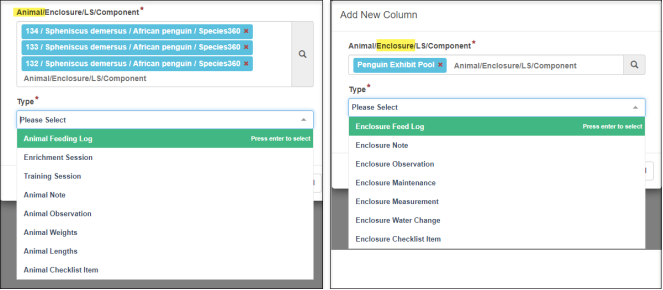
Life Support: Component:
In addition to type ahead look up, the “Search Glass” can be used to perform an advanced searches for Animals, Enclosures, Life Supports or Components. 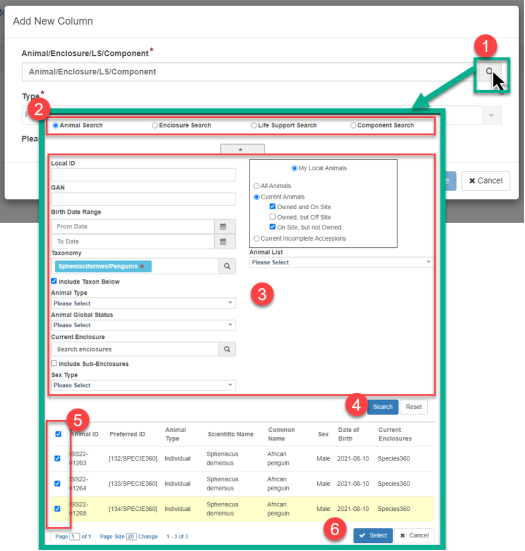
- Click the Search Glass to open Advanced Search.
- Choose from either Animal, Enclosure, Life Support or Components searches.
- Choose your search criteria, you can even search by Animal Lists.
- Click Search to generate results
- Select multiple results, or refine your search results with additional filters.
- Click Select to select the results you have marked and add them to your Husbandry Log Template
Once you have chosen your entities and type of information to add, your screen will update, and you can customize the entry.
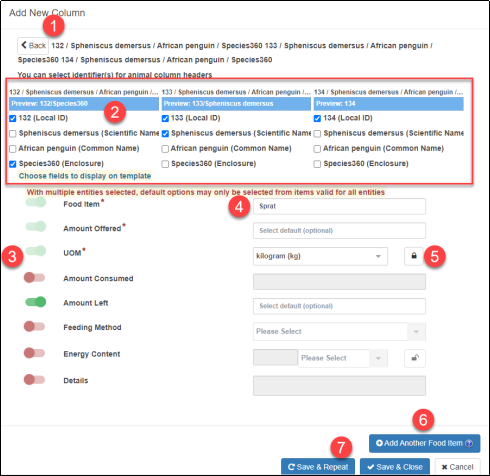
- The list of animals displays at the top. Click Back if you want to re-select any animals/entities.
- Check any Identifiers that you want to appear in the column, you can see a preview of how they will display. Make sure your selection allows you to identify the animal (e.g. not just an enclosure code).
- You can switch fields on and off, on means they will display on your template, off means they will not and you will not be able to add this type of information in the template. The lighter green switches represent mandatory fields and are already turned on.
- You can set default values to appear on your template.
- You can choose to lock certain fields with a default, this means users will not be able to change the value on the template when entering data.
- Some Types will allow you too “add another”, for example here with feed logs we can choose to add another food item. If you click this you will be taken to another feed log screen. Your locked fields will not be able to be changed, you can go back to the previous item by clicking “Previous … Item”.
- If you want to add more Types to the same entities, you can choose Save & Repeat to add another, or Save and Close to finish this entry.
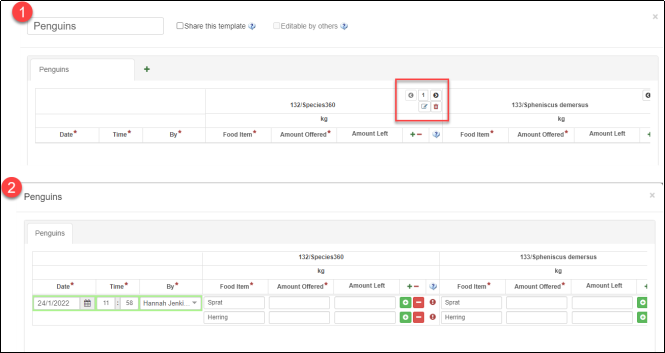
The columns will be added to the right in the order they were entered (1). You can move columns around by clicking on the < and > arrows, you can also edit or delete a column. Note that if you added a column for 3 animals at the same time, each will need to be edited separately. When viewing in data entry mode (2) you can see your locked values (kg), your default values which can be edited (Sprat and Herring), and your multiple food/measurement types.
We want to create a second sheet for the penguin enclosures. Select the Add New icon (green plus sign).
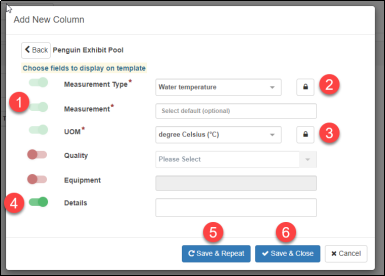
Name the new sheet as required, then select the green + within the sheet to add columns. In the entity box we have chosen our enclosure Penguin Exhibit Pool. The Types available are now related to enclosures and not animals. We are going to select Enclosure Measurement.
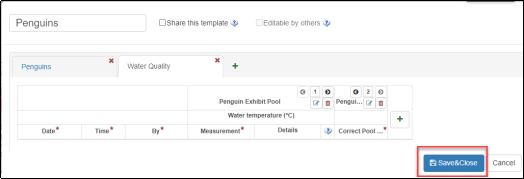
For the mandatory fields (1), we selected Water Temperature, and locked the type (2) so it cannot be changed. We also selected degree Celsius as the unit and locked it (3). In addition to these mandatory fields, we have turned on the Details field (4) in case we want to write why an entry is abnormal or what we did about it. We can again choose to Save & Repeat (5) to add another entry, or Save & Close (6) to save and go back to the template.
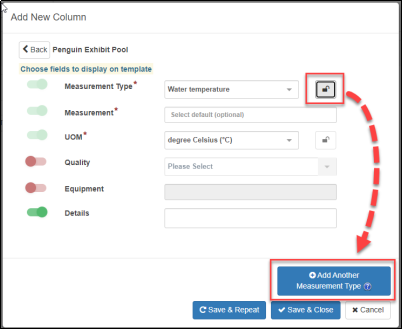
If we do not lock the measurement type, we are able to ‘Add Another Measurement Type’ as seen below. This will lay the entries out in the template in a similar way to the feed log we previously entered.
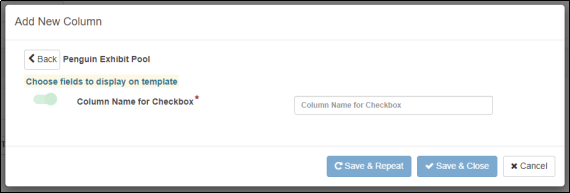
Lastly, we want to add a checkbox option for our keepers to check whether the pool is at the correct level. In HLTs, we can add multiple checkbox columns for different enclosure or animal checks. Click the green + within the sheet again to add a new column alongside the water quality. We still have the Penguin Exhibit Pool as our entity, but this time we have chosen Enclosure Checklist Item.
To add a checklist, simply add the name of your checklist item, and then Save & Close or Save & Repeat.
When you have finished adding fields to your template, click Save & Close.
Edit or Delete a Template
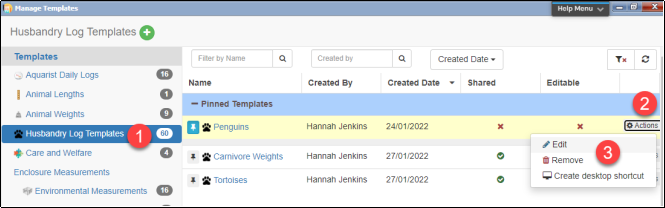
To delete a template, open the list of HLTs in Manage Templates (1), click the Actions button next to your desired template (2), then choose Remove (3).
To edit a template, choose Edit (3).
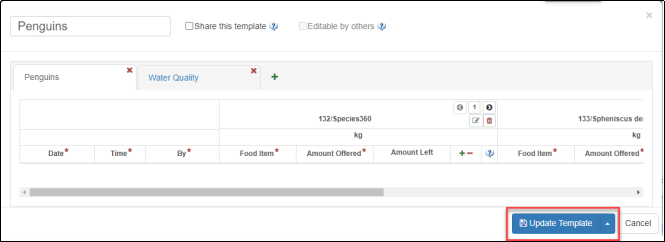
The selected template will open up in edit mode, where you can add, remove columns and sheets, or reorder columns. When finished, click Update Template.
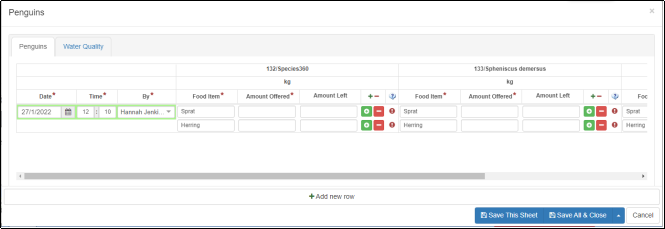
Using the Template
First navigate to the Husbandry Log Templates .
In the list of templates, click on the blue name of the template to open in data entry mode.
On desktop, keyboard shortcuts help you easily move through data entry screens, using: Ctrl+ arrow keys (Ctrl+Alt+arrow keys on Apple computers).

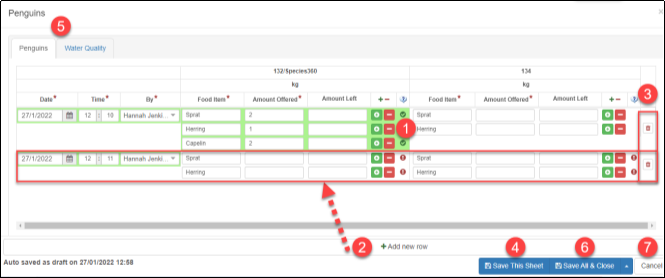
There is a column to add the Date, Time and User to each session (1). As you move through and complete the template, once all mandatory fields are completed the column will turn to green (2) and a tick  icon will appear. If you start entering data and mandatory fields are not completed, your column will turn red (3), and an exclamation
  icon will appear at the end of the column and on the sheet name. You will not be able to save this entry. If you have not entered any information into the column, it will stay white/gray (4), even though you have default fields filled in, the data will not be uploaded in this column unless you fill in the mandatory fields.

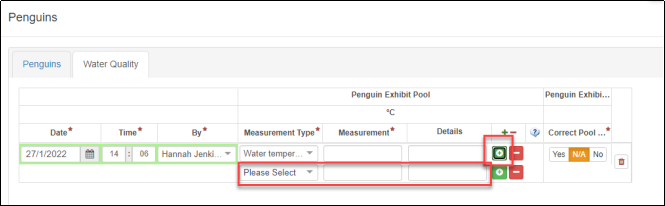
With multi-measurement columns, you can add or remove rows to your session by clicking the green  or red
  next to the entry (1). Add a whole new session, with its own Date, Time and User, by clicking Add New Row (2). Delete the session using the trashcan at the end of the session (3).
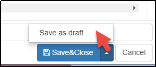
When saving, the template will save all the information into the correct locations in ZIMS. You can choose to Save this Sheet (4) which will upload the data entered only on this sheet, and then close or move on to your other tabs (5). Or you can choose to fill out the columns on all sheets and then click Save All and Close (6). The template continually saves as a draft you will not lose any data recorded. If you wish to come back to your template at another time, click Cancel (7) which will allow you to save a draft of your template.
You can also select to directly Save as Draft.
Your draft templates can be found at the bottom of the Manage Templates screen.
If you have not locked measurement types, you are able to add new rows and then choose a second measurement to add.
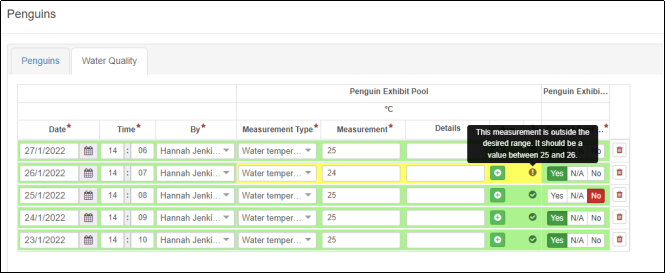
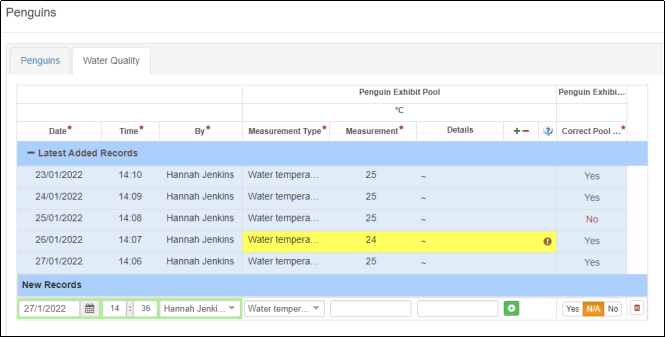
If you have created a Measurement Range Template for the enclosure and the measurements, ZIMS will reference it, highlight the entry in yellow, and you will receive a warning for any measurements that are out of your desired range. If you have enabled email alerts, an email will also be sent.
Viewing Data Entered in Husbandry Log Templates and Reporting
Husbandry Log Templates are a tool for easy data entry and when saved they upload information into the correct locations on ZIMS (except checklist items). You can find all of your data in its usual place, for example in the weights grid, enclosure measurements grid, Notes and Observations Tab.
You can also extract the data via your usual reports:
Daily Report
(including checklist items)
Note Retrieval Report
You can view the last 5 entries into the template when you next open the template in data entry mode. The previous entries will show in the blue box. You can collapse this box by clicking on the blue  icon. Any entries which are out of range will appear in yellow.
You can view all saved entries by navigating to the Husbandry Log Template section in Saved Records (1). You can filter your templates using the search (2), and open your records by clicking on the template name (3).
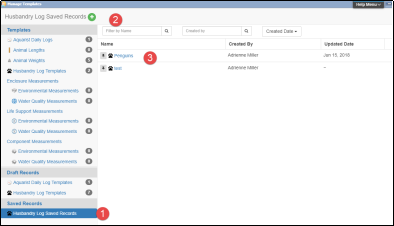
To view the Saved Records, it must be a Template where records are entered, and the Template must be shared if it was not created by you.
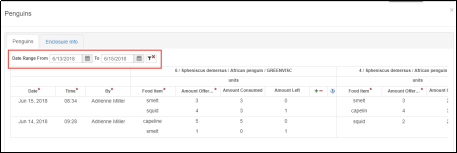
The Date Range selected must have records recorded, by default this will automatically be set to the previous 30 days,
Editing or Deleting Records from a Husbandry Log Template
Once Records have been saved in a Husbandry Log Template, the data can only be edited or deleted in the corresponding area within ZIMS. For example, if animal weights were added, you would need to go to the weights box on that animals record, and find the corresponding record to edit or delete the record. Alternatively, use the Data Entry Monitoring feature to ‘Undo Selected’ actions to delete the entry.
NOTE: Checklist items can only be deleted by using ‘Undo Selected’ in Data Entry Monitoring.
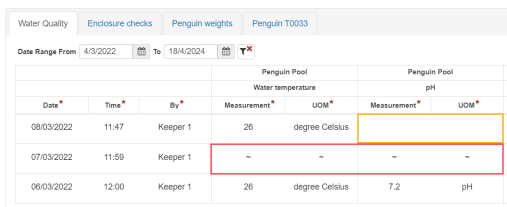
When data entered through a Husbandry Log Template is deleted, ZIMS will acknowledge the deleted data in the Saved Husbandry Log Template with a ‘~’ in place of the original data. Therefore, deleted entries appear like the row highlighted in red, and blank entries (where no data was ever entered) display like the entry highlighted in yellow.
Questions on Editing Templates and Checklist Items
Do we edit the current template to add a new animal ID?
If you need to add a new animal to a template, you can do so by adding a column for the new animal. You cannot edit a current column to change it to a new animal ID. If you need to remove an animal, the template will require you to delete the column. The deleted animal/column will move to the end of the template when viewing previously saved records. So, the option to view the saved data does not go away, just the format of the saved template changes.
What if we delete a template and we create a new template?
If you delete the old template and create a new template, the data remains on the animal records, however, it will not be viewable in the saved templates section. Note, checklist items are not visible elsewhere.
Are checklist items available elsewhere in ZIMS?
The checklist items created in templates are saved behind the scenes, but not viewable anywhere else in ZIMS currently. So, if you remove the template, visibility to the saved records “checklist items” is removed.
We recommend, for templates with checklist items, do NOT delete the old template, just rename it as ‘ARCHIVED/OLD’ or whatever format makes best sense to you.
What if we edit a template with a checklist item to remove the (Yes/No) column?
If you have yes/no data within a template, you can we access that information forever through the saved records logs. If you view the saved records of a template that had a checklist column removed, the column’s data moves to the end of the template.
You cannot view checklist items from a deleted template though (see question above).
What happens with the data if you delete the template?
All data, other than checklist items, will remain on the individual animal/enclosure records but will not be viewable in the saved templates section. See questions above for checklist data.
Create a Template in ZIMS – Practice!
Click here to create a template in ZIMS!
The following are specific use cases showcasing the capabilities of this new feature.
Note, if you do not have permissions in ZIMS to use the Husbandry Log Templates, these interactive tutorials will not work. Contact your local administrator to gain access.
-
Otter Keeper:
- Sheet 1: Enclosure and LS measurements (water temp, flow rate, pH, filter pressure), Enclosure maintenance (cleaning, window washing), checklist (check sump level)
-
Sheets 2-4: Otter feed log, enrichment and training - 1 sheet per otter with an animal feed log, training log and enrichment log.
Note: You can ‘Show multiple rows’ for feed log, enrichment, training behaviors.
-
Ocean Tank
- Sheet 1: Feeding: Animal feed logs for 3 sharks and 1 sea turtle, enclosure feed log for general broadcast feed
- Sheet 2: System measurements (water temp, flow rate, salinity, pH > enclosure, ORP > component, filter pressure > component)
- Sheet 3: Maintenance records (LS > backwashed all filters) (Enclosure > scrub dive to clean windows and siphon substrate)
-
Night Checks
- Sheet 1: Freshwater Gallery > series of checklist items for enclosure (System check?)
- Sheet 2: Otter Exhibit: Animal checklist (Otter 1 awake?) (Otter 2 awake?)
-
Life Support Staff
- Sheet 1: Ray Pool (LS > checklist item > system check) (Component > measurement > pressure) (Component > measurement > flow rate) (Component > measurement > ORP) (LS > maintenance > Backwashed sand filter) (Component > checklist > Cleaned protein skimmer?)
-
Frog Quarantine
- Sheet 1: Enclosure maintenance > cleaning, Animal checklist item > Fecal collection?, Animal feed logs
-
Sheet 2: Weekly frog weigh in: Animal > weight, Animal > Note
Example, show weight is down from last week, add note to increase diet by 1 cricket
For a PowerPoint on using the HLT with examples see Husbandry Log Template
Revised 18
th
April 202419 November 2025
It is the mission of Species360 to facilitate international collaboration in the collection and sharing of information on animals and their environments for zoos, aquariums and related organizations.
www.Species360.org – Global Information Serving Conservation