


Data entry in ZIMS
Data entry is a mobile-friendly way to entry records. In addition to
the Daily Activity Dashboard
, Data entry has been designed to simplify current ZIMS processes, providing users with a fast and easy experience for entering records while on the go.
Topics
Accessing Data Entry
Using Data Entry
Changing Institutions and Logging Off
Managing access to Data Entry
Data entry is automatically available in the following Species 360 template roles; Local Admin, Read Only and User. Functionality will need turning on in role management for Custom roles by Local Admins.
- Users with rights to add notes can enter notes for single and batch animals
- Users with rights to add weights can enter weights for single/multiple animals
- Users with rights to add lengths can enter lengths for single/multiple animals
- Users with rights to add census can enter census records for groups
- Users with rights to add clinical notes can enter clinical notes for single and batch animals
- Users with rights to add BCS can enter BCS for single/multiple animals
Notes on IP Restrictions and Advanced Access Management access:
- If a user has advanced access management access – Data Entry option will not display in the Start > New Features menu
- IP restrictions are not currently enforced in the Data Entry feature
- Single Session rules are not currently enforced in Data Entry.
Accessing Data entry
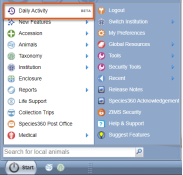
When logged into ZIMS through https://zims.species360.org, you can access Data entry from the ZIMS Start Menu > Data Entry when you have been granted permissions.
When you click Data entry, it will open as a new tab within your internet browser in the new sub-domain: https://zims2.species360.org
When using the new features, you will see a new navigation menu option:
1. The menu at top right will open...
2. The side-bar navigation with options to switch to different tools.
3. Access to the traditional ZIMS desktop is available here.
4. The option to log-out is available here.
Your original ZIMS browser tab will remain open so navigation between the two is simple. Note, if you log-out in Data entry, you will close your main ZIMS Session as well.
It is also possible to directly access your institutions Data entry through this address: https://zims2.species360.org/data-entry
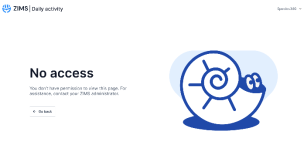
If you do not have access, you will see the following:

Using Data entry
Entering records via the Data entry screen works on mobile devices and on desktop browser. We recommend Google Chrome for best results. The options available via data entry will be limited based on your permissions in ZIMS and more record types will be added in the coming months.
See below for more details.
1. Select to enter data for an animal record or an enclosure record. Batch data entry can be done either.
2. Select the record type to record, the options will vary based on whether you chose an individual animal, group, or enclosure:
Individual animal record types: weight & BCS, length, note, identifiers, clinical note
Group record types: weight & BCS, length, note, identifiers, census, clinical note
Enclosure record types: note and maintenance
3. Select the date for entry (census assumes ’today’).
4. Create record option will take you to the next screen for the appropriate record entry screen.
NOTE: When adding Animal notes or Enclosure notes to multiple entities, you will have the option to add ‘one record for all’ or ‘one record for each’.
5. Recently added records will display for this session.
6.
Change institution and log-out option

7. Create a
QR code
for your currently applied filters.
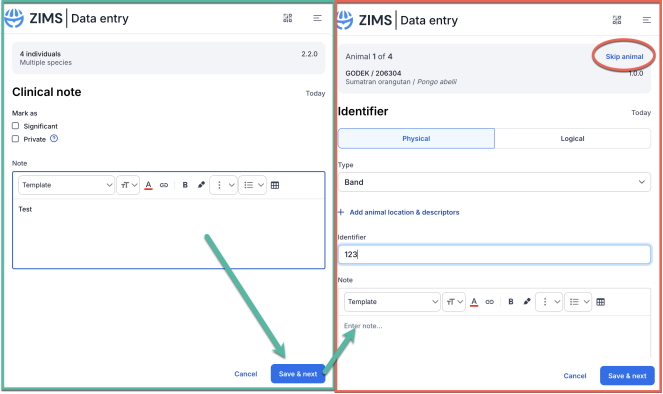
Additionally, you have the option to select multiple record types to enter at the same time:

The entry types will automatically proceed to the next selected type when selecting: ‘save & next’:
When appropriate, example: for Identifiers which must be unique to an individual, you will have the option to ‘skip animal’ if you have no need to entry a record.
Additional features, filters, and record types will be added periodically.
Back to topics
QR Codes
You can customize the data entry form to select specific animals and entry types (note, weights, etc.) and download a QR code that can be scanned from a mobile phone. When loading the data entry form from the QR code, users will be taken directly to the form, partially filled in, for quicker entry.
Some examples of how these can be used:
- Select the enclosure occupants for daily notes, print the QR Code in the keeper access area for easy reference.
- For animals needing daily/frequent weights, create an animal list and add this QR Code to your daily checklists.
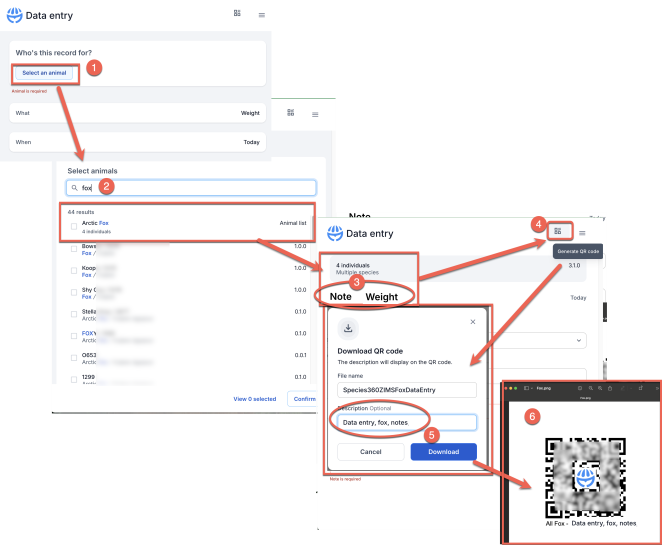
Setting up a QR Code:
- From Data Entry, select records.
- Select one, or multiple records, or select from a list.
- Choose your record type Ex: Note, Weight, ect.
- At this point, creating a QR code will use your selections to create a custom link back to the data entry form with the criteria defined above.
- Name the downloadable QR code appropriately, referencing the criteria defined above for easy reference, the text entered in the description field will print on the QR Code for easy reference.
- Save/share/print the QR Code you download with your team.
There are some limitations to the QR Code download:
- If an animal list or enclosure (to select occupants) are selected and then later someone edits the animal list or occupants, the URL/QR code won't update yet. It will only have the original animals that were selected and saved for the QR code.
- If a user selects an animal list that has ~500 animals, the URL won't work to generate a QR code to include all those animals, it will just direct back to the data entry screen with an error message.
- The QR code URL removes all the extra text if it is over 16000 characters, this happens if selecting 10k animals or more in the data entry search
- QR Codes from animals/lists assume the user scanning the code has permissions to access the defined records.
Logging Out and/or Changing Institutions
When you have loaded the Data entry, the current session is ‘shared’ with your ZIMS Desktop log-on. If you have a multi-institutional setup in ZIMS, you will only see the data from your current institution in the Data entry tool. You will need to use the Start>Switch Institution feature on the ZIMS desktop to change institution before reloading the Data entry to see your other collection data.
Note, logging off in Data Entry will also close your ZIMS desktop session – any unsaved changes will be lost.
Revised 5 May 2026