


Calendar and Tasks
The calendar in ZIMS, as well as the alerts for animals and enclosures can help support efforts across your facility.
This help document will show you how use the built-in calendar in ZIMS, and how tasks can help support your workflow.
Topics:
|
|
|
||
|
|
|
||
|
|
|
||
|
|
|||
|
|
|
||
|
|
|
||
|
|
|
||
|
|
|
|
|
|
|
|||
|
|
|||
Accessing My Calendar
Permissions
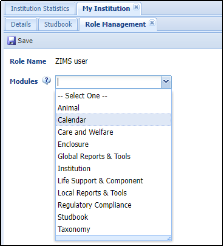
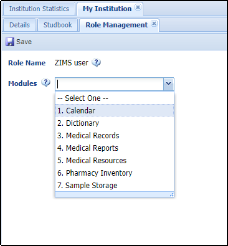
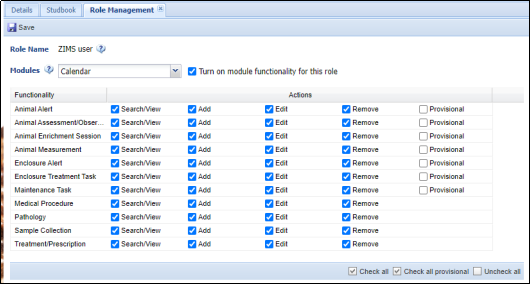
The calendar in ZIMS has its own role permissions to provide visibility to tasks for the following functionalities:
- Animal Alerts
- Animal Assessment/Observation
- Animal Enrichment Session
- Animal Measurement
- Enclosure Alert
- Enclosure Treatment Task
- Maintenance Task
- Medical Procedure
- Pathology
- Sample Collection
- Treatment/Prescription
The role creation is visible under medical and husbandry role management – note, the feature is not separate, both roles control access to the same features. It might be that your medical staff are only permitted a medical role in ZIMS, in that case their calendar access will be granted via their medical role.
The opposite might be true for a keeper or aquarist, their calendar access would be provided by a husbandry role.
Husbandry Role Management: Medical Role Management:
Note, if a user is assigned a calendar role under medical and husbandry, the access granted will defer to the role with the most amount of access.
Opening My Calendar
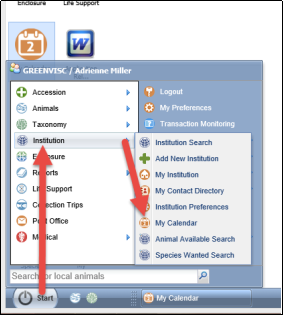
You can open My Calendar from the Start menu > Institution > My Calendar. If you have not opted to remove it, there is also a My Calendar icon on the desktop.
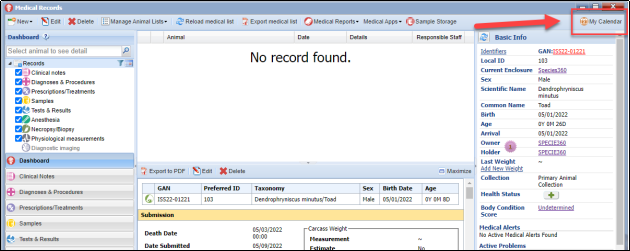
You can also navigate to calendar from the Medical Dashboard screen by clicking the My Calendar button in the top right corner.
Navigating My Calendar
Calendar Defaults
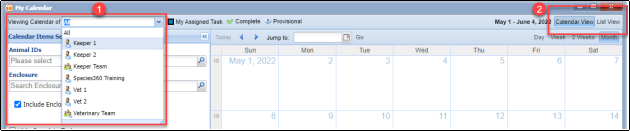
When you first open My Calendar, it will default to view “All” calendars (1), which will show all tasks in the calendar. You can use the drop-down menu to select which calendar you wish to see. You can select a specific user (e.g. yourself), or a team. Selecting a team will show you all of the calendar tasks assigned to a user within that team.
E.g.,Selecting Veterinary Team will show all calendar tasks assigned to the Veterinary Team, Vet 1 and Vet 2.
If you have chosen a specific calendar to view, ZIMS will remember that default the next time you open My Calendar.
When you first open My Calendar, it will default to view in Calendar View . You can click on the List View button in the top right (2) to switch to List View .
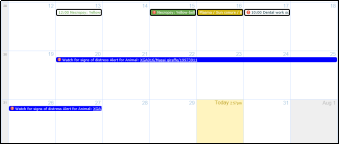
Calendar View
Calendar view displays the calendar all tasks in a grid view. You can switch to view a single day, a week, 2 weeks, or the whole calendar month (1).
You can filter the calendar to view tasks for specific animals or enclosures (2), and choose to hide completed tasks (3).
You can also use the ‘Task Types’ menu (4) to filter the calendar. Simply click on each task type to hide those tasks and click again to turn them back on. Hidden tasks in the Task Types menu are lighter in color with white lines (5).
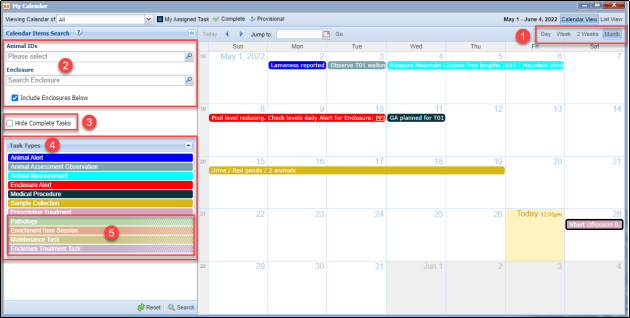
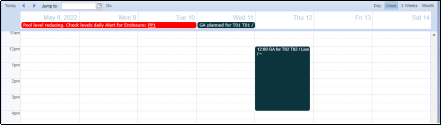
Tasks which have been added as “all day” will appear as a solid color. Tasks which have been added for a specific time within a day appear with a white background and text color of the task (in this case below, black text for a medical procedure).
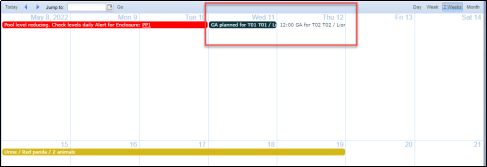
In the Day or Week view, tasks which have been added as “all day” will appear at the top of the day. Tasks which have been added for a specific time within the day will appear in the day view.
Tasks which have been assigned to you (the logged-in user) will appear with a black border. Here, the “Whole Blood” samples have been assigned to the logged-in user.

To add a new task in Calendar View, click on a date to bring up a new task. See Adding Calendar Tasks for more instructions.
Double click on a calendar entry to edit or delete the entry, or to mark the entry as completed.
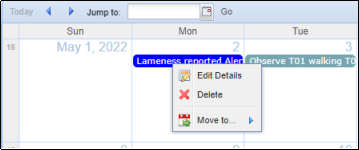
You can click and drag an entry to move it to another date. Alternatively, you can right click an entry to bring up the menu to edit, delete or move the entry
List View
List view displays all of the tasks in a list.
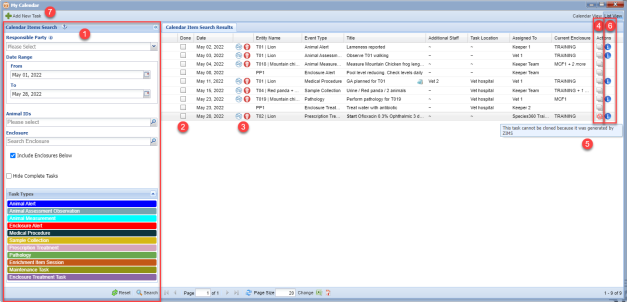
You can edit any task in the list by double clicking the task to open.
You can again use the search filters (1) to search for tasks for a specific animal, enclosure, team/user, and to hide completed tasks. There is the additional option in list view of searching for a specific date range.
From the list view, you can mark items as complete by clicking the check box in the Done column (2).
You can navigate straight to the animal’s husbandry or medical record by clicking on the icons (3).
You can hover over any information that is too long for the column (e.g. Current Enclosure column: TRAINING + 1).
For any task which has been entered by a user (i.e., not automatically created by ZIMS), you can click the clone icon (4) to clone the task and save for another animal/enclosure/date.
For any tasks which have been automatically generated by ZIMS (e.g., through a prescription), the clone icon will be blocked (5).
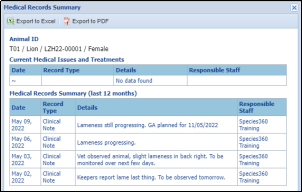
You can click on the i icon (6) to see a summary of the medical records (below) for the animal in the task.
You can add a new task by clicking on the Add New Task button (7) in the top left corner. See Adding Calendar Tasks for more instructions.
Adding Calendar Tasks
Calendar tasks can be added directly into the calendar in Calendar View and List View , from specific areas within the medical module and husbandry module.
When adding a new task from My Calendar, left click anywhere on the calendar in Calendar View , or click Add New Task in List View .
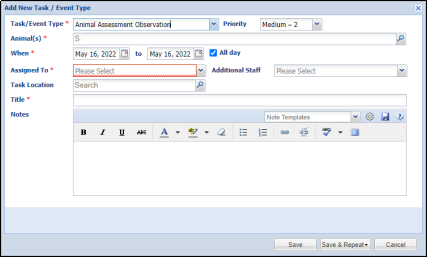
You first need to choose the type of Task/Event you want to add:
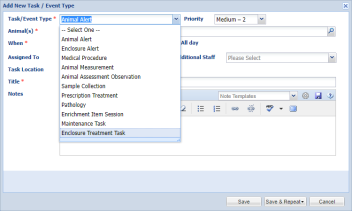
There are 11 types of task that can be added:
|
Animal-Based Tasks |
Enclosure-Based Tasks |
|
|
|
|
Medical Alert in Basic Info |
|
|
|
|
|
|
Animal-Based Calendar Tasks
Animal-based calendar tasks require the same information. To complete the task you will need to record:
- The animal or animals assigned the task
- The date and time of the task
- Who the task is assigned to
- The title of the task (i.e., what the task is about)
You also have the option to record:
- The priority
- Any additional staff associated with the task
- The location of the task (an enclosure code)
- Any additional notes
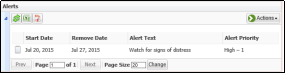
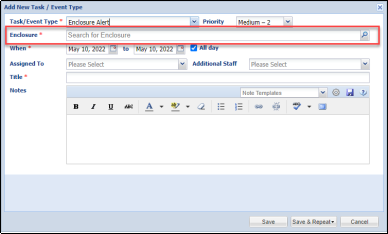
Animal Alert
Animal Alerts require the same information as the Animal-based tasks , but in addition Animal Alerts can also be added from an animal’s record within the Alerts grid. The Animal Alert task will display in both the animal record and Calendar regardless of where it was entered.
Animal Alert from the Husbandry module:
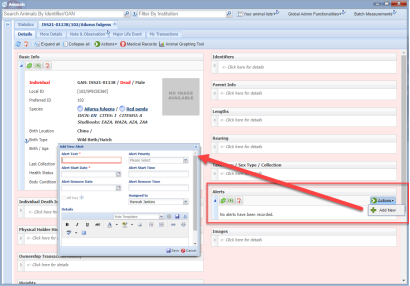
Animal Alert from My Calendar:

When adding an Alert from My Calendar, you will need to specify which animal or animals the alert is for. Within the My Calendar Animal Alert, you can also assign the task to additional staff, and a location. The rest of the fields are the same for both alert boxes.
The Alert will display in the Calendar across the dates selected, and also in the Alert grid of the animal record, no matter where you entered the task.
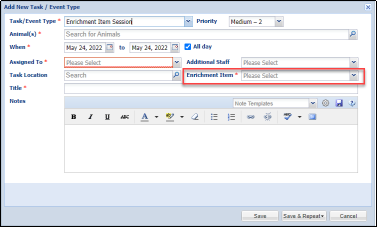
Enrichment Item Session
The Enrichment Item Session task is similar to the above animal tasks, with the addition of the mandatory Enrichment Item field. To be able to choose the enrichment item, the animal(s) in question must have the enrichment item assigned ( see more on enrichment items here ).
Sample Collection
The Sample Collection task has the additional mandatory field of Sample Type. The task also differs in that the title is automatically generated from the information recorded in the task.
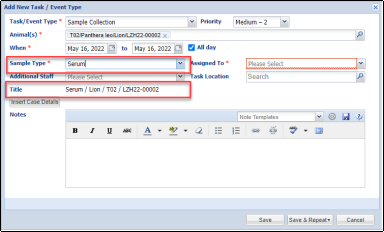
( more on Insert Case Details button here )
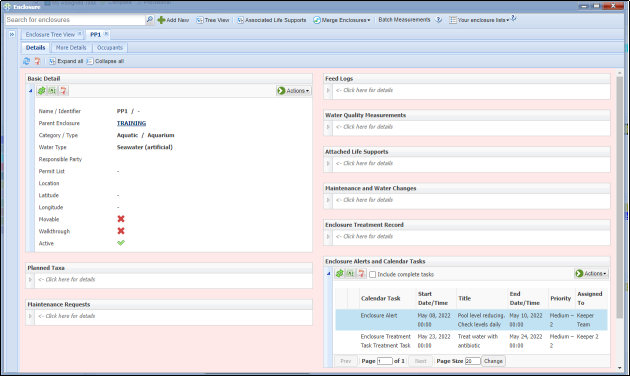
Enclosure-Based Calendar Tasks
Enclosure-based tasks require you to assign an Enclosure to the task rather than an animal. Enclosure Alerts and Maintenance Tasks can only be assigned to a single enclosure, but Enclosure Treatment Tasks can be assigned to multiple enclosures within the same task.
Enclosure-based tasks can be added from either My Calendar, or from the Alerts grid within the enclosure record.
Inserting Case Details into a Calendar Task
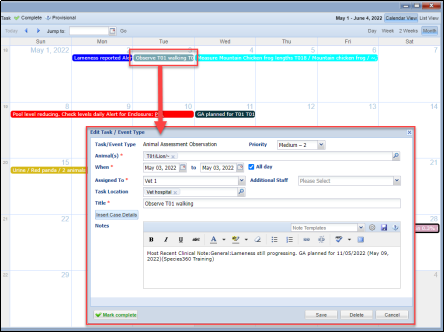
When adding a new Animal Assessment Observation, Medical Procedure, Pathology, Prescription Treatment or Sample Collection task, once you have assigned an animal an Insert Case Details button appears. When clicked, this button will insert the most recent medical case details into the task note for the animal(s) selected.
Automatic Tasks
Some medical tasks are created on the calendar automatically.
Animal Assessment Observation is a system generated calendar task that is created on the last day of treatment for any treatment that goes longer than 7 days. The intent is to prompt the vet/staff to reassess the case to see if it improved, declined or stayed the same. This task can also be entered directly into the calendar and does not have to be generated by a treatment.
Prescriptions which have been written to start in the future will auto-generate a calendar task for the start date to remind staff when to start the prescription.
Additionally, when a default pathologist is defined in your institutional preferences, a necropsy submission will automatically add a calendar task, assigned to the default pathologist, to schedule a necropsy.
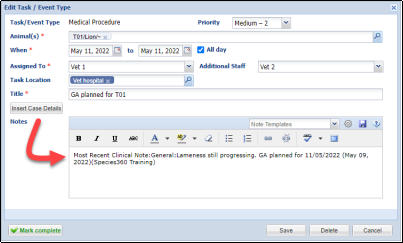
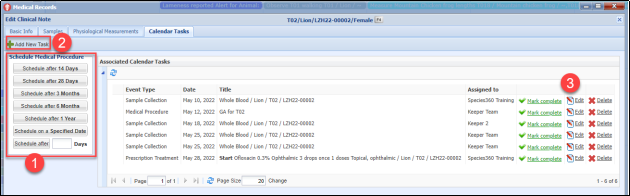
Creating Tasks from a Clinical Note
When a new clinical note has been saved, the Calendar Tasks tab becomes active. Here you can automatically schedule a Medical Procedure task (1) (note you can use the auto-schedule and change the task type). You can also add a new task for this animal (2) which will open a blank new task box. You can also manage previous calendar tasks for the animal (3) with the option to edit, delete or mark them as complete.
Creating Tasks from a Full Prescription
When a new Full Prescription has been saved (or a Quick Prescription is edited), the Calendar Tasks tab becomes active. Here you can automatically schedule a repeat for the prescription which generates a Prescription Treatment task. You can also manage scheduled prescription tasks for the animal, with the option to edit, delete or mark tasks as complete.

Creating Tasks from a Sample
When a new Sample has been saved, the Calendar Tasks tab becomes active. Here you can automatically schedule a repeat Sample Collection task. You can also manage Sample Collection tasks for the animal, with the option to edit, delete or mark tasks as complete.

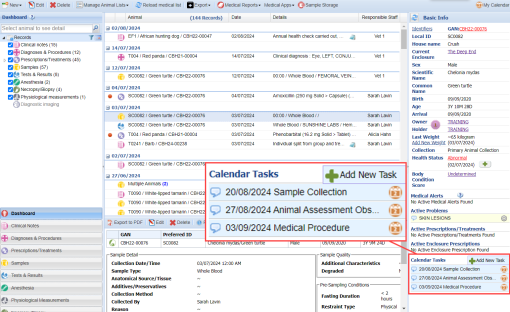
Calendar Tasks in Basic Info Panel
Calendar tasks will display in the Basic Info panel for any animal in focus in the Medical Dashboard.
This summary of calendar tasks will only show the upcoming 30 days and will be limited to 3 calendar tasks. To see the full list of Calendar tasks for a specific animal open My Calendar, filter by animal ID, and select List View.
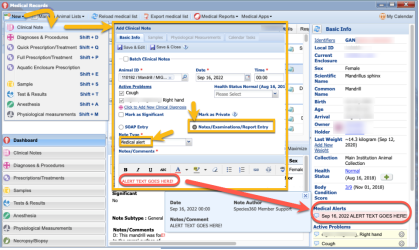
Medical Alert in Basic Info Panel
To add a Medical Alert that displays in the right side of the Medical Dashboard when an animal is selected, you must add a Clinical Note for that animal. Choose radio button for: Notes/Examinations/Report Entry and note type = Medical Alert.
To edit exiting Medical Alerts, search with the clinical notes search filter for Medical Alerts.
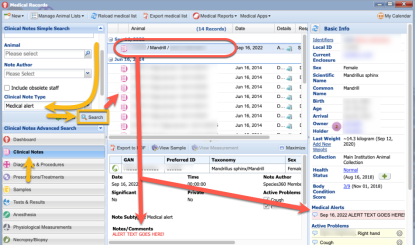
To Delete existing Medical Alerts, after searching for the record as described above, either delete the original alert, or change the note type from Medical Alert to another type to remove it from the Medical Alerts section on the Basic Info panel.
Marking Calendar Tasks as Complete
It is good practice to mark completed tasks as complete to keep your records clean.
To mark as complete in Calendar View , simply double click any entry in the calendar and click “Mark Complete”.
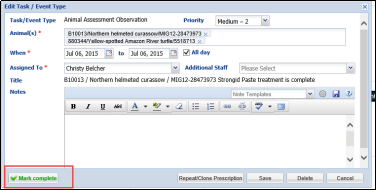
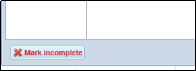
If you have marked a task as complete by mistake you can check the Mark Incomplete button to make it active again.
To mark entries as complete in List View , simply click the checkbox within the Done column (1). To view or hide your completed tasks, toggle the Hide Completed Tasks box on and off within the Search.
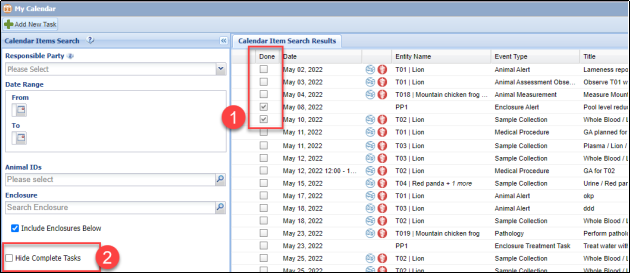
If you have marked a task as complete by mistake, make sure you Show Completed Tasks, and then you can un-check the checkbox within the Done column to make it active again.
You can also mark calendar tasks as complete for a specific animal from the Clinical Note , Full Prescription and Sample Calendar Task tabs.
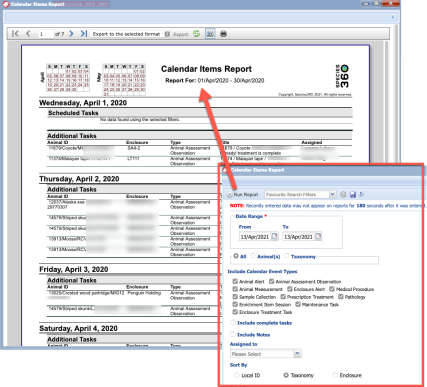
Exporting Calendar Tasks
Exporting calendar items is only available via a report in ZIMS for Medical currently. Within the Medical Reports menu, choose Calendar Items Report.
Additional help:
More on My Calendar (powerpoint)
Revised 5 March 2025
It is the mission of Species360 to facilitate international collaboration in the collection and sharing of information on animals and their environments for zoos, aquariums and related organizations.
www.Species360.org – Global Information Serving Conservation