


ZIMS for Medical – Getting Started
This Getting Started guide is designed to be followed in the order in which it is presented. This is for two reasons:
- Some of the information and functionality will build on what has been covered previously
- The information starts with what everyone, from limited Users to advanced Users, should know. It progresses to include what medium Users should be aware of and ends with the functionality that power Users will use.
If you are truly just getting started using ZIMS for Medical, feel free to stop whenever you want in this guide and master what you have learned before proceeding to cover new topics.
Table of Contents
Initial Set Up
Rights and Roles – Medical Admin Responsibility
Medical Preferences
Institution Preferences –Medical Admin Responsibility
My Preferences – All Users Responsibility
Medical Dashboard
Dashboard Navigation
Type-ahead Lookup Fields
Global Medical Resources
Drug Usage Extracts
Anesthesia Summaries
Expected Test Results
Search by Test
Global/Local Morbidity and Mortality Analysis
Husbandry Resources
Pedigree Explorer
Age Distribution Graph
Weight Comparison Report
Weight History and Graph
Clinical Notes
SOAP versus Notes/Examinations/Report Entry
Animal Care Staff Medical Summary
Templates
Batch Entry
Health Status and Body Condition Score
Single Entry
Batch Entry
Incomplete Accession
Calendar
Adding Institutions and Contacts
Dictionary Items
Adding New Drugs
Adding New Medical Terms/Concepts
Adding New Tests
Reports
Diagnosis & Procedures
Prescriptions
Anesthesia
Drugs Given
Effects & Milestones
Samples
Physiological Measurements
Notes/Comments
Recovery & Ratings
Physiological Measurements
Samples
Tests & Results
Setting up New Laboratories
Requesting Tests
Test Panels
Test Results and Findings
Necropsy/Biopsy
Submission Tab
Case Info Tab
Gross Necropsy Tab
Samples and Tests Tab
Measurements Tab
Histopathology Tab
Images Tab
Finalize Tab
Adding a Pathology Diagnosis
Initial Set Up
Rights and Roles – Medical Admin Responsibility
Your access to ZIMS for Medical is determined by your Role and the access it is assigned. The Local Administrator for the Husbandry module has the following responsibilities for creating a Medical Admin:
- Add the desired Staff member to the Staff List
- Assign them the Husbandry Role of Vet – Husbandry (Species360)
- Assign them the Medical Role of Medical Admin (Species360)
The Medical Admin can then assign any Medical Roles as desired once the Husbandry Admin has added the Staff member to the list and assigned a Husbandry Role. To assign a Medical Role go to Start > Institution > My Institution > Staff > highlight appropriate Staff > Actions > View/Assign Medical Roles.
ZIMS for Medical has four Medical Role templates that are created by Species360. These are identified by (Species360) after the name. You cannot edit these Roles and they will be automatically updated by Species360 as new functionality is deployed.
-
Medical Admin (Species360)
- Ability to assign Roles
- Calendar - Search/Add/Edit/Remove any medically related tasks
- Dictionary – Complete Access
- Medical Records – Complete Access
- Medical Reports – Access to all
- Medical Resources – Search Access to all
- Pharmacy Inventory – Complete Access
-
Veterinarian (Species360)
- Calendar - Search/Add/Edit/Remove any medically related tasks
- Dictionary – Complete Access except for Test Grouping
- Medical Records – Complete Access
- Medical Reports – Access to all
- Medical Resources – Search Access to all
- Pharmacy Inventory – Complete Access
-
Read Only Medical (Species360)
- Calendar – Search for any medically related tasks
- Dictionary – Search except for Test Grouping
- Medical Records – Search Access to all
- Medical Reports – Search Access to all
- Medical Resources – Search Access to all
- Pharmacy Inventory – Search Access
-
University User Medical (Species360)
- Calendar – No Access
- Dictionary – No Access
- Medical Records – No Access
- Medical Reports – No Access
- Medical Resources – Search Access to all
- Pharmacy Inventory – Search Access
If you do not find a medical Role that meets your needs for a Staff member you can create custom Local only medical Roles. These Roles will not automatically be updated as new functionality is deployed. You will need to keep them updated yourself. For help with creating Custom Roles use the “help with Medical Roles” link below.
If there is a medical function that you need to perform your job but you do not have access to it, ask your Medical Admin to give you the rights to that task. If there is a husbandry function that you need you will have to contact your Local Admin.
Click here for more help with Medical Roles
Medical Preferences
Institution Preferences affecting the Medical module are set by the Medical Admin and will be the defaults for all new Users. Users can change some of these to meet their needs using My Preferences.
To set Institution Preferences go to Start > Institution > Institution Preferences > Medical Preferences.
Institution Medical Preferences include:
-
Clinical Notes
- Set default to SOAP entry or Notes/Examinations/Report Entry
- Open animal care staff medical summary box as default
-
Pathology
- Default Staff for Pathology Submission Alert
- Enable Auto-incrementing Pathology Case Number
- Provide New Case Number Settings
- Default Gross/Examination Location
- Default Histopathology Location
-
Tests and Results
- Default System for Test Units
- Default Laboratory
-
Species360 Template Visibility
- Display Species360 maintained Test Panels
- Display Species360 maintained Favorite Samples
To set My Preferences go to Start > My Preferences > Medical Preferences. My Preferences for Medical allow Users to personalize some of the Institution Preferences to better meet their needs. If Institution Preferences are changed, My Preferences will not be over-written for those Users who have set My Preferences unless Save & Apply to all Users is selected. My Preferences for Medical include:
-
Clinical Notes
- Set default to SOAP entry or Notes/Examinations/Report Entry
- Open animal care staff medical summary box as default
-
Tests and Results
- Default Laboratory
-
Species360 Template Visibility
- Display Species360 maintained Test Panels
- Display Species360 maintained Favorite Samples
There are also some Preferences that can be set that are not strictly medical related and include:
-
Measurement Preferences
- Set your default Unit of Measure
-
Application Preferences
- Set default Responsible Party to yourself or another staff member
- Select the grids in the husbandry module record to open expanded
- Show only your institution’s active identifiers in animal search results grids and reports
Click here for help with My Preferences
Medical Dashboard
Dashboard Navigation
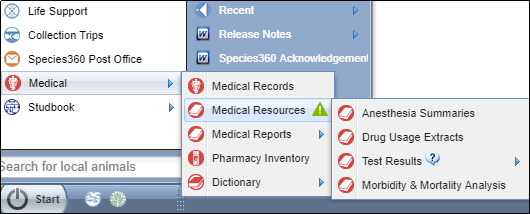
To open Medical records, go to Start > Medical > Medical Records. You may want to drag this to the desktop for easy access. The dashboard allows you to filter and organize your records so you can rapidly view the data you need at this moment. The Dashboard is divided into five parts.
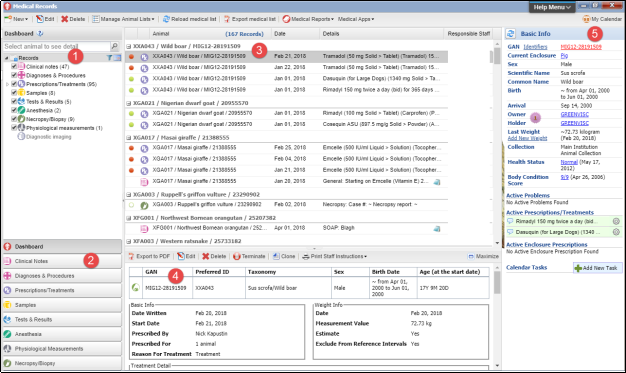
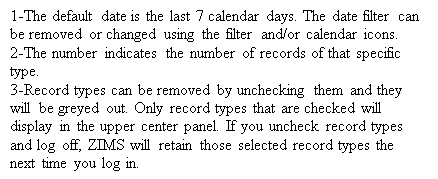
1-The upper left hand side of the screen lists the Medical Records Types.
2-The lower left panel are the record types search options.
3-The upper center panel displays a list of the records relevant to the records types checked in the Records list.
4-If a record is highlighted in the upper center dashboard, the details of that record are displayed in the lower center panel.
5-The right hand menu provides details about the animal in context.
We will look at each of the five parts of the Dashboard.
(1)Records
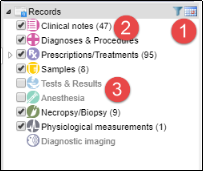
(2)Records Types Search Options
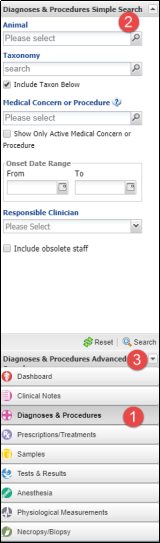

(3) Upper Center Panel
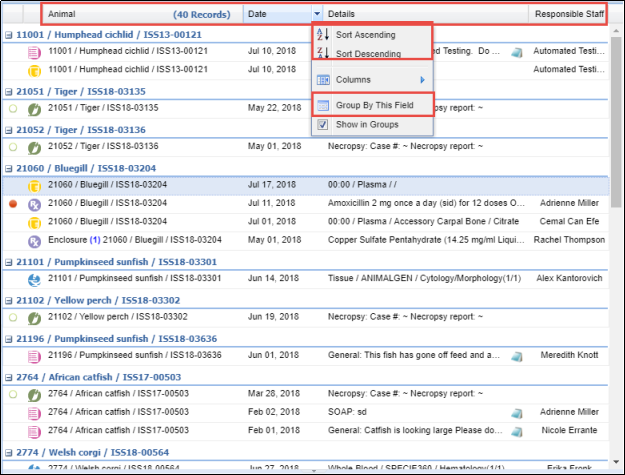
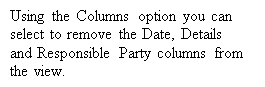
The upper center panel displays the record types that are checked in the left hand Records box. A limit of 500 records can display here. If the record limit hinders the management of a large caseload, please contact your member support representative. The display can grouped by Animal, Date, Details or Responsible Party by selecting Group by This Field. The columns can also be sorted by ascending or descending order.

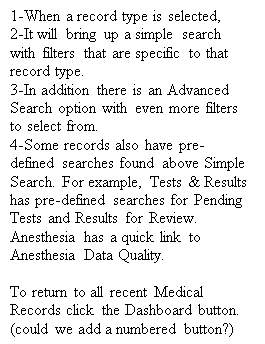
(4)Lower Center Panel (Preview Panel)
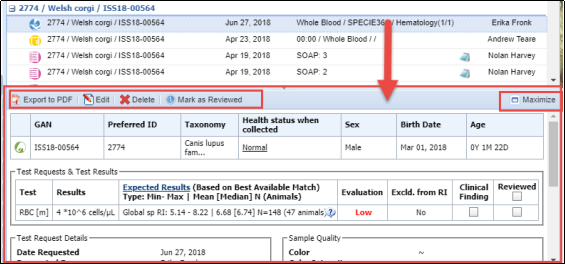
If a record is highlighted (in context) in the upper center panel, the lower center panel will display the details. All can be exported, edited or deleted from here. Other options depend on what type of record is highlighted. Here we have highlighted a Test & Results record so we have the option to Mark as Reviewed. If a Sample record was highlighted the options would be Request Test, Move to Storage, Create Subsample or Sample Tree View. This panel can be Maximized to view the entire record.
(5)Animal Information
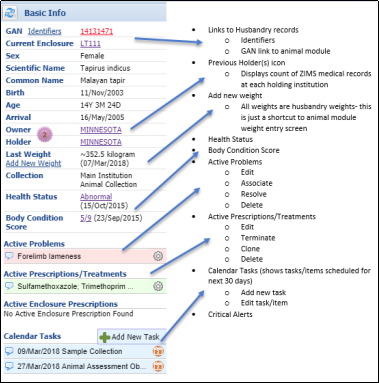
The right hand side displays Basic Information on the animal that is in context. The upper information is sourced from the Husbandry record. The lower information is sourced from the Medical record. You can easily access the Husbandry record by selecting the GAN hyperlink. The Identifiers hyperlink will quickly display any active identifiers. This is a great double check that you have the correct animal without opening the entire record! The medallion will show you previous holders and the number of medical records and whether they are shared or not. You can add a new weight and update Health Status and Body Condition Score directly from here. The colored medallion will display any previous holders/owners and the medical record count.
If you would like to review an animal's record in more detail, you may either type the GAN, local ID, house name or other identifier into the search bar (located right above the Records in the left hand panel) and select it, or highlight a record from the center pane and drag and drop that record over to the left upper panel and it will display all the records related to that individual.

You can export the record from here, or remove it from the Records panel by selecting the red “x”.
Type-ahead lookup fields
Any fields with the Magnifying glass are “type ahead lookup fields.
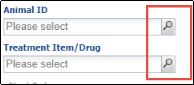
These fields allow you to quickly find what you are looking for without having to type the entire name or number. The work on fields driven from a large list of items:
- taxonomy
- institutions
- medical terms
- medical tests
- medical treatments (drugs)
- enclosures
Using multiple word fragments will narrow the search faster than continuing to type a whole word. For example, you are looking for a Treatment Item / Drug type-ahead
- “enro” - shows first 10 matches (the remainder of the long list does not show)
- “enro inj” - better; still shows 10 matches, but now all are injectable form
- “enro inj 100” - best; down to 5 options
The order of words does not matter. For example “100 inj enro” gets you to same list of 5 items.
An example for taxonomy type ahead is “tham si” will find garter snake. An example for institution is “U Minn Uro” will find the University of Minnesota Urolith Center).
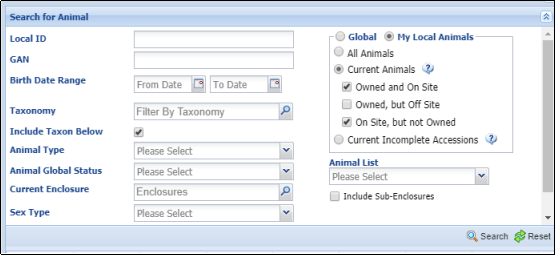
Using the “Select animal to see detail” field in the left hand dashboard, you can also use the magnifying glass to open a screen where you can search using multiple filters.
Click here for help with the Medical Dashboard
Global Medical Resources
Even before you start using ZIMS you can benefit from the Global Medical Resources available in the application. The data included is sourced from decades of medical information entered by Species360 member institutions. The institutions are not identified with the data for their privacy. Reviewing these resources may help you decide what topics you wish to contribute to by entering data into ZIMS.
There are four unique analyses of the global ZIMS database: Anesthesia Summaries, Drug Usage Extracts, Test Results (Search by Test and Expected Test Results), and Morbidity & Mortality Analysis. These resources were funded, in part, by an Institute of Museum and Library Services grant (MG-30-14-0039-14). Each resource is recalculated several times a year, providing users with the most current information available.
Anesthesia summaries
This resource summarizes the most commonly used injectable anesthesia protocols for over 1300 species. The top five protocols are reported. Each summary includes data on anesthetic complications and patient recovery. For each species, the analysis provides information on:
- Drugs and dosages used
- Patient body weight range
- Complications experienced during the anesthesia event
- Problems experienced during the recovery period
- Total number of anesthesia events
Recognizing that drug protocols change over time, and that a historically popular protocol may continue to show in this resource even as usage declines, the recent usage for each protocol is displayed in a popup graph when the mouse cursor is placed on the protocol number (left column). Each summary page also has a filter section that allows the user to look at a subset of the anesthesia records, such as only animals fasted for more than 8 hours, and a customized summary page will be produced based on the selected filter criteria.
- Filtering by drug: As new anesthetic drugs become available (e.g., thiafentanil), this filter allows users to quickly find any existing protocols that use this drug.
- Usage histogram: Hover-over the drug protocol number to see usage over the past 30 years and evaluate whether protocol is gaining or waning in popularity.
- Dosage histogram: Hover-over the histogram icon next to any drug dosage range to see the distribution of that drug dosage and view complications as they relate to dosage.
Drug Usage Extracts
This resource provides information for over 600 medications, extracted from more than 2.8 million prescriptions on over 240,000 different animals. You can search by Taxonomy, Drug Category (e.g., Antibiotics) and/or a specific drug. The summary is presented in an easy to interpret table. In addition, you can also access this information from within the dose calculator when entering a prescription. Hover over the histogram to view details on dosage range distribution and adverse effects. There is also a global map of where these records originated.
Click here for help with Global Drug Usage Extracts
Test Results
The stringent requirements for calculating reference intervals means that only a small fraction of the available information gets incorporated into the Expected Test Results (see below). This search tool provides some access to the rest of the ZIMS test result database. If you have just measured your first B-type natriuretic peptide (BNP) level in a gorilla, this tool allows you to see what related information has been entered by other users around the world. You can see the test result, sample type, patient health status, restraint type, laboratory, sex and age. There are multiple filters in the search area to narrow the scope of the search to give you the most relevant results for comparison.
Expected Test Results
This resource is derived from more than 10.8 million test results extracted from the global ZIMS database from animals evaluated as healthy at sampling. These results were used to calculate over 373,000 separate Global Reference Intervals based on different combinations of taxonomic group, test, sample type, sex, and restraint method. Every reference interval is based on a minimum of 40 results, as recommended by the American Society for Veterinary Clinical Pathology, but in many cases, they are based on hundreds, sometimes thousands, of test results. In addition, when the data set for a taxon/test combination is too small to allow a valid reference interval calculation, the module will provide basic statistics for any data set with between 15 and 39 values. These Basic Stats includes mean, median and the range of values for that data set.
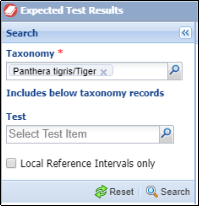
Searching the resource
:
- Use the Search panel on the left side of the resource to search by taxonomy. You can narrow the results by selecting a test type or simply click Search
- Then, click on the hyperlinked Tests to view the results for the desired taxonomy.
- The first value is the total number of Expected Test Results (including Basic Stats) calculated from the ZIMS database, the second value is the number of those Expected Test Results that meet the Global Reference Intervals requirements.

Use the Expected Results Filter to narrow type of result, sex, restraint and sample type. Also, select the measurement system.

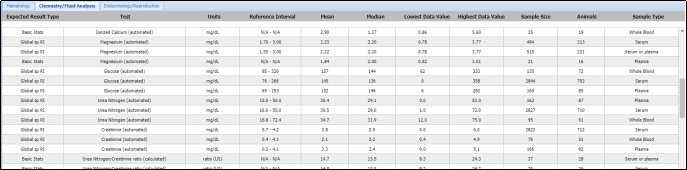
The results are grouped by Test Category on separate tabs and can be exported to PDF. The columns include the expected result type, test name, the units of measurement, reference interval, the mean and median of test result values, lowest data value, highest data value, number of samples used in the calculations, the number of individual animals that were sampled and the sample type.
Global/Local Morbidity and Mortality Analysis
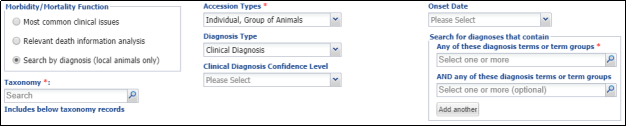
There are three functions available in this resource:
Common clinical issues are extracted from the clinical diagnosis records and are a summary of the most commonly reported medical problems for a species. Diagnoses can be grouped into related categories (ie: wounds includes terms for wound, laceration, abrasion, puncture, bite, etc) and can be expanded or collapsed for more information. The summary provides diagnosis, duration and sample size for active and resolved diagnoses. The histogram graph provides more information regarding duration.
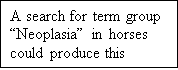
Relevant Death Information analysis provides a graph for any taxonomic grouping with a global, regional or institutional scope. The data is layered and users can "drill down" through the layers by clicking on bars in the graph. When the scope is institutional, users can drill down to lists of individual animals, allowing easy identification of animals where relevant death information is missing or otherwise needs editing.
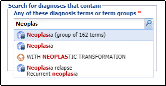
Search By Diagnosis (local animal records only) is a report that allows members to search local animal records for clinical or pathology diagnosis that contain specific medical terms.


Click here for help with Morbidity & Mortality analysis
Husbandry Resources
ZIMS also has some resources that are sourced from the Husbandry module that you may find of interest.
Under Start > Tools > Pedigree Explorer you can find Parents, Descendants and Siblings for a selected animal.
Under Start > Global Resources > Animal Management/Husbandry you will find Age Distribution and Weight Comparison Report. The Age Distribution is a graph for a specified taxonomy that displays the count of sexes and ages of the current population. This can be filtered by Global, Continent, Country, Association or My Institution. This graph is often a good indicator of the reproductive potential of a species.
Here you will also find the Weight Comparison Report. This report is a graph that lets you look at the weights of a single animal, the weights of that animal compared with global weights for the species, or global data for the species without an animal in focus.
Within the animal Husbandry record you can also view a graph of the weights or lengths of the animal in focus.
Clinical Notes
Clinical Notes are often the first type of medical data entry used in ZIMS. They allow for recording free text information and are a good starting place for your ZIMS adventure. As on all data entry screens, any fields that are mandatory are marked with a red asterisk.
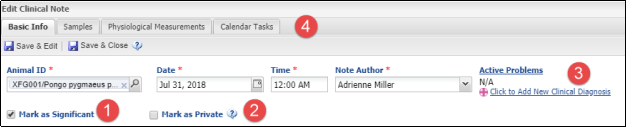
1-If you check the Mark as Significant checkbox a red exclamation point will display to the left of the Note in the medical record.
2-If you check the Mark as Private checkbox the note will not be shared outside your institution even if the record is shared. It will be visible to other medical users with clinical note rights at your institution.
3-Active Problems will display and you can add a New Clinical Diagnosis right from this Note screen.
4-Once you Save the Note the remaining tabs at the top become active. You can add and manage Samples, record Physiological Measurements and create Calendar Tasks without leaving this screen
SOAP versus Notes/Examinations/Report Entry
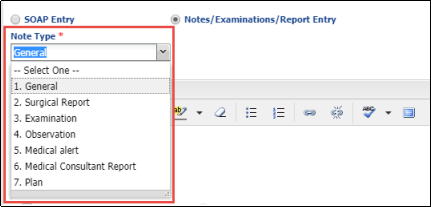
Clinical Notes can be written as SOAP (Subjective, Objective, Assessment and Plan) entries with separate boxes for each type of entry, or as one single text field (Notes/ Examinations/Report Entry). You can set the default for which type of entry you prefer in My Preferences > Medical Preferences > Clinical Notes. For a SOAP entry you do not have to select a Note Type but for Notes/Examinations/Report Entry the Note Type is required.
Animal Care Staff Medical Summary
The Animal Care Staff Medical Summary is an optional entry and found under the Clinical Notes. You can choose to use this as a way to communicate medical information directly to husbandry staff via ZIMS as Notes written here will display under notes and observations tab in the animal husbandry record. They cannot be edited or deleted from the Husbandry module, they are view mode only and have to be edited or deleted from the Medical Clinical Note. In My Preferences > Medical Preferences > Clinical Notes you can select if you want this option to automatically open or not.
Note Templates
Note Templates are pre-written sections of text that can be inserted into most Comment and Note fields. They are faster than copy & paste because they are stored in one location so they are easier to find (no need to find previous text entry for the copy & paste). They also help guard against missing important data that you want to record on a topic. You can create SOAP style structured templates as well as free form note templates.When working in Clinical Notes, you only see Clinical Note templates so be sure to select a Template Type of “Clinical Note Template” when creating them. Some examples where Templates are useful:
- Forms such as rehab admission form
- Culture and sensitivity results
- Routine clinical procedures
- Quarantine exam
- Neonatal exam
- Necropsy protocols
You can add and manage your Templates from Start > Tools > Manage Note Templates:

Or, you can save from within the record module as you enter the text:

Click here for help with Note Templates
Batch Clinical Notes
Batch Clinical Notes allow for quick data entry for roundup events where you handle many animals in a single day and apply the same exam and procedures to each individual. You can use current Animal Lists or create your own for often used groupings of animals. You can also create a list on the fly that you will not save by searching by taxonomy or the enclosure and selecting some or all results. To record a Batch Clinical Note from within the Clinical Note screen, click the Batch checkbox at the top left corner (1).
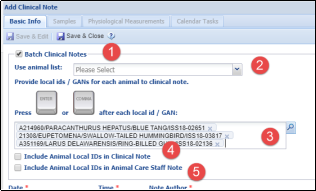
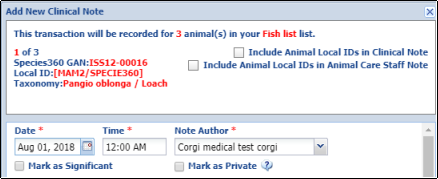
You can use an Animal List (2) or enter the animal records you want for this note by providing Local IDs or GANs (3). If you want the animal Local IDs included in the Clinical Note check this box (4) and of you want the Local IDs included in the Animal Care Staff Note check this box (5). It is highly recommended that you place the note text before the list of Local IDs so it will display in the record first.
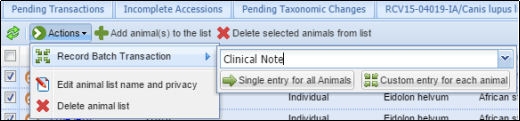
If you check the box for a batch entry from the clinical note screen, you can enter a duplicate note for each animal in the batch. If you have just completed a flock or herd round up and need to efficiently enter the clinical notes from your exams and procedures, we recommend the you proceed from a different starting point. From a search results grid or starting with an Animal List, select the animals that you want included > Actions > Record Batch Transaction > Clinical Note. You can enter the same note for all animals (Single entry for all animals) or a custom note for each individual (Custom entry for each animal). If you are entering a custom note and your field worksheet is in order of patient seen, we recommend entering the patient ID’s manually into your batch action, vs searching and selecting by taxonomy or enclosure. Then you can transfer notes down your list in order and avoid jumping around. You can still use a template and then you only have to add the data that is different for each patient (band confirmation, pododermatitis score, etc).
If recording a custom note the record you are in will be identified at the top.
Health Status and Body Condition Score
The Health Status is very important to keep up-to-date because the data recorded on animals is only included in the Global Reference Intervals if the Health Status is Normal. If there is no Health Status defined, or it is anything other than Normal, the data will not be included.
Single Entry 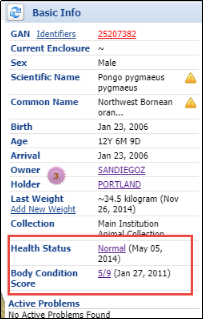
Select Add Health Status or Add Body Condition Score as appropriate.
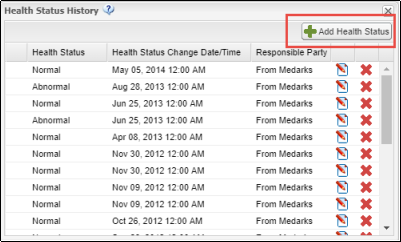
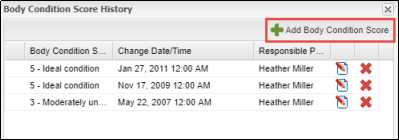
ZIMS has a 1 – 9 Body Condition Score rating. If your institution prefers a 1 – 5 rating, simply use the odd numbers.
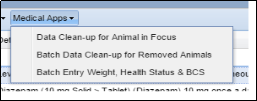
Batch Entry
To do Batch entries, such as when you do a flock round up or a herd assessment, from the menu bar in the Medical dashboard select Medical Apps > Batch Entry Weight, Health Status & BCS.
You can use an Animal List or select one or more animals. Again, if your field worksheet is listed in order that the patient was evaluated, we recommend entering the ID’s in that order to make data entry more efficient.
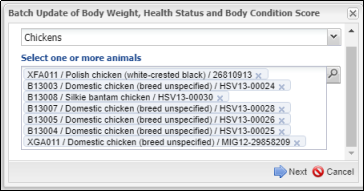

The animal in focus will display at the top (1). The last weight (2), Health Status (3) and Body Condition Score (3) will be shown for easy comparison.
Incomplete Accession
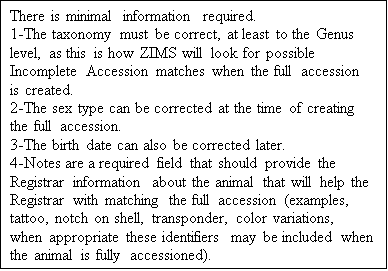
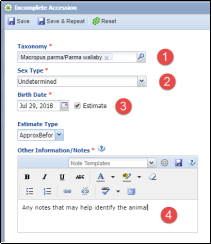
Incomplete Accessions allow Veterinary Staff to create a record that they could record medical data into prior to the full accession of the animal. The Staff member charged with creating accessions may be off and the Vet staff needs to capture information on a new arrival or birth. Some examples are a neonatal exam done on a weekend and medical care to stabilize a patient upon arrival from transport. Curators may also want to use the feature should they wish to record information on an animal that has not yet been accessioned. All information recorded on an Incomplete Accession will be migrated into the permanent accession record when it is created later. Access to creating Incomplete Accessions needs to be assigned by the Husbandry Local Admin, it is not a Medical role. To create an Incomplete Accession, go to Start > Accession > Incomplete Accession.
An Incomplete Accession receives a temporary GAN that ends in “IA” which will become an “Old Accession Number” identifier once the full accession is created.
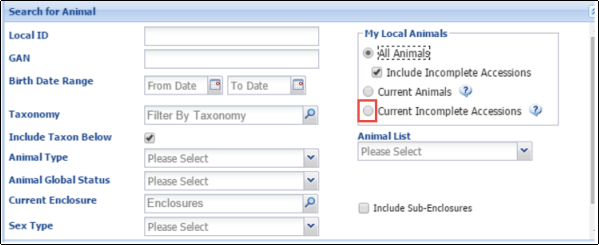
To find an Incomplete Accession you can enter the GAN into the search bar. Or, use the magnifying glass lookup in the search bar and check the radio button for “Current Incomplete Accessions”.
Calendar
Access to the Calendar can be found
- As a desktop icon
- Start > Institution > My Calendar
- Calendar View in upper right corner when Medical module is open
- Calendar > Add New Task from the Basic Info when you have a record in focus.
Some Medical records also have a Calendar tab to create tasks right from within that record type and some Calendar items are created automatically. The Calendar tasks can be assigned to a specific staff person or a team. When assigned to a team, every member of the team will see the task in their list of calendar tasks/items. Items can be marked as “all day” (no specific time requirement) or can be scheduled with start and end times. Once completed you have the option to mark the tasks as done.
There are seven types of medical calendar tasks/ items that can be assigned from the Calendar module.
- Medical Procedure – example: scheduling an annual exam
- Animal Measurement – example: weighing the penguin colony
- Animal Assessment Observation – example: reminder to check post-surgery
- Sample Collection – example: collect fecals from the Aviary
- Prescription Treatment – example: reminder to booster vaccines next year
- Pathology – example: schedule a necropsy
- Enclosure Treatment – example: reminder to treat an enclosure
The following modules have Calendar tabs that allow you to schedule tasks right from that record.
- Clinical Notes
-
Full Prescription
- With the ability to repeat on future dates
- Samples
Some Calendar tasks are automatically generated
- Animal Assessment Observation at the end of a prescription to remind you to evaluate response to treatment.
- Necropsy pending reminder is generated when a carcass is submitted
- If treatment Start Date is in the future, the system will generate a start treatment reminder
The Calendar also has an option for a List View where you can sort by Date, Entity, Event Type, Title and Assigned To.
Adding Institutions and Contacts
For some of the modules that follow you may have to record a Laboratory or Medical Supplier or a Responsible Clinician other than a permanent member of your Staff.
If you have the access you can add a Laboratory/Medical Supplier from Start > Institution > My Institution > Add New. This access is available under the Vet-Husbandry(Species360) Role.
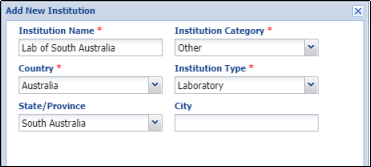
Select Other for the Institution Category and Laboratory or Medical Supplier as the Type. To add communications details such as address and phone number, ask your Local Admin to do so as Vet-Husbandry(Species360) does not have the rights to edit institutions.
To get an outside Clinician added, contact your Local Admin and have them add them as a Staff member and a non-ZIMS User. The name will then appear to select from.
Dictionary items
The Dictionaries are found under Start > Medical > Dictionary. Report any dictionary problems to support@species360.org - we will try to fix them.
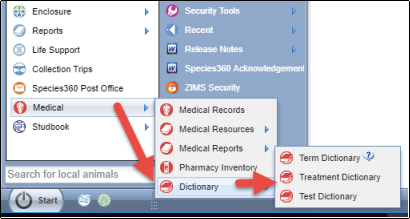
Term Dictionary
ZIMS contains a large list of Medical Terms. An easy way to find what you are looking for is to use the Search Terms and filter by Term Type. Hovering over the Term Type will provide a definition for that Type.
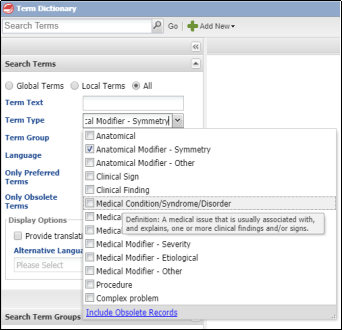
There may be times you may need to add a term that meets your needs. Once added, this Term will be visible only to your institution. However, if several institutions are adding the same Local Term, Species360 may promote it to a Global Standard Term. If this happens you will receive a Post Office message to let you know that your Local Term is now visible Globally. You can Add New Term, Add New Synonym/Translation and Create New Term Group. Before you add there are some suggestions:
- Look for possible synonyms first; adding as a synonym for an existing term helps everyone. Use the Search Terms box and filter by Term Type.
- Please avoidadding abbreviations
- Get the medical term or concept to the simplest, distinct form and add that concept; everything else is a modifier for that term/concept
Treatment Dictionary
The Treatment Dictionary allows you to search for drugs by Name, Active Ingredients and Item Type. There is also a Dictionary Advanced Search to further filter your search to easily find the drug you are looking for.
The Treatment Dictionary also allows you to add new drugs. There are three types of pharmaceutical entries:
- Active ingredients - single item; we use the English INN as the main entry when possible; no mixtures (e.g., paracetamol)
- Synonyms - another recognized name for an active ingredient (e.g., acetaminophen)
- Formulations - an active ingredient or mixture of active ingredients with an associated form and concentration and sometimes, a brand or trade name (e.g., Tylenol 200 mg caplets); with drug combinations, the formulation captures the amount of each active ingredient that is present
Before you add there are some suggestions:
- Try to find the drug you want to add using the Dictionary Search. Use the Advanced Search to filter by more categories
- Rarely, if ever, should you add English synonyms; these should be reserved for active ingredient translations and for cases where regional nomenclature is not aligned with international standard. Example: Paracetamol (INN) and Acetaminophen (USAN)
- Adding new drugs should be done by somebody that understands the difference between an active ingredient and a trade or brand name (Celebrex is not an active ingredient entry; Celecoxib is the active ingredient)
- Work directly from the drug insert or drug bottle when adding to the dictionary
- Check spelling before clicking Save
- Add new formulations when they are significantly different from existing formulations. For example, ketamine 100 mg/ml, ketamine hydrochloride 10% (100 mg/ml) and ketamine HCl (100 mg/ml) are not functionally different and they just make data entry difficult for other users; when identified by Species360 staff these entries will be merged into a single entry; don’t waste your time adding a formulation that will be removed
- If you dilute, mix or adulterate a commercial formulation on a regular basis and want to have easy access to that altered formulation, mark that adulterated item as Compounded so that Species360 will not remove the formulation. Example: you routinely dilute the commercial 10 mg/ml ivermectin to 1 mg/ml; if you put that diluted formulation (1 mg/ml) into the system for easy access, it should be marked as compounded (it is not a commercially available dilution, so it is, by definition, a compounded drug formulation)
- When you add a brand or trade name formulation item, remember to mark it as Proprietary
Test Dictionary
The Test Dictionary is Search/View only. If you don’t know the full test name you can search by Category, Valid Sample types and Primary Result Type. Tests are only added by Species360 to maintain global consistency and allow for improved reference intervals in the future. Users can request a new test using the fillable Word document Global Test Request found in the ZIMS Help Menu. Once we have all the needed information on this form it usually takes just a few days to add a new test.
Reports
The Medical Reports can be found from Start > Medical > Medical Reports or at the top of the medical dashboard. Each report has its own specific filters. Once you start entering data you should spend some time running the various reports with different filters so you gain experience in knowing which report to run to get the information that you are looking for out of ZIMS.
If there are specific reports with specific filters that you find you commonly use, you can select to create Favourite Search Filters by completing the filters you want and selecting the Save icon. You then name the filter and Save it. It will appear in the Saved Filters dropdown for selection. This can be a great time saver.
Diagnoses & Procedure s
To enter a new diagnosis or procedure, from the medical dashboard select New > Diagnoses & Procedure. If you have an animal in focus on the left hand dashboard the Animal ID will prefill, otherwise you need to enter it. You can also get to this screen using the hyperlink at the top of the Clinical Notes screen. An additional way to add a diagnosis is to copy the text from your clinical note, right click, and choose “add clinical diagnosis”. ZIMS will attempt to match the terms you have highlighted to the dictionary, and you can validate them and save. The term dictionary will start to recall the medical terms entered most frequently at your institution. So if over time you type “Air sacculitis” more times than you type “Air embolism”, Air sacculitis will float up to the top of the list when you type “air”. Reminder, if you are not seeing the specific term you desire in the list, type the first few characters of each word in the term and it will produce a shorter list (“deg jo di” to efficiently select “degenerative joint disease”).
A Diagnosis & Procedure must have one , but only one medical concern. A medical concern is built out of a series of terms that describe and define the medical issue. To understand what terms can be entered, read the “?” hover over to the right of the Medical Concern or Procedure field. The terms include:
- Anatomical – Location of the clinical sign or clinical finding. Only a single Anatomical Location is allowed in each entry.
- Clinical Sign - What the animal is displaying (example: lameness, cough
- Clinical Finding – Interpretation of a test result, the results of a measurement (example: fever, tachycardia, elevated white blood cell count)
- Medical condition, syndrome or disorder – A diagnosis that explains the clinical sign or finding
- Medical Modifier – Details on the extent of the issue, how long it has lasted and its severity. Up to eight of these modifiers are allowed in each entry.
- Procedure - Action taken, major medical events such as surgery. These terms can stand alone as a valid diagnosis. However, you will often want to provide additional details or clarification using modifiers. “Lameness” tells another clinician what medical problem is present. “Lameness, right front limb, mild” provides a more complete description
Diagnoses & Procedures can be saved and associated to other related records such as Clinical Notes. They can be resolved and/or edited from the top of the lower center dashboard when the record is in focus or from the right hand Basic Info. When you resolve a diagnosis you can update the health status at the same time to keep your records accurate and consistent.
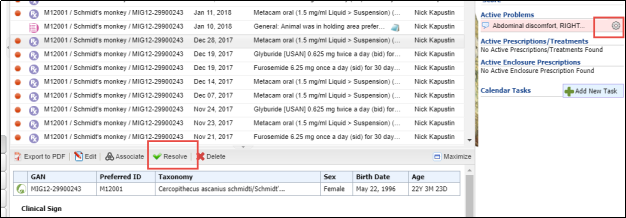
They can also be resolved using the Data Clean-up tool under Medical Apps at the top of the dashboard or Cleanup Medical Records from the Case Info tab under Necropsy.
Click here for help with Diagnosis and Procedures
Prescriptions
When recording any drugs, treatments, or therapies try to do so in a standardized way so you can later search for them and review usage.
A Quick Prescription is used for one time treatments such as vaccinations, a single dose of anthelmintic or fluids administered during anesthesia. Think “one and done”. Batch Prescriptions (check box in upper left corner and enter Animals by GAN or Local ID or select an Animal List) can be recorded when you give the exact same dose to several animals. An example of a Batch entry would be vaccinating the flock of flamingos for West Nile Virus. 14 birds got the same volume of vaccine from the same lot number.
A Full Prescription is typically administered over a time period such as antibiotics. Multiple animal entries are intended for the situation where you apply a single volume of drug to an entire group and all animals share the dose and you cannot confirm how much each animal specifically ingested. An example of Multiple animal records (check box in upper left and select animals or an Animal List) would be top-dressing feed with Ivermectin and offering the medicated feed to a herd of antelope. You can access the Global Drug Usage Extracts from this Full Prescription screen to double check dosage used in this species. Once you Save the Basic Info for a Full Prescription, five additional tabs become active – Dispensing, Administration, Staff Instructions, Calendar Task and Treatment Response.
The button for the dose calculator can be very useful. Launching it provides you a chance to enter the desired dosage. If the weight is entered, click the button and calculate the dose to be given. If the drug selected has a concentration defined, ZIMS will also calculate the quantity to be administered. If needed, you can update the quantity to a more logical value (round 0.42 tablets to 0.5 tablets) and recalculate the dose and dosage based on the quantity. You can also compare your dosage to global drug usage data on that species by clicking the buttons to view or search global drug usage extracts.
Aquatic Enclosure Prescriptions are intended for continuous immersion prescriptions for aquatic enclosures. This allows you to record the prescription against an enclosure with many occupants and/or multiple taxa. The treatment concentration calculations are based on system volume. The treatment duration can be extended beyond the number of doses delivered such as when drug remains in the system until life support components or water changes are implemented. If given the Role access, other staff members such as Aquarists can record the actual treatments to the enclosure/tank. Once you Save an Aquatic Treatment, four additional tabs become active – Dispensing, Administration, Calendar Task and Treatment Response. Any Active Enclosure Prescriptions will display in the right hand Basic Info when an animal occupying the enclosure is in focus.
To terminate a prescription for any reason (patient non-compliant, change drug based on response or culture results, etc.) you can select Terminate from the menu bar on the preview panel when the Treatment is selected in the main dashboard. You can also terminate from the right hand Basic Info.
The Save & Repeat and Clone options help you save time. Save & Repeat is available for all types of prescriptions when you are ready to Save. You have the option to use the same drug for a new animal (example: (administering 1 week of aspergillosis prophylaxis to several penguins in preparation for transport), or a new drug for the same animal (example: recording antibiotics and anti-inflammatories for an individual animal).
Cloning makes a copy of an existing prescription record, and opens that record in edit mode. To Clone, highlight the record in the dashboard and select Clone at the top of the preview panel. Then you can update the weight, the start date and the staff instructions very quickly. Repeated treatment calendar items have links back to the original record and include a clone button.
Click here for help with Prescriptions
Anesthesia
Basic Info
As with the other modules, the first Basic Info screen must be completed and Saved before the remaining tabs are activated. Some things to note are:
- If the Clinician responsible for the anesthesia is not a Staff member you can add them without giving access to ZIMS so they can be selected here.
- The Health Status is a hyperlink that will allow you to view/add/edit/remove the health status history of the patient. This is a required field as the global anesthesia summaries can be filtered by patient health status.
- If a weight has previously been recorded, it will default to the last weight. You can toggle the selection to record new weight if you'd like. This will be selected by default if no weight is recorded historically. Take care to check/uncheck estimate/exclude from reference intervals as appropriate.
- There are three options for recording anesthesia location :
- Enclosure - This has a link to your enclosure detail page .
- External institution - This is populated from the institution list so please be sure to add local institutions if necessary .
- Geolocation - Best for use in the field with available GPS data .
- Undetermined - If you don't know where the event occurred or if the event started in one location and moved to another, Undetermined is your best bet.
Drugs Given
The Drugs Given tab allows you to record details on the drug used as amount, delivery route and method, and its success. Some things to note are:
- In the Delivery Route field, if you enter “i.m.” it will select “intramuscular injection” rapidly. If you enter “im” without the period, the cursor will jump to the top of the list of delivery routes beginning with those letters.
- Most of these fields are global data standards and the choices for Delivery Route is driven by the choice of drug.
- The bottle ID and Lot Number are sourced from your drug inventory and are not mandatory. You can add a new bottle ID via the hyperlink.
- If you need to add more than one drug associated with the drug event, you can select "Done and Repeat". Some of the information will prefill from the last drug entered, but all fields are editable.
- If you are entering a second dose of the same drug, you can copy the row above and just update the time given.
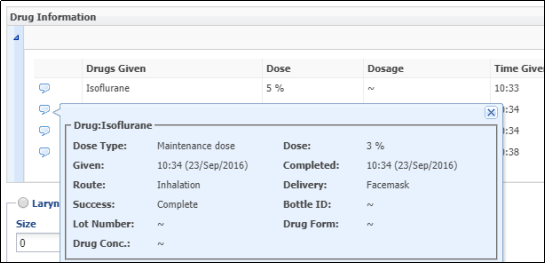
- Once saved, the Drug Information will display in a grid. You can add new drugs via the Add New or the shortcut Alt+A
- When you hover over the balloon it will show additional details on the drug.
Effects and Milestones
Some things to note are:
- The effect of a drug is separated from the drug itself.
- A milestone can only be selected once for each anesthesia event.
- Anesthetic Depth is more dynamic (patient may get light so you turn up inhalant or administer additional drug to get back to working anesthesia, etc.)
- Once entered, Effects and Milestones will display in a grid.
Samples
See the detailed description of the Sample module below. When collected/recorded during an anesthesia event, ZIMS will create a hard link between the sample and the anesthesia. Then in the future we may be able to assess the impact anesthesia has on certain test results.
Physiological Measurements
When collected/recorded during an anesthesia event, ZIMS will create a hard link between the measurement and the anesthesia which is relevant for calculating future global reference data. See the detailed description of the Physiological Measurements module below.
Notes/Comments
Notes/Comments is a free-text field that allows you to capture any additional information not captured elsewhere or provides a field for further explanation of data recorded elsewhere. Note Templates marked as Anesthesia will be accessible from here.
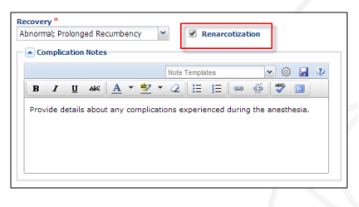
Recovery & Ratings
This screen gathers details on the recovery period as well as on the overall event.
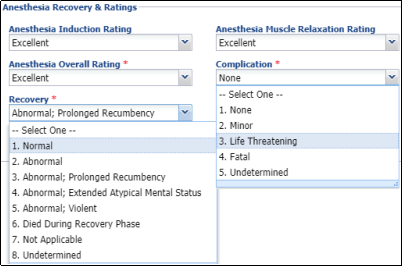
Be sure to check the box in the lower right hand if re-narcotization occurs. You can also add notes directly related to the re-narcotization or other complications (vomiting, apnea, etc.) by explaining in the complications notes box.
Click here for more help with Anesthesia
Physiological Measurements
If you have a single measurement to record, select Add Single Measurement and complete the screen.
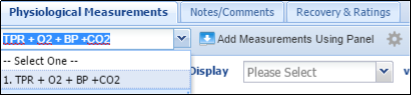
In most cases though, you will have multiple measurements to record. It is recommended that you create and save a panel of the measurements you routinely collect during an exam or anesthesia so they can be loaded with a few clicks and all you need to enter are the numerical values for data collected. Create a panel by clicking the wheel icon to the right of Add Measurements Using Panel. From there, you can create a new panel, edit an existing one, or delete panels. Be sure to include the default unit of measure, default equipment used, and anatomical site so that you have very little editing to do when using your panel. To enter that information just click on the white space below the column heading in each row. Use the far right arrows to arrange the order of the measurements as you desire.
Once the panel is saved, you can select it when you are entering data in the physiological measurements tabs in the other modules. Choose from the list and click on the “Add Measurements Using Panel” button.
Enter the time and the data collected. You are not required to complete all fields when using a panel, only those measurements that you actually take. Use Control + down to quickly move from data row to row without using your mouse. If a measurement is considered questionable for any reason, you may mark to exclude it from norms.
Samples
Collecting a Sample is the first step in the Tests & Results workflow:
- Capture a sample from a patient
- Request a Test
- Enter Test Results when they return
- Review the findings
Tests can only be recorded on valid sample types, so you will likely have to register 2-3 samples for each venipuncture.
Whole blood- for the complete blood count
Serum- for the biochemistry panel and/or serology
Plasma- for the total protein measured in house from the hematocrit tube
**Even if you send a single tube of blood out to an external lab for testing, the lab will process it and aliquot into two sample types upon arrival.
What you select for Sample Type will drive many of the other fields on the screen. For example, if you select Whole Blood you will have fields to record the pre-sampling conditions whereas these fields are not available for Feces samples.
Creating Favorite Samples can help save you time by allowing quick entry of commonly collected samples. To create a Favorite Sample open the sample screen and complete the fields
- Sample type, preservative/additive, collection method will be saved.
- Note: Sample Quality parameters will be saved, remember to edit when appropriate.
- Select the star icon to Save as Favorite Sample and provide a unique name.
- Your saved Favorites will list in the drop down menu next to Favorite Samples.
- To use the saved favorites: select desired sample from drop down list.
Once the Sample Details are saved, a Calendar Task tab becomes active to help you schedule further Sample collections.
Click here for more help with Samples
Tests & Results
Setting up new Laboratories
Some laboratories are already included in the global institution list. However, if there is one you use that is not on the list your Local Admin can create it as a local institution. It is recommended to check with Species360 before adding in case it is on the list and you just aren’t finding it. The institution Category is “Other” and the institution Type is “Laboratory”.
Requesting Tests
Tests can only be requested for valid Sample types (for example you cannot request a complete blood cell count on a serum sample, it is only valid on a whole blood sample). When an animal is in focus the first screen that opens will display any Recent Samples that you have collected from it. If you have not yet recorded collecting the Sample, you can use the Add New Sample option at the bottom of the screen. Highlight the desired Sample and Select & Continue. There is also a Sample Search tab if you have many recent samples.
If you select an External Laboratory the name must be provided. You will save time if you set your most commonly used lab as the default. Even if you more commonly run panels in house, you can switch to “My Institution” with just one click, vs switching and then having to search for the lab name.
The Sample Info will display but is not editable. The Sample Quality, however, is editable as that may have changed since the sample was collected. If you are requesting one or two tests you can use the Add New Test option. If you know the name of the test you can start typing it until it is recognized. Or, you can use the look up to search by Test Category, Test Abbreviation or Result Type. When you request a test in ZIMS, the type of sample is critical. Test names and methods can be very specific and can make a big difference to the global medical resources database; choose your tests carefully. For example: pH (arterial.blood gas analyzer.automated) versus pH (venous.blood gas analyzer.automated). Reminder to consider the type ahead search tip when entering test name. “Pro cli” will efficiently produce a shorter list to help you select “Progesterone (chemiluminescence immunoassay)”.
Another example is you send a serum sample out for vitamin D analysis and when the result comes back you go to add the result and you find 3 possible tests in ZIMS:
25-hydroxycholecalciferol (radioimmunoassay)
25-hydroxycholecalciferol (high precision liquid chromatography)
25-hydroxycholecalciferol (chemiluminescence immunoassay)
Which test do you select? All are measuring the same substance, but use different methodology and will give different results for the same sample. If we want global reference intervals to improve, you must enter your results under the correct test / correct methodology. You may need to call that lab to get the answer about which methodology they use. If you just pick a test at random and enter the results, you degrade any future reference intervals for that test - methodology does make a difference to the reference intervals, but that information gets lost when all the methodologies are mixed together.
Test Panels
Test Panels are used to assist with data entry only; they are not saved as part of the system records. ZIMS medical module has many Global Test Panels already created to select from. Panels are for a specified laboratory and if you are sending a sample to labY, you do not see panels from labX. The Test Panels will not appear in the dropdown list until an External Laboratory or My Institution has been selected. The Test Panels are restricted by sample type, you will not see a urinalysis panel if you are requesting a test for a serum sample. Tests are in same order on the data entry screen as on the printed laboratory report tospeed data entry. Use Control + down arrow to rapidly skip to next test result field
In addition, you can create your own Local Test Panels to save you data entry time. These can be created for External Laboratories such as Idexx, Antech, Michigan State and Cornell. They can also be created for panels done in your institution’s laboratory such as for manual complete blood cell counts, parasitology and urinalysis.
To create a Local Test Panel select the Manage Favorite Test Panel icon:
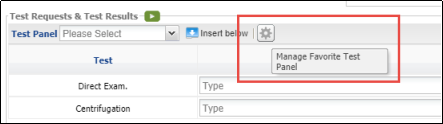
Complete the fields. The Valid Sample Types is a multiple select drop down list so you can select more than one Sample Type. Add the desired tests and use the Move Up and Move Down arrows to arrange the order of the test items. Make sure to include the unit of measure in the report, to do this click on the white space to the right of the test name. Once saved, this panel will appear in the Manage Panels list with a Local house icon.
Test Results & Findings
To record the Test Results, open the Test & Result screen where you recorded the tests requested and record your results. The Expected Results column displays the Global Reference Intervals if there is a value available in the database for the taxonomy in context. It includes the minimum and maximum expected result, the Mean value for the population, Median value, N- the number of unique test results included in the analysis and Animals- the number of individual animals contributing results. The Expected Results hyperlink takes you to the global resource > Expected Test Results (Best available match for each test is determined by sex, restraint, and sample type of the animal. For more expected result data, please search the full resource).

If you hover-over the question mark it will display sex, restraint method, sample type and age class for that Global RI. Please note that the reference interval is specific to each test and represents the best match for the animal in context. This means that comparing individuals of the same taxa may result in slightly different reference intervals, as the calculations are tailored
to each patient.

If a value is out of range, the Evaluation will be in Red Text to draw attention to the potentially abnormal value.

If a result does not have a global expected result as defined by the Test Dictionary, the Expected Result displays “Not Calculated”.

If a numeric test does not have an RI calculation because there are not enough values in the database to meet criteria to calculate a global basic statistic, the Expected results display "Insufficient data".

If a test does not have a RI data set available ZIMS will provide Basic Statistic: We do not have enough results to estimate the central 95% of the population results (a valid RI), but we have at least 15 values, so it displays the mean and median values.

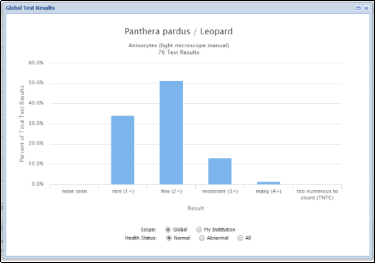
For tests that use a data standard to record results it is not possible to calculate Expected Results. Instead, global and/or institutional values for that test, species & sample type combination are included as a histogram.

Click on the View Global Results link to view the histogram. Select Scope & Health Status for additional filtering of results.
You also have the options to exclude the results from the Global data (please read the disclaimer if you select this), add Clinical Findings and mark the Test Result as Reviewed.
For additional help:
Recording Tests and Results
Necropsy/Biopsy
The Necropsy/Biopsy module is a complex record (case folder) that includes text records (e.g., gross necropsy report), diagnosis records, sample records (tissues collected), test & result records (e.g., cultures, PCR, immunochemistry), and measurement records (e.g., organ weights and lengths). To reduce data entry, ZIMS inserts default values on almost every tab; if you do not save that tab, those defaults are discarded; unsaved default values are not distinguished in any way
The Submission tab gathers general information about the death such as Death Date, Manner of Death, Location and Notes. If a Death has been recorded in the Husbandry module, Death Date and Manner of Death will be prefilled. If a death has not yet been recorded in the Husbandry module, once this tab is Saved an Incomplete Disposition will be created in the Husbandry module.
Case Info tab
This tab collects information relevant to the case such as Pathology Case Number and Responsible Pathologist. The Case Number can be numbered automatically (using Medical Preferences), manually numbered or a mixture of the two. The Responsible Pathologist can be edited at a later date. The Animal Information section allows you to confirm that the carcass matches the husbandry records. In addition, there is a field to record Necropsy Case Info for Husbandry Staff and what is recorded here will display in the Notes section of the Husbandry module. This is an easy way to get notes back to the Husbandry staff.
The Parties to get copy of final report is simply a list. Copies still have to be sent manually but this may help you make sure you don’t miss anyone.
Death Numbers are optional identifier with no universal definition; they mean different things to different users. At some institutions it is not used at all. At others the death number equals the case number. At some institutions the death number assigned sequentially by the Registrar and the case number is assigned by the Pathologist. Group may have multiple death numbers and the Pathologist sees the last 30 days of death number entries in the grid.
In the upper right hand corner are three buttons:
- Cleanup Medical Records button allows you to quickly resolve active problems, terminate active prescriptions, edit calendar items, health status and body condition score for this individual.
- View medical summary button shows “high level” view of last 12 months of medical records
- See medical records button closes the pathology record and returns user to medical records with the pathology record animal in focus so that the entire medical history can be viewed at any level of detail
Gross Necropsy tab
The Gross Necropsy tab captures the initial finding of the necropsy set as the Necropsy Date, the Carcass Condition (a data standard) and the Necropsy Location. The Necropsy Prosector is the person in charge of the necropsy and responsible for producing the necropsy report. Additional Staff captures those staff members that participated in necropsy and is multiple select. This can be useful when the elephant comes back positive for M. tuberculosis and you want to know which staff should be screened and monitored.
The Necropsy Report/Description is a good place to use Note Templates. You can quickly load a blank Fish necropsy form, Bird necropsy form, etc. This section has the voice to text feature; with Bluetooth wireless microphone and computer in necropsy room, you can dictate the necropsy report as you perform the necropsy and just edit the text report later (no transcribing from paper notes with bloody glove prints).
The Gross/Preliminary Diagnosis allows you to record standardized and non-standardized options.
Samples and Tests tab
The Samples and Tests tab was designed for fresh tissue samples being tested. Add Sample button allows you to add a single tissue or other sample (e.g., urine) to the list of samples. The Use Sample Template is designed to allow you to quickly add multiple tissues into the sample list. Under this tab you can also request a test for the samples that you added. The View/Edit Selected button is used to enter or edit results for the selected sample. The View/Edit All Tests shows the entire list of tests and samples so that test results can be entered all at once.
Measurements tab
This tab allows you to capture external body morphometric measurements as defined in the Husbandry module and internal organ weights and measurements. For organ measurements be specific (left kidney, right kidney, or both).
Histopathology tab
The tab gathers information on the tissue processing such as Trim Date, Submission and Completion Date and the Laboratory used if performed outside your institution. It also gathers information on the Histopathologist. There is a free text field for the final report.
In the Diagnosis section you can select standardized and non-standardized Diagnosis terms.6
There are three levels of importance for pathology diagnoses:
- Incidental - a necropsy finding that played no role in the death of the animal (e.g., kidney stones in an animal that died of pneumonia)
- Significant contributor to death - a necropsy finding that was significant or important or critical to the death of the animal (‘cause of death’); not limited to a single ‘significant’ diagnosis
- All other diagnoses - not marked incidental and not marked significant
There are three data entry options for a diagnosis:
- Diagnosis is a free text field with no standardization of terms. You can enter or paste the text to save time. Because this is not standardized information it is of no value to the global community. It is also of reduced value to the institution because of the lessened ability to search due to inconsistencies in the data (e.g., spelling errors, using two terms that have the same meaning in different diagnoses, or using abbreviations).
- Standardized Diagnosis are all terms validated against the medical terms dictionary. It is slower data entry as you build a diagnosis one term at a time. However, the results are standardized globally and the end result is more consistent local records
- The Hybrid method uses the Generate Standardized Terms button. You enter (or paste from report) the full diagnosis text, separating concepts by commas (many pathologists do this anyway). Click on the Generate Standardized Terms button. The system will parse the text into concepts, attempt to match to terms in the dictionary and display the results. Green highlighted terms are exact matches and yellow highlighted terms are close matches. Check the terms you want in the standardized diagnosis and click Select.
If you have several Diagnoses the default order is the order of data entry. You can place them in the order you want by using the Up/Down arrows.
At the bottom you can attach images.
Images tab
This tab allows you to view all case images in one location. You can record how many Radiograph, Necropsy and Histopathology images are stored offline. You can also view any Histopathology or Necropsy images that have been attached to those tabs.
Finalize tab
This last tab allows you to close the case. The Preview button in the upper left shows you the complete pathology record as it will appear in the final report. The Sign Off button closes the case and locks the record to prevent further changes.
If Relevant Death Info or Primary Body System Affected have been recorded in the Husbandry record that information will default here but it can be edited and any edits will be reflected in the Husbandry module. All diagnoses not already flagged as incidental are shown in a grid with checkboxes; the most significant/important to the death of the animal can be marked. The Final Summary captures your final comments and interpretation of the case. The Necropsy Case Info for Husbandry Staff is optional and is the same note that is visible on Case Info tab. This gives you another chance to provide necropsy information back to the husbandry staff.
Once a case is closed, all the information is protected from changes, but users can write and save an addendum to the case. Closed cases can be reopened for editing, but the Audit Trail will automatically record the user that reopened the case and the date and time.
Click here for more help with Pathology
Revised 5 March 2025
It is the mission of Species360 to facilitate international collaboration in the collection and sharing of information on animals and their environments for zoos, aquariums and related organizations.
www.Species360.org – Global Information Serving Conservation