


Studbook Labels
Labels can be applied to studbook animals to allow users to group their animals into categories. Multiple labels can be applied to one animal, and multiple animals can have the same label applied.
Labels must be activated for your studbook via ‘role control’ – permissions for these roles are set by the regional association/hosting institution for the studbook.
Topics
Overview
Create, Apply and Remove a Label
Creating, Applying and Removing Labels for Multiple Animals
Viewing Active Labels
Filtering & Reporting
Label Management Tool
Example for Using Labels
Label Overview
Labels are tags or keywords that users can assign to animals to indicate that they possess certain characteristics or criteria. Labels allow you to classify animals more flexibly and informally than User Defined Fields (UDFs). Labels are an easier way to quickly tag an animal with a specific value. For example, I may want to label all animals that should be excluded from breeding or label all animals that should be released. Animals can have many labels and those labels can be added or removed quickly. Labels are per studbook, not per user.
Currently, many users are tracking information about individual animal outside of the studbook and this information is lost from year to year or when the studbook keeper transitions. Users will save a lot of time having these types of labels available within the studbook. In addition, we have had many users ask for specific labels/groupings to be added to the studbook (ex. surplus, managed vs. non-managed, pending transfers, etc.) – but, not all users will need these if we added them for everyone. These needs can now be addressed by using these quick label filters.
When creating and applying labels, just like with UDFs and other studbook-specific conventions, we recommend you clearly document the intended use of your labels.
Back to Topics
Creating, Applying and Removing Labels
Labels for individual records are created from the Studbook animal’s record – if your role permits you to manage labels, you will see this option between the basic information at the top of the studbooks record and the Transactions grid. Clicking on the ‘paper and pen’ icon, you will see the Labels editor is activated:
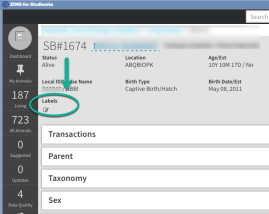
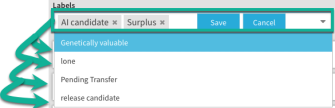
Adding a Label is as easy as typing the word, phrase, or number combination into the editor and hitting “Enter” or by adding a “,” at the end of you desired label name. Once you validate the label, a grey box with an “X” will be presented in the editor window.
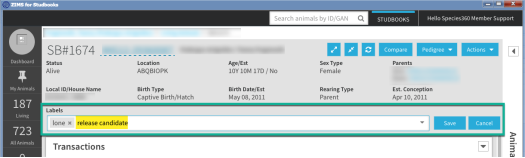
You must save the Labels to your studbooks before proceeding.
As you begin to type into the editor, any previously saved Labels will be presented to you.
To remove a label, click the X on the label you wish to remove.
Back to Topics
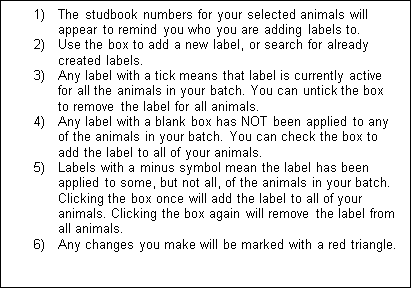
Creating, Applying and Removing Labels for Multiple Animals
You can create and apply labels to multiple animals at once from the Living and All Animals lists.
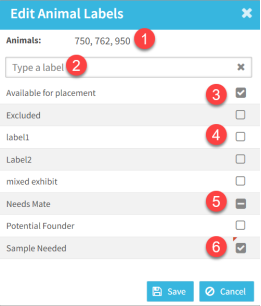
Check the box next to the animals you want to add labels to (1) (if helpful, use the list filters to narrow down your list of animals). Once you have your animals selected, click the Actions button (2) then select Edit Labels for Selected Animals (3).
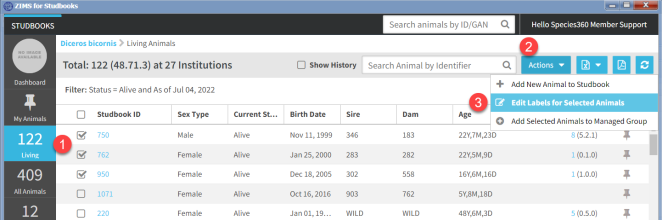
In the pop-up box, you can add and edit the labels for your selected animals.
Back to Topics
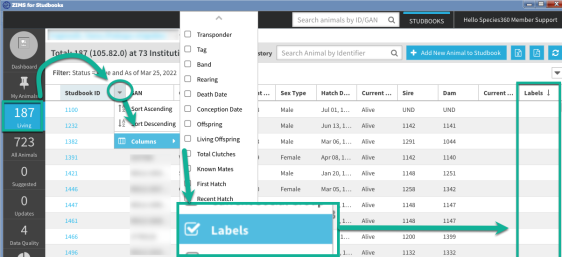
Viewing Currently Active Labels
To view individual labels, you will open your animal lists and make sure the additional column for “labels” has been activated:
Back to Topics
Filtering and Reporting Options
Labels can be applied as a filter from the following lists and tools:
- All Animals, Living animals, data quality, pending updates
- Census report
- Institutional holdings
- Age structure
- PMx export

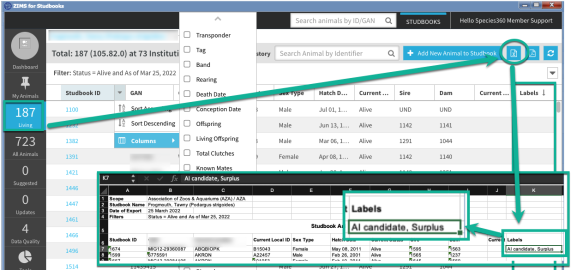
Currently you have the ability to export animal lists with the labels added
via column customization
as a comma separate list:
Back to Topics
Label Management
You can edit and delete your labels using the Label Management tool. The Label Management tool is located in the Tools menu.

- Tools Label Management to open the Label Management menu. This displays all of your current labels
- The number of animals with each label assigned is listed. Additionally, the number of Managed Groups assigned is listed.
- Clicking the number of animals will display the animal list with a filter applied corresponding the label name assigned.
-
Editing or deleting an existing labels will immediately remove the label from the assigned animals and groups.
Recommended, before editing/deleting an assigned label, export the list of assigned animals/groups in case you need to recreate the assignment. - You can export lists to Excel of PDF.
Label assignments are still managed through studbook records, group management and animal lists.
Back to Topics
Example Labels
- Exclusions – animals that are excluded from the breeding population. Users could also create a new label for exclusions each year to keep track of which animals are excluded over time (Excluded 2020, Excluded 2021, etc.)
- Reason for exclusion from breeding population
- Pedigree investigation needed
- Animals in need of placement
- Animals in need of mate
- Animals available for placement
- Release candidate
- Animals with behavioral considerations
- Animals pending transfer
- Track mates (Mate of SB ID)
- Genetically valuable
- Potential founders
-
Studbooks with multiple users entering data could label animals to communicate to the other editors.
- Example: Label animals by region so the regional representative knows to update that animal, label “needs review” for animals that need to be reviewed by other editors, etc.
- Animals that need genetic testing or have had genetic testing completed
- Sample collection needed
- Animals used in education programs
- AI candidates / animals born through AI, etc.
- Outside of managed program
- Surplus
- Ownership
- Color morphs
- Medical considerations
- Aggressive animals
- Indicate which animals are the alphas within a group
- Hybrid, generic, unknown taxonomy
Back to Topics
Revised 5 March 2025