


RECORDING ANIMAL ENCLOSURE MOVES
As animals/groups move around in your facility from enclosure to enclosure or tank to tank you can record these moves and locations using the Enclosure grid in the Details tab of the animal/group
record. The three topics covered are:
Recording Current and Historic Enclosure moves
Recording Enclosure moves when Allow Multiple Enclosure Assignments is activated
Batch Enclosure Moves
Recording Current and Historic Enclosure Moves
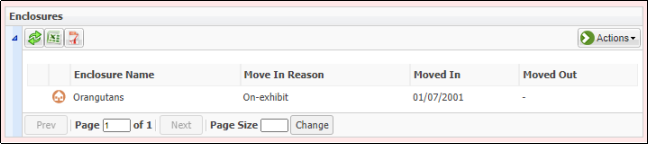
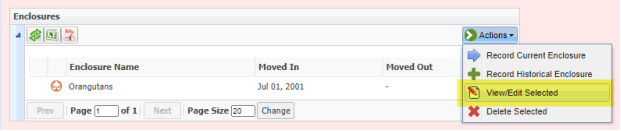
Below we have an animal that is recorded as residing in the Orangutan Enclosure. He is still there as there is no Move Out Date:
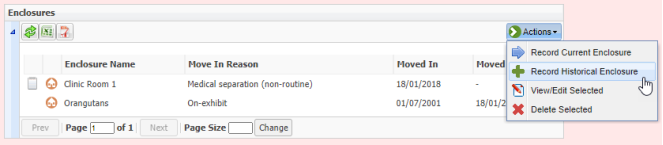
On 5 January 2018 he needs minor dental surgery and will be held in the Clinic for several days for observations. From the Actions menu select Record Current Enclosure. This selection is to record a move from the most recent enclosure the animal is occupying. ZIMS will automatically record a Move Out date on that enclosure once the move is saved.


1)The Move Time is not mandatory but you will need it if you are recording more than one move on the same day.
2)The Destination Enclosure is where you are moving the animal in to and is a type ahead drop down list sourced from your Enclosure Tree.
3)The Transfer Reason is a multiple select data standard to select from. This is the reason you are moving the animal INTO the Enclosure, not why you are moving the animal OUT OF its current Enclosure.
4)You can add additional information not captured in the Details box.
Once you Save, the grid displays the move, Move In Reason, and an automatic Move Out date has also been recorded. If you selected multiple Move In Reasons and they don’t all fit in the display you can use the hover over feature to see all of them. The hover over feature also works on the Note icon  to see any details added, these can also be viewed in the notes and observations tab.
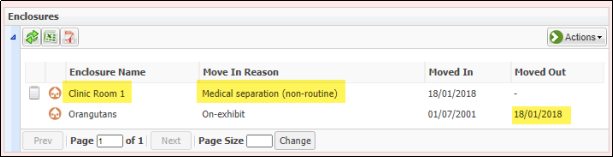
We now want to record that the orangutan was held in quarantine for 60 days after he arrived. For this scenario we would select Record Historical Enclosure as it is not a move out of the current Enclosure he is occupying.
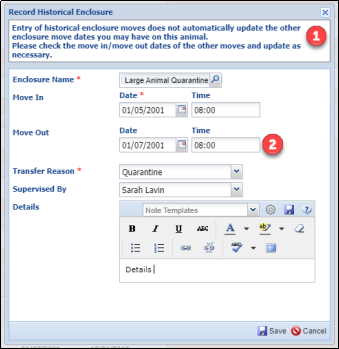
1)Note that an Historical Move will not automatically update other enclosure records like the Current Enclosure Move did.
2)You can also record Move Out date which was not available in Current Enclosure.
NOTE: If you are recording Historical Enclosure moves that impact the dates for other moves, you may need to adjust those dates as appropriate.
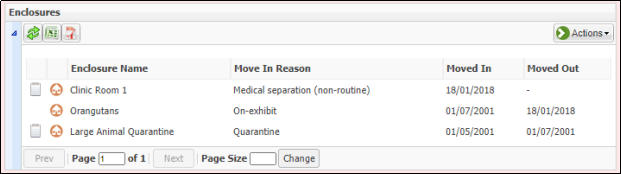
The animal now has a complete enclosure history:
Recording Enclosure Moves when Allow Multiple Enclosure Assignments is Activated
Allow Multiple Enclosure Assignments lets you put an animal/group in to more than one Enclosure at the same time. To turn on this functionality go to Institution > Institution Preferences > Enclosure Preferences > check Allow Multiple Enclosure Assignment. If this is allowed, ZIMS will not calculate move out dates and you must do them manually.
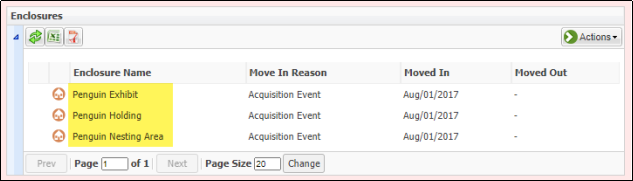
Here our penguin has access to the Penguin Exhibit, the Penguin Holding Area and the Penguin Nesting Area:
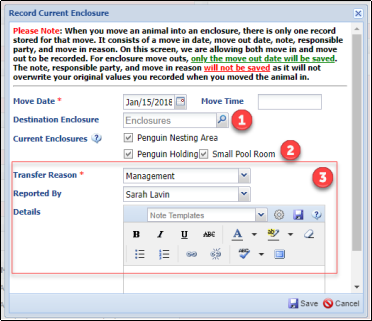
The Penguin Exhibit will be undergoing renovation so the bird was locked out of it on January 6, 2018. It will have access only to Penguin Holding and Penguin Nesting Area. Record a Current Enclosure Move.
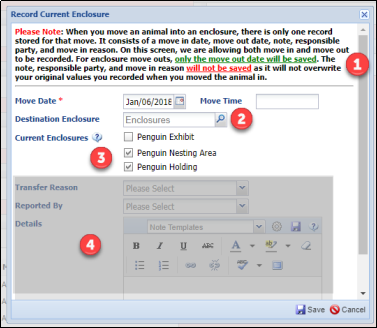
1)Read the Note to understand how the functionality works if you are recording ONLY a Move Out Date which is our example.
2)Do not record a Destination Enclosure.
3)Uncheck Penguin Exhibit.
4)Because you recorded a Move Out only and not a Move Into another enclosure, the lower part of the screen is greyed out.
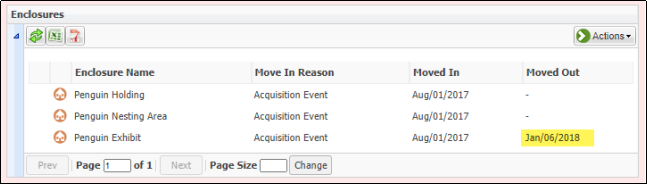
You can see that the penguin was moved out of the exhibit on 6 January, 2018:
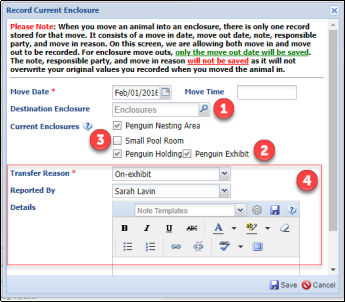
Because the penguins are getting agitated in the smaller areas you allow them access to a room with a small pool. Select Record Current Enclosure Move:
1)Record the Destination Enclosure
2)As soon as it is selected from the enclosure drop down list it will display under Current Enclosures.
3)Because you have added a Destination Enclosure (a Move In) the bottom part of the screen is activated, so you can add transfer reason, reported by and details.
The grid now displays the three enclosures with access for the penguin, and the Move In date and reason for the new enclosure:

The Exhibit is now renovated and the penguin is given access to it. However access to the Small Pool Room is now removed, Record current enclosure:
1)Select Penguin Exhibit as the Destination Enclosure
2)It will automatically become a Current Enclosure
3)Uncheck Small Pool Room
4) Because you have added a Destination Enclosure (a Move In) the bottom part of the screen is activated, so you can add transfer reason, reported by and details.

Batch Enclosure Moves
To save you time you can make batch animal enclosure moves. These can be done from an Animal List:
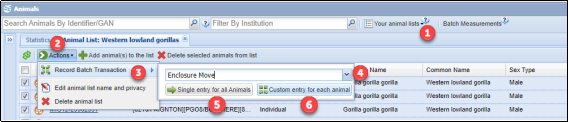
1)Select the desired animal list.
2)Select Actions.
3)Select Record Batch Transaction.
4)Select Enclosure Move from the drop down field.
5) Select ‘Single entry for all animals’ if everything about the enclosure move is the same for each animal.
OR
6) Select ‘Custom entry for each animal’ if some details differ for each of the enclosure moves (i.e different reasons for moving, different date of move etc.)
Then complete the move screen and Save. The enclosure move will be entered into all of the selected records.
This can also be selected from the animal search grid after populating your search results:

1) Select the relevant animals and then Click ‘Actions for Selected animals’
2) Select ‘Make a simple batch action (for selected animals)’
When the Simple Batch Action pop up opens:
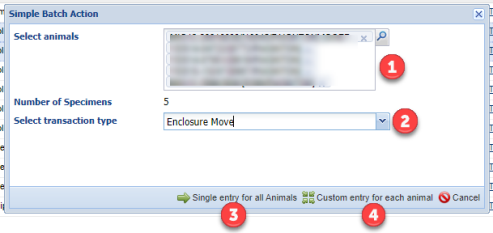
1) This field will automatically populate from the previously selected animals.
2) Select ‘Enclosure move’ from the dropdown list
3) Select ‘Single entry for all animals’ if everything about the enclosure move is the same for each animal.
OR
4) Select ‘Custom entry for each animal’ if some details differ for each of the enclosure moves (i.e different reasons for moving, different date of move etc.)
Then complete the move screen and Save. The enclosure move will be entered into all of the selected records.
Editing batch enclosure moves
To edit an enclosure move, go to the animals record > Enclosures > Actions > View/edit selected.
If your institution allows for Multiple Enclosure assignments, then editing an enclosure move that was part of a batch will only edit that single enclosure move and not the whole batch.
If your institution only allows for Single Enclosure assignments, when editing an enclosure move that was part of a batch you will be met with a pop up that will ask you to specify whether you are editing the entire batch or only this enclosure move.

If you select ‘Entire batch’ the changes will be applied to all animals included within the batch move.
If you select ‘Only this enclosure move’ another pop-up will open to alert you that this enclosure move will be excluded from any future batch edits.

Note:
If an enclosure move is carried out on a single animal after a batch enclosure move, this animal will no longer be included in the batch, and it’s previous batch move will need to be edited independently.
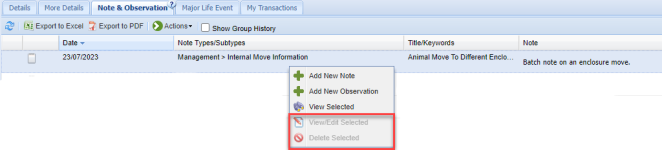
If any notes were recorded in the Details field when carrying out a batch Enclosure move then it is not possible to edit these later through the notes and observations page, this must be done through the enclosure tab. Note that the ‘View/Edit selected’ and ‘Delete Selected’ options are greyed out to prevent this.
Revised 5 March 2025
It is the mission of Species360 to facilitate international collaboration in the collection and sharing of information on animals and their environments for zoos, aquariums and related organizations.
www.Species360.org – Global Information Serving Conservation