


Managing Transponders
Transponder Inventory and Assigning/Implementing Transponders in ZIMS.
There are three categories of identifiers in ZIMS – physical and logic identifiers and transponders. The difference is that transponders are managed as a separate inventory list in the My Institution module and the permissions to add/edit/remove transponders are assigned from the Institution module and not from the Animals module as other Identifiers are. Note: You cannot create/assign transponders when logged in as a Provisional Data Entry user.
Permissions for Transponders are located under the
Institution Module selector in the role set up
:
![]()
Adding a Transponder
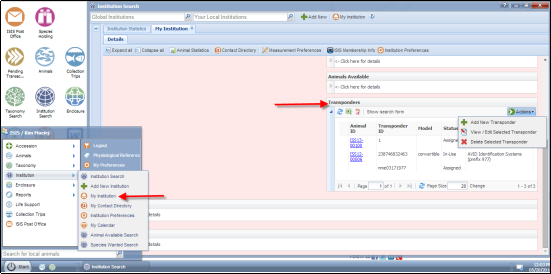
To add a transponder, go to Institution > My Institution > Transponders > Actions > Add New.
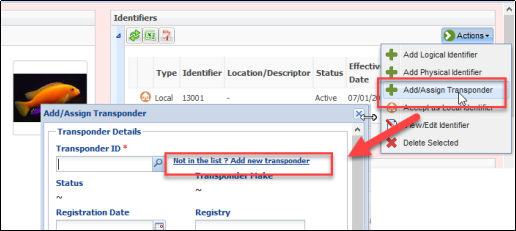
Alternately, from within an animal record, when you have permissions to add to the inventory, you will see the option under the Add/Assign Transponder>Not In List? Add New Transponder.
![]()
In the Add New Transponder box the only mandatory fields are the Transponder ID and the Status.
The Statuses available are:
- Assigned – reserved for use in a specified animal but not yet implemented
- Available – available for use
- Damaged – damaged and not readable in some way
- In-Use – implemented in an animal
- Lost – could not be found and believed to have been lost
- Not located – could not be found but believed to remain in animal, possibly migrated
Generally, when adding a new Transponder from the My Institution grid, the Status should be Available, meaning it is available to be assigned or implemented. When adding from within the record, the Status will probably be Assigned or In-Use.
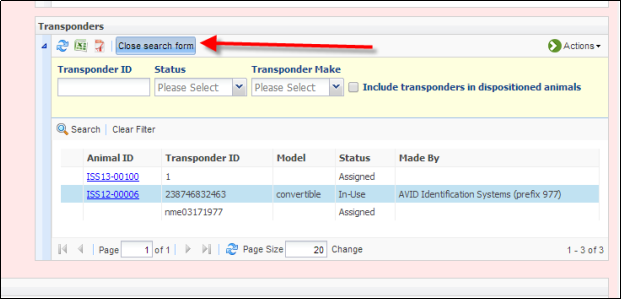
You can search for specific transponders by ID, Status and Make by using the search form. You can also export your transponder inventory to excel and pdf documents in the same toolbar.
Updating Transponder Status
These actions are best done from within the animal record. An exception could be if available transponders were somehow lost or damaged without ever being associated with an animal, but this would be rare.
For our first scenario we will Assign a transponder to an animal. This is often used when a permit requires a transponder being noted but you do not want to actually implement it until the exit exam because it would require anesthesia to implement. From the animal record go to Identifiers > Actions >
Add/Assign Transponder.
![]()
1.Record the Transponder ID. You will be able to save only transponders with a Status of Available. As soon as you select a transponder the Status will display so you know if you can move forward. If the transponder has not yet been recorded you can add it to the inventory from this screen.
2.If your region requires transponders to be registered, record that information.
3.Check boxes as appropriate.
4.Check Assignment Information and record the date. Once saved, the transponder will now display as Assigned in the record and in the My Institution transponder grid.
We now want to put the transponder into the animal (implement it). From the animal record select to edit the record.
![]()
1.Check Implementation Information and record the date. Implemented By is optional.
2.Although the On-animal Location and Descriptors are optional, if you don’t know where to look you will probably not find the transponder! Once saved, the transponder will now appear as In-Use in the record and the My Institution transponder grid.
The transponder is causing irritation and we want to remove it. Select to edit the transponder.
![]()
1.Select Unassociate and record the date.
2.Select the reason from the dropdown. Once saved, the transponder will now display as Removed in the record and in the My Institution transponder grid.
IMPORTANT NOTE: If you delete a transponder ID from an animal record, you will still need to go into your transponder grid in My Institution to fully delete it, or mark it as available if it was recorded as Assigned or Implemented by mistake. You cannot delete a transponder from the inventory if it is Assigned or Implemented in a record
Revised 5 March 2025
It is the mission of Species360 to facilitate international collaboration in the collection and sharing of information on animals and their environments for zoos, aquariums and related organizations.
www.Species360.org – Global Information Serving Conservation