


Tests and Results
Tracking requested tests and logging results
Contact Species360 Support
In ZIMS for Medical, there is a 4 step workflow covering sample collection, testing and results review permitting you to:
1)
capture a sample from a patient
2)
send sample for a test
3)
test panel set up and recording the results when they return
4)
review the findings
Recording Clinical Findings & Diagnosis from Results
Additional:
Recording Sensitivity Results for Culture Results
Note, in Tests & Results you are provided a comprehensive list of available tests to choose from via the test dictionary . To request a test be added to the Global Test Dictionary, you may fill out the Global Test Request form found in the ZIMS Help Menu and submit it to Support@Species360.org
This document covers the second, third and fourth steps of this workflow- these steps are managed in the "tests and results" portion of ZIMS for medical. The first step,
Sample Recording
can be recorded directly for the animal/group record or can be recorded as a part of an Anesthesia Event.
Request Tests

There are two ways to request tests on your samples.
1. From within the animal medical record.
Select Samples from the left side Dashboard, highlight the appropriate Sample on the main screen and select Request Test:
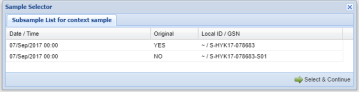
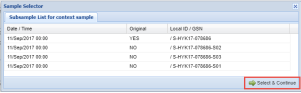
If Subsamples have been created from the original Sample, the grid will display them. Highlight the appropriate Sample and then click Select & Continue.
This will take you to the Test Request screen.
2. Start from the Dashboard.
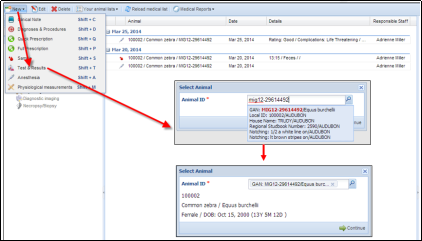
Select New then Tests & Results. The application will ask you to select the animal. Once selected some details will appear to confirm you have the correct animal.
When you select Continue, a list of recently recorded samples will appear. If one of these is the correct sample highlight it and choose Select & Continue.
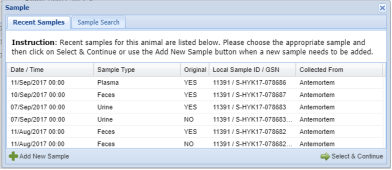
If the appropriate sample does not appear in the list you can select the Sample Search tab.
Checking the Available Samples/Subsamples Only box will filter out any Samples whose status is Consumed, Discarded or Lost. You can also Add New Sample from either tab.
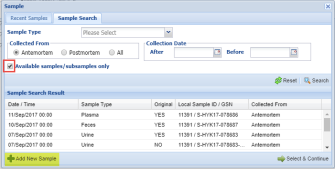
Highlighting the sample and Choosing Select & Continue or adding a new sample will take you to the Test Request screen
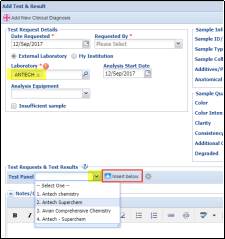
If External Laboratory is checked there is a field to record what laboratory it was. This is sourced from the Institution List so if there is a lab you commonly use that is not on the list you may need to add it to your Local Institution list .
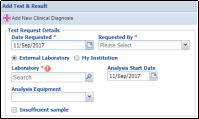
If the sample is too small to actually test, check the Insufficient Sample box.
If My Institution is checked there is a field to record who did the analysis. This list is sourced from your Staff list.
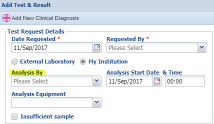
The Analysis Equipment is not mandatory and is a cascading dropdown. You can select at any level in the list.
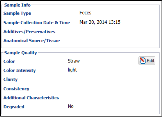
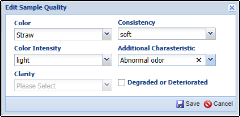
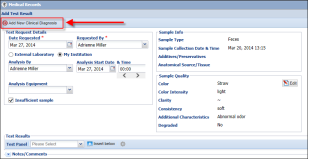
The Sample Info is not editable and is only for your information. However, since the Sample Quality may have altered since the collection that data is editable and will update the record if changed.
You may see tests by the same name but with an [a],[m] or a [c] beside the test name, the definitions for these terms are as follows:
[a] automated - A machine is providing the results
[m] manual - A technician or physician has manually counted the results
[c] calculated - ZIMS Is calculating a value based on a formula using the results of other entered tests
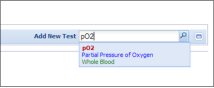
To add a new test you can type into the Add New Test field if you know the name of the test you want performed. This is a Type Ahead lookup field so ZIMS will present possible matches as you type.
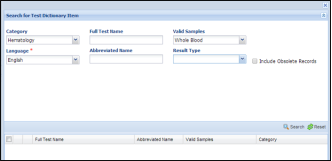
Or you can use the magnifying glass to perform a Search to lookup the test by entering the category and asking for Valid Samples.
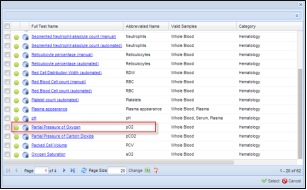
You can then select it from the results grid.
You can continue adding new tests until you have all that are desired.
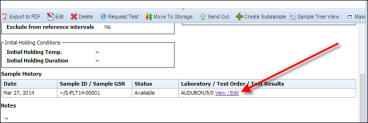
Selecting the View/Edit hyperlink will take you back to the Test screen where you can add more Tests, remove a Test, or add Test Results.
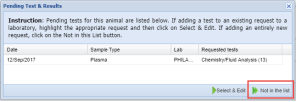
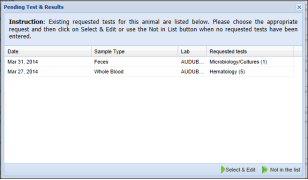
Another way to edit the original Test Request is to select Request Test again. Samples with existing tests will be listed and you can select and edit. If the sample is not on the list, for example a Subsample you have not yet created, then select Not in the List and it will take you to the screen to add it.
The grid will display all samples and you can highlight the correct Sample and choose Select & Continue.
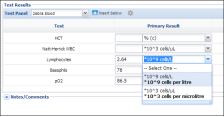
Manage Test Panels and Enter Results
In ZIMS, you are able to manage a list of the typical tests that are available from a specified laboratory. These are called Test Panels and you are able to create a list of a series of tests to be applied to a sample. When applied to your sample, these rows of tests are presented in the order/format that is provided by your laboratory results making data entry quicker and easier. In addition to the test panels, you can quickly proceed through these rows of data entry using tab down keyboard shortcuts.
The tests you have recorded for your Panel will display in the order that you arranged them in the Test Panel you created.
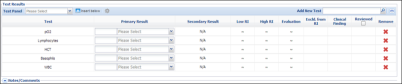
Now record the test results. If the default Unit of Measure is not what you desire it to be you can use the dropdown selections to select the appropriate unit.
There is a keyboard shortcut to make data entry easier in these lab results screens.
Tab-Down for easy data entry, keyboard shortcut
.
If a bacterial culture test yields a bacterial name, the Secondary Results column becomes active and you can indicate the measure of growth obtained

When you select to create new tests, if there are any existing requests for tests that have not been reviewed you will receive a list of them. Choosing Select & Edit will take you into the test screen to edit or review. If it is a new test you want to record, then select Not in the List and add the new test.
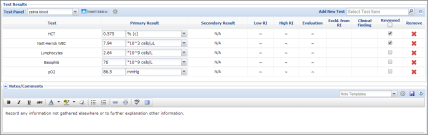
If you do not intend to fill in data for a specific test in a panel being used, remove the record row. Failing to do so will leave this record 'stuck' in the 3 step of the workflow until a valid result is entered or the test type row is removed:

Reviewing Results
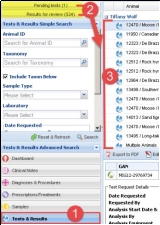
1) From the ZIMS Medical dashboard, to review the tests & results that are pending results or awaiting approval, select the Tests & Results Search in the left hand Dashboard.
2) You have two prefilled search filter options: 'Pending Tests' and a 'Results for Review'.
3) Both of these filters will reflow the main dashboard results window (middle pane) presenting items that are either awaiting results entry or for those with all entry rows fulfilled, awaiting the reviewed column check boxes to be filled.
When you have recorded test results and reviewed them remember to check the Reviewed box.

Once all rows have both been filled with test results and the check box for "reviewed" has been checked, the 4 step workflow is complete. Once this review has been completed, the test will no longer display in the Pending Tests & Results filter (see below) but will remain as a part of the Tests and Results record type for future reference.
Recording Clinical Findings & Diagnosis from Results
When recording test results, some will produce an evaluation depending on the test result and expected results for the species.
If the evaluation is low or high, the Clinical Finding checkbox will become active.
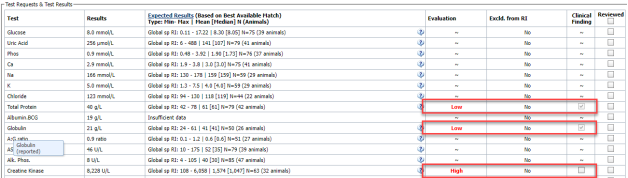
Clicking the clinical finding checkbox will auto-create a diagnosis for that test result in the animals records:

You can open the diagnosis to add more related diagnosis.

If you want to remove the diagnosis, you can highlight the diagnosis and click Delete on the Medical Dashboard, or uncheck the Clinical Finding checkbox.
Note, if you delete the diagnosis from the dashboard, the checkbox will remain checked, you will still need to uncheck the box if no longer applicable.
You can also add a new Clinical Diagnosis directly from the Tests & Results screen. Clinical Diagnosis is covered here .
Recording Sensitivity Information for Culture Results:
Microbiology or culture results often include additional information about the antimicrobial drugs that might be effective treating the organism isolated by the laboratory. If you decide to enter this drug sensitivity data into ZIMS, it should be placed in the comments section of the Test & Results record. Here are hints to make it easier and faster to get this information into ZIMS.
- Copy/paste: If your results are provided on a web page (example: the VetConnectPlus website) a copy/paste of the sensitivity results from that web page is likely to be the easiest solution and will often maintain the text format provided by the laboratory. A copy/paste from a pdf or an email laboratory report is less likely to maintain the format seen in the report and manual entry of the information using a ZIMS template may be needed to make the information easy to read.
- Templates: Use a template to make it easier to manually enter sensitivity results from the laboratory report. Create Test and Result templates that list all the drugs used by the laboratory when testing an organism, then paste that blank template into the comments and add the missing data. Typically a table will provide the easiest format for data entry. An example template could be:
|
Sensitivity Results |
||||
|
Antibiotic |
Isolate #1 (S;I;R) |
Isolate #1 (MIC) |
Isolate #2 (S;I;R) |
Isolate #2 (MIC) |
|
Amoxicillin |
|
|
|
|
|
Amoxicillin-Clavulanic Acid |
|
|
|
|
|
Cephalexin |
|
|
|
|
|
Cefovecin |
|
|
|
|
|
Amikacin |
|
|
|
|
|
Ciprofloxacin |
|
|
|
|
The list of drugs should be the same as provided by the laboratory and in the same order so that S;I;R and/or MIC values can be entered into the table by simply going down a column. Laboratories will usually have a standard list of drugs used for sensitivity testing, but the list may be different for anaerobic versus aerobic organisms and the list of drugs and their order will almost certainly be different for another laboratory. Creating multiple, custom sensitivity templates to meet your needs, rather than trying to merge 2 different drug lists into a single template will typically make for easier data entry. Just remember to name the templates in a manner that makes it easy to select and add the correct template to the test and result comments.
The end result after pasting in the template and entering the sensitivity values should be something like:
|
Sensitivity Results |
||||
|
Antibiotic |
Isolate #1 (S;I;R) |
Isolate #1 (MIC) |
Isolate #2 (S;I;R) |
Isolate #2 (MIC) |
|
Amoxicillin |
R |
>=32 |
|
|
|
Amoxicillin-Clavulanic Acid |
R |
>=32 |
|
|
|
Cephalexin |
R |
>=64 |
|
|
|
Cefovecin |
S |
<=0.5 |
|
|
|
Amikacin |
S |
<=2 |
|
|
|
Ciprofloxacin |
S |
<=0.06 |
|
|
- Other options: Just enter the most useful information into the comments using a summary format. The above table could be summarized in the single sentence:
Isolate 1 sensitive to Cefovecin, Amikacin and Ciprofloxacin.
This could provide the veterinarian with the information needed to make a treatment decision while minimizing data entry (but at the cost of discarding some information).
Additionally help:
-Reporting is available via the
Samples, Test and Results report
and
Specific Test Report
-Or learn more about
test panels
-
Expected Test Results
are available when reviewing results
Revised 5 March 2025
It is the mission of Species360 to facilitate international collaboration in the collection and sharing of information on animals and their environments for zoos, aquariums and related organizations.
www.Species360.org – Global Information Serving Conservation