


TEST UPLOAD
Test Upload functionality helps you save time and reduces data entry errors by allowing you to upload your Test results directly from the lab into the ZIMS Test Results module.
Contact support@Species360.org
A few notes about Test Upload in ZIMS:
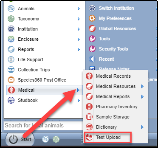 Test Upload is found under Start >Medical > Test Upload. If you use this often you can drag it to the desktop.
ZIMS assumes that you will use the same supported lab consistently and therefore will save the previously used lab as your default. Types of tests that can be uploaded are correlated with which Lab you are using. See Global availability for more information .
Uploading Test Results to a ZIMS medical record is a three-step process:
- Step 1 – Import tests for processing
- Step 2 – Link the imported tests to ZIMS Samples
- Step 3 - Upload results to create a ZIMS Tests & Results record
Topics Covered
Global Availability and Formatting
Video Overview
s
Step 1 Importing Results
IDEXX VCP or Antech Diagnostics
Step 2 Linking Results
Step 3 Uploading Results
Undo Versus Data Entry Monitor
Understanding the Test & Results Grid
Import Status
Global Availability and Formatting
For Antech and Gribbles Laboratories:
Only Hematology and Chemistry results can be uploaded.
IDEXX
For IDEXX Laboratories, Hematology and Chemistry, Endocrinology, Microbiology, Molecular diagnostics such as PCR, Pathology, Toxicology, and Urinalysis results can be uploaded.
A note about decimal format
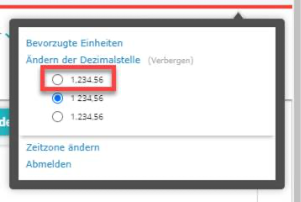
If your region uses a comma decimal separation convention, please carefully review how the data is imported into ZIMS via the Test Result Upload module. In most cases, the data will be correct, but we have identified one region where some imported values are off by X1000 greater than expected (example: an absolute eosinophil count of 0,345x10^3/uL is interpreted as 345,00 cells/uL instead of 3450 cells/uL).
If you see this error, you should update your IDEXX preferences to use the conventional preference, typical for North America, for decimal/comma number formatting.
This is a change that must be made in your IDEXX Vet Connect profile before attempting to upload data into ZIMS. Doing this will ensure your data is accurate.
IDEXX Test Upload is currently available for members in Netherlands, Australia, Canada, France, Germany, United Kingdom and the United States. The feature is setup to support members in Nordic countries, and we ask members to reach out to us at support@species360.org to help us move forward in your region. As IDEXX expands to support additional regions with Vet Connect Plus, ZIMS will support that integration as well.
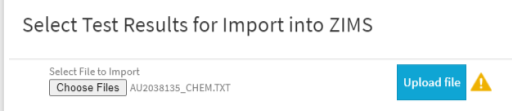
STEP 1 - IMPORTING RESULTS
*To access Test Upload, use the path: Start>Medical>Test Upload
IDEXX Vet Connect Plus or Antech Diagnostics Clients:
The first time you import results from IDEXX or Antech, you will retrieve the last 2 weeks of data. Every subsequent login will import a maximum of 14 days of new results. If you use the ZIMS test upload feature infrequently, we recommend that you set a reminder to import data to ZIMS every 2 weeks to ensure all data is available. If you DO NOT import data at least every two weeks there could be gaps in your data.
Importing IDEXX Laboratories or Antech Diagnostics Test Results
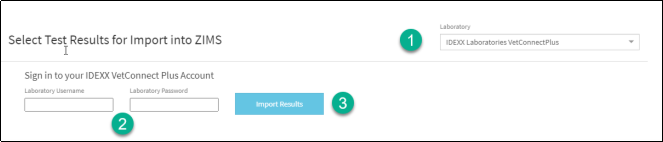

- Select IDEXX Laboratories or Antech Diagnostics from the list.
-
Enter your IDEXX Vet Connect Plus or Antech Lab Clinic ID and account Username and Password.
These are provided by IDEXX or Antech, not Species360. - Select the Import Results button.
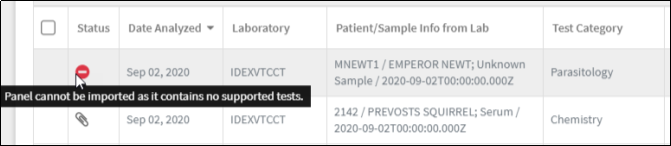
The results will be displayed in the Imported Tests and Results grid below the data validation screen. Any rows with invalid data or unsupported tests will display with a red or yellow icon in the Status Column. You can hover your mouse cursor over these icons and a black box will appear, explaining why it was invalid or unsupported.
Tip: If you have questions about this message, this is a great place to take a screen shot with the message displayed, to share with your member services representative.
If you have accumulated a large number of test results that you do not intend to link to samples and upload to ZIMS, you may choose to delete them from the Test Result Upload list. This may be particularly helpful if the screen is loading very slowly.
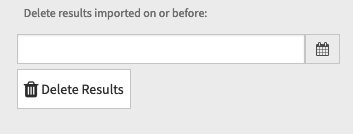
If you have already entered the results manually, and they are listed as “not supported”, or are “invalid and cannot be uploaded,” you may choose to delete records imported on or before a specified date using the Delete Results area in the top righthand area of the screen.
Note: when using this option, the following notice will be displayed, informing you that you
cannot reimport these records into ZIMS Test Upload.
This action will permanently delete all the test panels as of (before) the date selected; you will not be able to recover or re-import them.
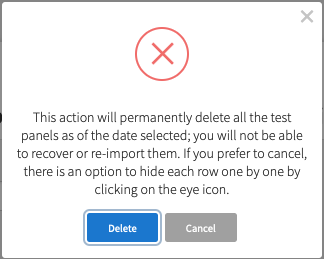
Another option: If you do not want to remove these panels permanently, select “Cancel,” and there is an option to hide each row one by one by clicking on the “eye” icon in the “Actions” column.
For Gribbles Veterinary Australia Clients:
Note, CBC results will display out of order. If you do not want to view their results in that way, we recommend that you only upload the chemistry values until we can address the test order.
Additionally, we can only support email results from one date. If you have an email with historical trend data, or a duplicate set or results from the same date, it will not upload correctly, and you should enter those results manually through the dashboard.

- Select Gribbles Veterinary Australia from the dropdown list in the top right corner.
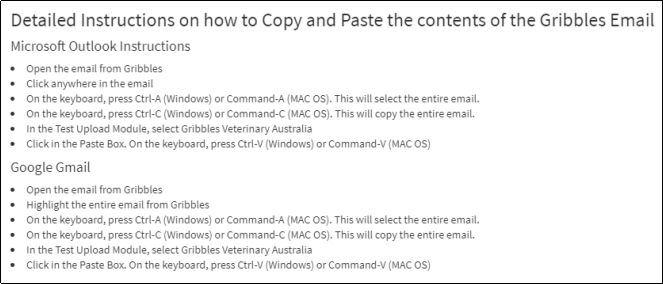
- Copy and paste the COMPLETE contents of the email you received from Gribbles into the box labeled 2 in the image above. Select the question mark for details on how to do this (or see below).
- Click the “Import Results” button. (Bottom left)
The results will be displayed in the Imported Tests and Results grid below the data validation screen. Any rows with invalid data or unsupported tests will display with a hover over message providing additional details (see additional images below).
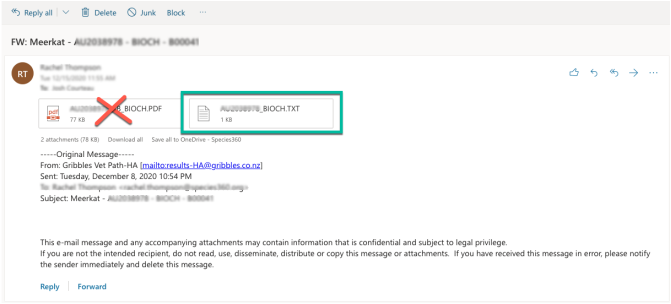
For Gribbles Veterinary New Zealand Clients:
Note:
"Save
”
and upload
”
the TXT file
, not the PDF.
Here’s an example of a chemistry test result list email report:
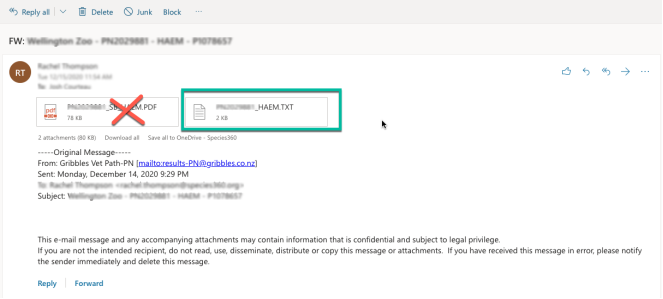
Here’s an example of a hematology test result list email report:
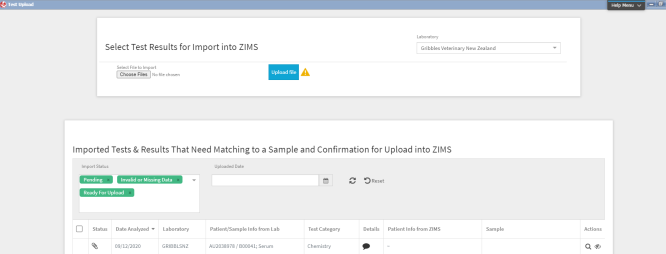
Each TXT file uploaded will populate in the grid below:
Back to Topics Covered
STEP 2 - LINKING RESULTS
If you have a Sample Already Recorded in ZIMS Medical:
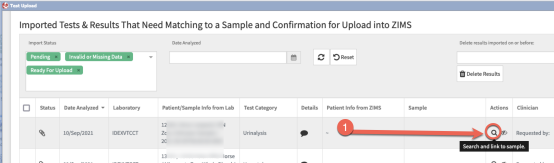
If you have already created a sample in ZIMS Medical, you can link this to a Test Result now.
Start by clicking on the “magnifying glass” icon in the Actions column.

Note: If you haven’t yet created a sample in ZIMS Medical, start here.
-
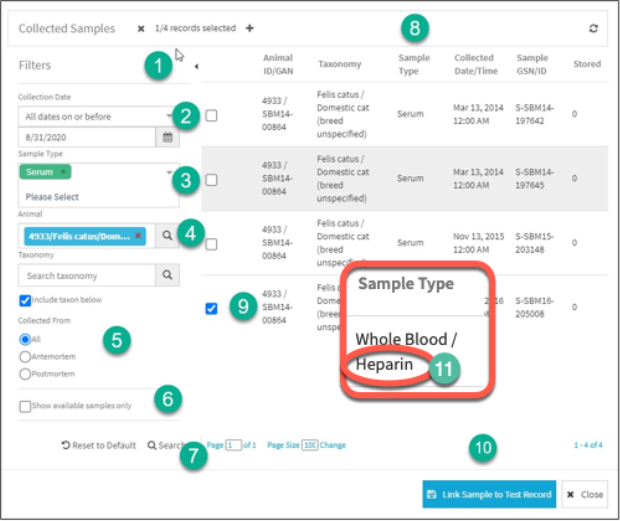 Use the expandable filter box to find the Sample record.
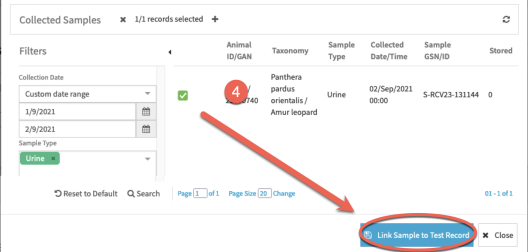
- Select the desired Collection Date. It will default to samples collected within the last 7 days. If a Sample has already been entered, you will just need to select it and link to the Test record. If you do not see your Sample, you should modify the filters. If the Sample has not been added yet you can click on the “plus sign” icon at the top of the window to create a new Sample record (see Sample Not Yet Recorded below ).
- The Sample Type will default based on the Test Category. Hematology will default to whole blood; chemistry will default to serum and plasma.
- Find the animal by Local ID, GAN or Taxonomy.
- Select Antemortem or Postmortem collection. The default is both.
- You can select to see only Samples that are Available.
- Once you have set your filter parameters continue to the bottom of the window and click “Search.”
-
The results will be displayed on the right-hand side.
- Note, if Samples were collected within the last 7 days but were collected AFTER the date the test analysis was done by the lab, that Sample will not be available for selection. (Check the date in the Zims record to resolve this)
- Select/Check the appropriate Sample.
- Click on the “Link Sample to Test Record” Button in the bottom right-hand corner
- Note, if you have additives for the sample registered in the Sample Record, this will display along with the sample type.
Sample Not Yet Recorded
If you haven’t yet added a sample in ZIMS Medical to link to your Test Result, you can add one right from the Test Upload tool.
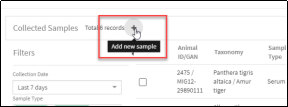
- Select the magnifying glass icon from the righthand “Actions” column.
- Then select the Add new sample “plus sign” icon.
- You will be taken to the ZIMS Medical “Add Sample” screen. Follow the typical workflow to enter a new Sample.
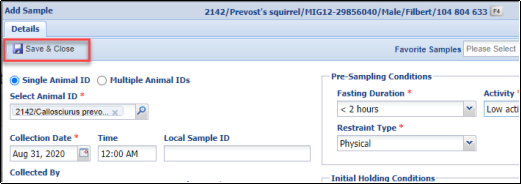
From this sample creation screen, you can use any of the “favorite samples” already created to save yourself time. See Creating and Using Samples .
- Your newly created Sample should now populate in the righthand side of the pop-up window. In Test Upload, below the “Plus sign” icon. (If you do not see your sample, adjust the filters on the left and click “Search.”
Now, check the appropriate box and select Link Sample to Test Record.
Remember: The Sample collection date must be BEFORE the date the tests were analyzed. If it is not, go back to the ZIMS Medical sample screen and adjust the date and come back to this screen and click “Search.”
Responsible Clinician
Once results are linked you will return to the main test upload page.
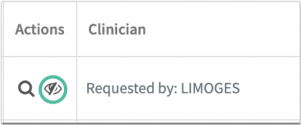
Now the name of the responsible clinician (provided by the lab) will be displayed in the last column. This can be changed as needed to the staff associated with the record in ZIMS via a dropdown menu in the “Clinician” column.
Note: You will only see this drop down after a sample has been linked.

It is important to accurately identify the clinician here to have the review/approve options in the ZIMS Medical Dashboard populated properly.
More on reviewing tests in the ZIMS Medical Dashboard here.
Back to Topics Covered
STEP 3 - UPLOADING RESULTS
To upload the test results into ZIMS, check the box to the left of the Status column and then click the “Upload Results” button in the bottom right-hand corner of the screen.
Note: You can upload multiple rows by selecting all rows using the check box in the column header or manually selecting appropriate rows.
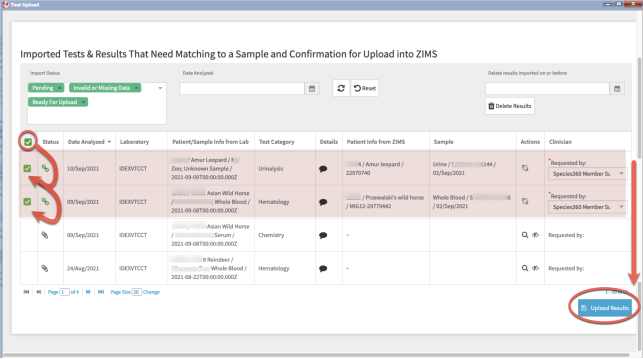
The information associated with each row will be uploaded into the Tests & Results record.
To view the records, you have uploaded to this grid, you will need to change the Import Status to Uploaded. (Click on the small arrow in the Import Status box and select “Uploaded” as the status type. The list will reload now and show you only those uploaded.)
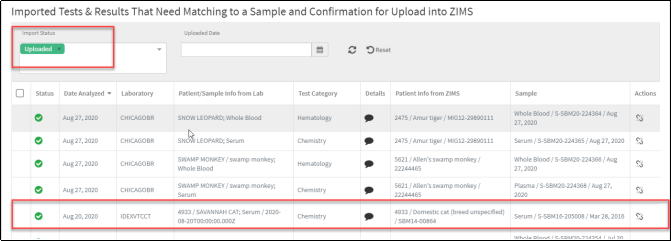
The results will be incorporated into the ZIMS database and visible in the patient’s medical record. (You can verify this by returning to your ZIMS Record and click “Reload the results” (top middle of the dashboard page) and your test result should be seen below the sample you created.
You can open this new result as seen below:

If any of the tests you upload are not mapped to the available ZIMS dictionary tests, your results will be displayed in the “Notes” section below the main results section.
If the lab adds a new numerical test that is not mapped, use this Global Test Request form to request a new test and we will update the dictionary.
Back to Topics Covered
If you make a mistake and want to Undo your previous action:
UNDO VERSES DATA ENTRY MONITOR
Data Entry Monitoring (DEM) can be used to roll back the addition of the ZIMS Test & Result record, but we strongly recommend you use the specific "Undo" action option instead. The undo function removes the Test & Result record (reversing Step 3), then unlinks the imported results from the ZIMS sample, and resets the imported results status to Pending (reversing Step 2).
This allows you to reprocess the imported data set using a different patient and/or sample. If you roll back the upload using DEM, only the ZIMS test and results record is deleted, and the imported laboratory results cannot be reprocessed.
In that case, manual entry of this test and result information into ZIMS will be required.
Note: if the results are merged to an existing set of test results, or modified after upload, you will not be able to undo them. This is to ensure you do not lose data.
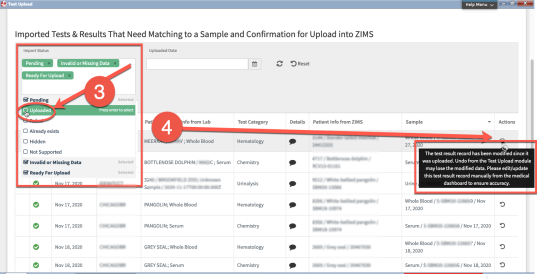
1) In the scenario below... from the Test Result Upload feature, the records that are present (RED) were previously uploaded from Test Results.
2) The additional single test is added to the results grid and values are added.
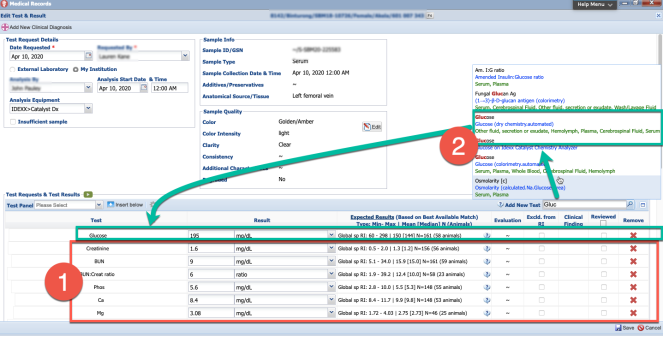
When we return to the Test Upload module after modifying the previously uploaded results.
3) We search for ‘uploaded’ results
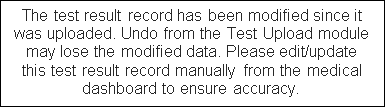
4) Where we’d normally be allowed to ‘roll back’ the changes we see the following message:
Back to Topics Covered
UNDERSTANDING THE TESTS & RESULTS GRID
Test Results are not Yet Linked to a Sample:
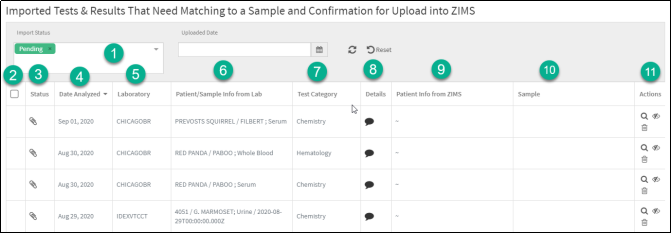
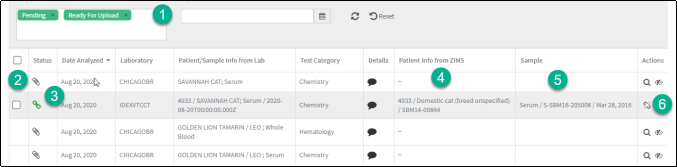
- Select the Import Status you want to view.
- If the results are linked to a Sample and ready to upload there would be checkboxes in this column.
- The Status of the results. Hover over the icon present to read the explanation. (See the import status icons and definitions below.)
- The date the test results were analyzed at the lab, * not necessarily the Sample Collection date.
- The laboratory where the tests were run. If they were run at your institution on a bench top analyzer that is synced to Vet Connect Plus, your institution would display here.
-
The information on the animal and the sample reported from the lab.
-
Please note that this may contain typos or incomplete details. You will need to validate that data with your actual patient data.
- HANDY HINT! Providing the lab with more complete details on the animal (species, sex, Local ID, GAN) will make this validation much easier!
-
Please note that this may contain typos or incomplete details. You will need to validate that data with your actual patient data.
- This column indicates the category of the test performed.
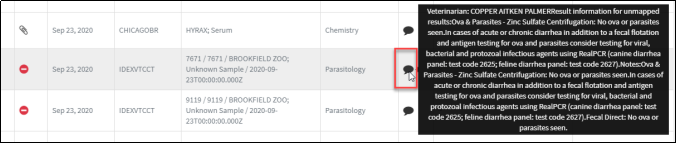
- Hovering over the “shout out” icon will display the Test names and the results. This can be especially useful for unsupported panels as the results may need to be manually entered.
- Once linked to a Sample, the patient information is pulled from ZIMS and can be verified against what the lab provided.
- Once linked to a Sample, The Sample information is pulled from ZIMS and can be verified against what the lab provided.
NOTE: For 8 and 9, until the data is linked you only have what the lab tells you. Once the user links the results to an existing patient and sample in ZIMS, you have more context to confirm that everything is linked properly and complete the upload.
-
These are the actions you can take on each row or set of results:
- The magnifying glass lets you search for a Sample or record Sample collection details.
- The “eye” icon lets you hide the row.
- The “trash can” icon will permanently remove the row. This option is only available after hiding the item first then filtering the list to show hidden results.
- The “broken paper clip” icon will unlink the results from a sample.
- The “counterclockwise arrow (reset)” icon will undo the results upload.
Once Test Results are Linked to a Sample:
-
By default, the Import Status is Pending, Ready to Upload, and Invalid or Missing Data.
- If you have changed the Status filter, you will need to select Ready to Upload as an Import Status.
- A checkbox to select to Upload is now active. You may link several rows to samples. Select all, or the desired rows from the left column, and upload as a batch.
- The Status is now ready to be uploaded into ZIMS
- The patient information is pulled from ZIMS and can be verified against what the lab provided.
- The Sample information is pulled from ZIMS and can be verified against what the lab provided.
- The action you can take from the right-hand column is to Unlink the Sample from the results.
Import Status
To get a shorter Imported Tests and Results grid, you may want to filter by one or more of the seven Import Statuses available.
-
 Pending – Test Results are available to be linked with a patient sample.
-
 Uploaded –Results have been successfully uploaded into the medical record.
-
 Failed – The results failed to upload. These issues cannot be resolved via Test Upload and results will need to be entered manually.
-
This may occur when if there is already a test recorded on that animal on the same sample/same date it is perceived as a duplicate. If the duplicates occur in two different rows on the validation screen, or if one was entered manually, user may successfully link a sample to the results, click to upload it and then it will fail.
-
 Hidden –Row has been hidden from the main screen; Click to “un-hide”.
-
 Not Supported – Row cannot be uploaded because it has no supported tests.
-
 Invalid or Missing Data – Row cannot be uploaded because it contains missing or invalid data. Please note the details in the hover over message. You may need to contact member support to resolve the data issue.
- If a choanal swab and a blood sample is sent to screen for avian infectious diseases, they are reported in Australia in a way that ZIMS cannot discern the two samples and they get imported as duplicates). Users cannot resolve this and will need to enter the data manually.
- If a user links a test to a sample and there is a taxonomy mismatch (example: a complete blood cell count with neutrophils gets linked to an avian whole blood sample, and birds do not have neutrophils). This occurs after the sample is linked, the user should unlink the sample and choose the correct patient. If it is the correct patient, it breaks a business rule, and the user needs to enter that result manually.
-
 Ready for Upload – Results are linked to a Sample and are ready to be uploaded.
Additional notes on result linking/uploading statuses
Results that ZIMS cannot process are entered into the result list with "see notes for details" and full information from the lab is included in the note on the test result header.
- If there is a test name that is not mapped, it will fall into this category.
- Taxonomy that does not align with our taxonomy list will fall into this category. If the taxonomy is obsolete, it will roll up to the closest match in the taxonomy hierarchy and full details displayed in the note.
- If a secondary result, data standard phrasing, unit of measurement, etc. does not match our dictionary and data standard options, the results will fall into this category.
Back to Topics Covered
Revised 5 March 2025