


Adding measurements and using the Batch Measurement Templates for Enclosures, Life Supports and Components
Batch Measurement Templates allow you to save time entering multiple measurements on multiple enclosures, life support and components. In addition, they are a handy tool to remind you what measurements you want to take on what enclosures/tanks. Adding single measurements for an enclosure is completed in the specific enclosures record and not in the template window.
Adding Single Measurements to an Enclosure
The same is true for Life Supports and Components, just substitute that module for enclosure in the process below.
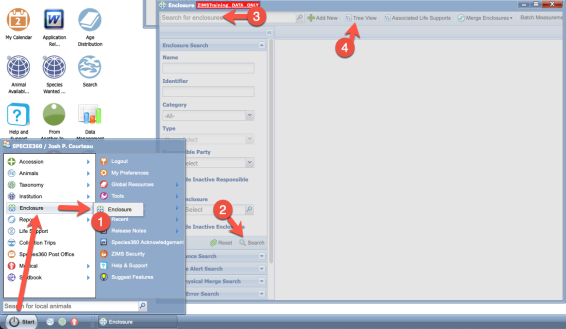
- Open Enclosure modules
- Search for enclosure, or
- Type in the name of a known enclosure, or
- Use the tree view to open a desired enclosure
Single measurements can be added from the Measurements grid under the details tab:
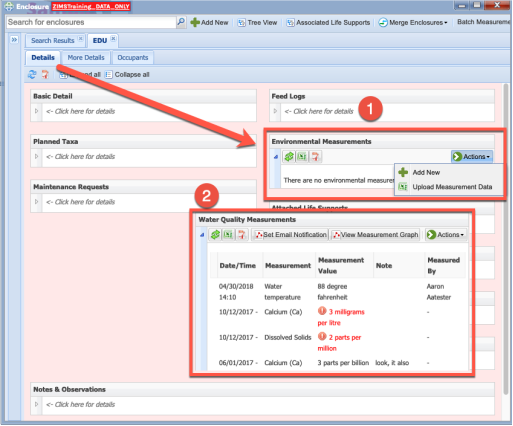
- Note, if the enclosure is a terrestrial type enclosure you will see “Environmental measurements” as the name of the grid and all types of measurements available will be for terrestrial exhibits.
- Note, if the enclosure is an Aquatic type enclosure you will see “Water Quality measurements” as the name of the grid and all types of measurements available will be for aquatic exhibits.
Creating Batch Measurements
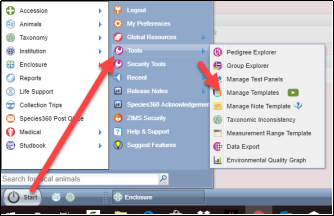
To create a Batch Measurement Template go to Start > Tools > Manage Templates.
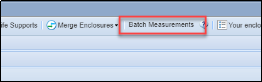
You can also get to the same screen from within the Enclosure/Life Support/Component modules by selecting Batch Measurements at the top of the screen.
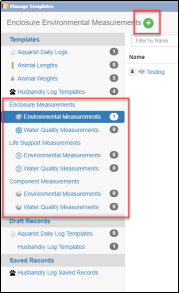
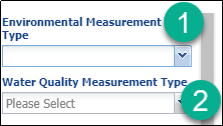
Select Environmental or Water Quality Measurements under Enclosure Measurement, Life Support Measurements or Component Measurements and then select the green “+” Add New icon.
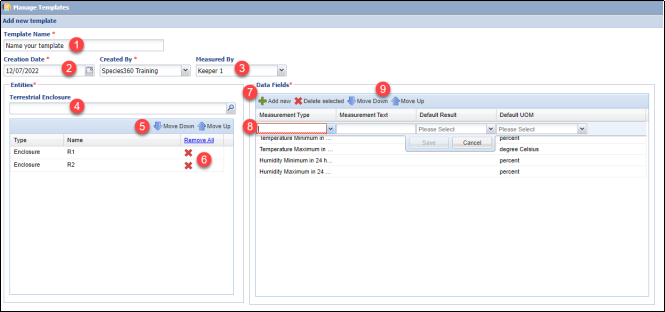
1) Template Name - should be unique in your template list.
2) Creation Date - the template can be used for measurements taken before the creation date. Created By – who created the Template. Sourced from your Staff list.
3) Measured By - can save data entry time if it is always the same person taking the measurements. This can be edited during data entry. Sourced from your Staff list.
4) Entity (Enclosure/Life Support/Component depending on template type) - select the desired enclosures, life supports or components. You can use the magnifying glass lookup to help you find them. Lists cannot be used. What is available to select here is sourced from what you selected to create the Template for. Some examples:
- You selected Enclosure Measurements and Environmental Measurements – only terrestrial enclosures will be available to select from.
- You selected Life Support Measurements and Water Quality Measurements – only aquatic life supports will be available to select from.
5) Move Up/Down arrows – easily change the order of your entities.
6) Red X – delete single enclosures, or use the Remove All to start again.
7) Measurements Add New - select Add New to add a new measurement.
8) Select the Measurement Type and the Default Units of Measure. Remember to Save each entry before moving on to another.
9) Move Up/Move Down – use the arrows to arrange the order of your measurements.
When done select to Save the Template.
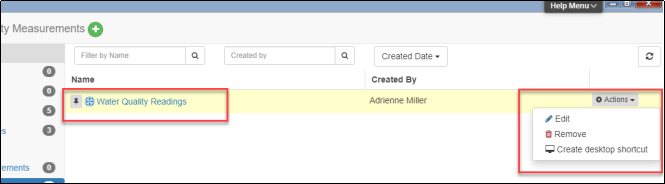
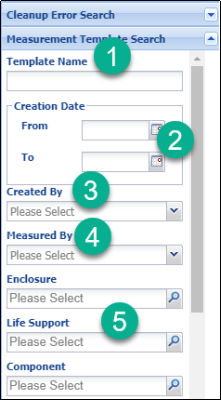
The Template will now display in the list. Use the Actions menu to Edit or Remove the Template. You can also create a desktop shortcut to the Template here. If you have a lot of Templates, you can use the search options at the top to search by Name, Created By and Created Date
To use the Template, select the Name hyperlink.
You have the option to select a different Template in the Template Name field
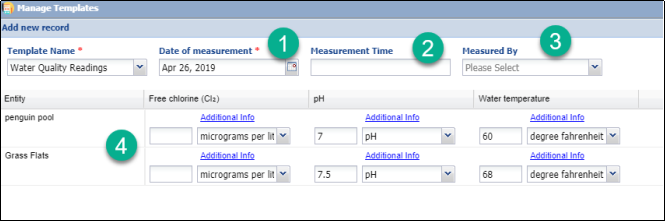
1.Date of measurement – defaults to today but is editable.
2.Measurement Time – can be very important is multiple measurements are taken on the same day.
3.Measured By – this would prefill if you had recorded a Staff member when you created (or edited) the Template.
4.Record your measurements and Save.
You can now use the TAB key on your keyboard to jump to the next blank field. If you have set default values, using the tab button will automatically skip over these fields. If you have not set a default value for one of your fields, the TAB key will still move to that space.

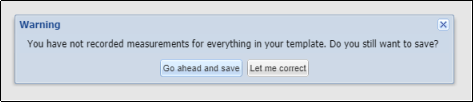
You do not have to record a measurement in all your fields, but if any are blank you will receive a warning message.
Once saved, the measurements will be displayed in the Measurement grid in the appropriate Enclosure, Life Support or Component record.
Another option to search for a Template is to use the expandable left hand search box in the Enclosure module.

.
You can edit the Templates from this search but you cannot open them up to use them from there.
Revised 5 March 2025
It is the mission of Species360 to facilitate international collaboration in the collection and sharing of information on animals and their environments for zoos, aquariums and related organizations.
www.Species360.org – Global Information Serving Conservation