


Time Saving Accessions
Using the time saving functionalities for Accessions in ZIMS
ZIMS has many options that help you save time recording your Accessions. These options also can help reduce data entry errors, providing it was recorded correctly the first time.
-
Auto-increment Local ID
- Your next Local ID will prefill when Accessioning
-
Batch Accessions
- Use this when you have multiple Accessions and the data is the same for each entry
-
Save & Repeat
- Use this when you have multiple Accessions but the data is different for each entry
-
Take a Copy
- Use this when you already have a record that is very similar to the new Accession data
-
Add Offspring From This Animal
- Many of the fields recorded for the Parent prefill
-
Egg Laid From This Animal
- Many of the fields recorded for the female Parent prefill
-
Favorite Accession Template
- Use this when you have default information that remains the same for particular accessions
Accessions Covered
Auto-increment Local ID
Batch Accessions
Save & Repeat
Take a Copy
Add Offspring From This Animal
Egg Laid From This Animal
Auto-increment Local ID
Scenario 1: You have multiple Users doing Accessions and it is difficult to keep track of what your next available Local ID is.
Open Institution Preferences > Application Settings and check the Enable Auto-incrementing Local ID checkbox.
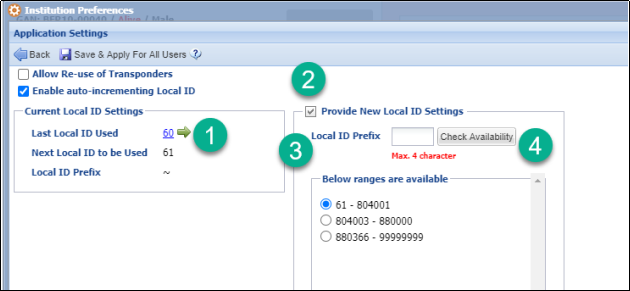
1.The last Local ID used and the next Local ID to be used will display.
2.If you want to reset the Local ID settings check this box.
3.You can provide a Local ID Prefix of up to 4 characters. For example, this is helpful if you begin your Local IDs with the year.
4.You can check for availability of IDs. Strings of at least 50 available numbers will display. Selecting the radio button will allow you to start using that range of numbers.
Remember to Save & Apply For All Users.
You can edit the Local ID during the Accession. This will change the next available ID to the next sequential number after what you recorded.
Auto-increment does not work if you code your Local IDs by taxa (example prefixes of M for mammals and B for birds).
Back to Accessions Covered
Batch Accessions
Scenario 2: You have a litter of 3 black-footed ferrets born. Birth Date, Parentage and Sexes (Undetermined) are the same.
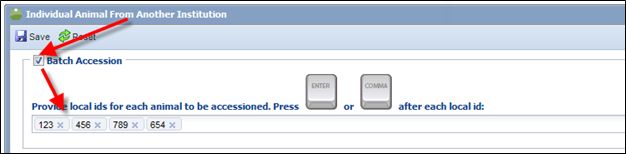
Batch Accessions are found in the Accession screen and are available for any entity and for any Accession mode. Once you have selected your Entity and accession Type, check the Batch Accession box at the top of the screen.
If you have selected to auto-increment your Local IDs (available in Institution Preferences, see above) enter the number of animals you are accessioning and then select Generate. It will pre-fill with your next available Local IDs:

If you have not selected to auto-increment your Local IDs you will need to manually enter them. Remember to press enter or select a comma between each Local ID (count your entries!):
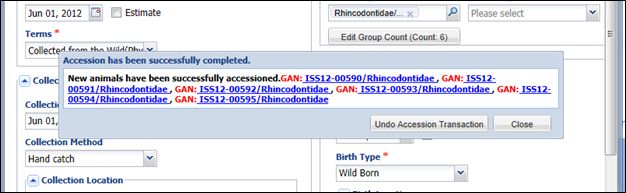
Complete the fields and Save. You will be provided with a list of your GANs created. All information for each entry will be identical. You can go into each record and edit as needed.
Back to Accessions Covered
Save & Repeat
Scenario 3: You received six black-footed ferrets to increase your breeding program. They all came from the same facility but the Birth Dates, Parents and Sexes are different. If you used a Batch Accession you would need to remember to go back in and correct the records as needed.
Save & Repeat is also found on the Accession screen. Complete your first Accession and select Save & Repeat.
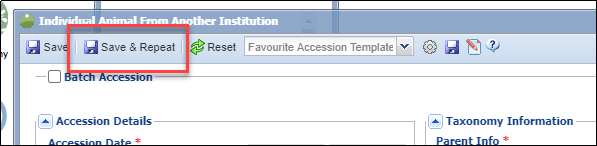
The Accession will save but the screen will remain open. Make edits as needed and continue selecting Save & Repeat until you have created the correct number of Accessions. For the final Accession select Save to save the record and close the screen. Only the GAN for the final entry will be provided after you Save. You are not provided with the number of Accessions you have entered.
Back to Accessions Covered
Take a Copy
Scenario 4: A few days after the ferrets in Scenario 2 were born you get the opportunity to check on the litter. You are surprised to see that there are actually four, not three, kits in the nest box.
Take a Copy should only be used if the Accession Type is the same for the origin record as it is for the copied record as that is what is copied.
To Take a Copy open one of the records for the accessioned kits. From the Details tab Actions menu, select Take a Copy From This Animal.
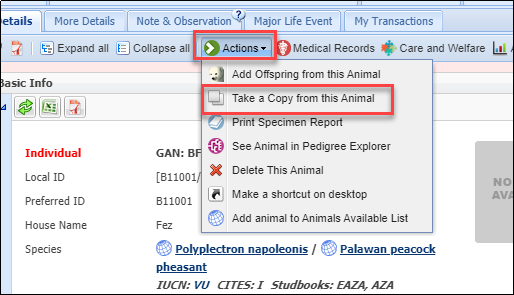
The Accession screen for the record in focus will display and you can make any edits as needed. Batch Accession and Save & Repeat are also available when you Take a Copy.
Back to Accessions Covered
Add Offspring From This Animal
Scenario 5: Your female Sumatran orangutan has given birth.
Open the record for the Parent (this option is available for both male and female Parents) and select Add Offspring From This Animal from the Actions button in the Details tab.
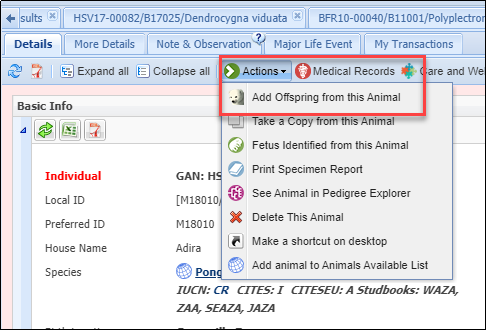
The following fields, sourced from the Parent record, will prefill:
- Birth Type (Captive)
- Collection
- Enclosure (be careful to check this is adding from the male Parent record)
- Sire or Dam information (depending on whose record you are adding from)
- Taxonomy
All fields are editable. Batch Accession and Save & Repeat are also available.
HINT: Imagine how much time you could have saved if you had used this option and selected Batch for your ferret litter in Scenario 2!
Back to Accessions Covered
Egg Laid From This Animal
Scenario 6: Your female sun conure has laid an egg.
Open the record for the conure and select Egg Laid From This Animal from the Actions button in the Details tab. This option is only available for females of egg laying species.

The following fields, sourced from the female’s record, will prefill in the Accession screen:
- Collection
- Enclosure
- Dam Information
- Taxonomy
All fields are editable. Batch Accession and Save & Repeat are also available.
Favorite Accession Template
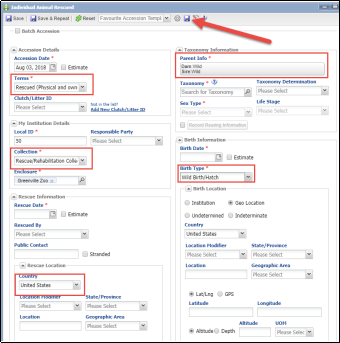
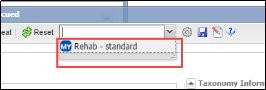
Scenario 7: You occasionally need to accession rescue animals, and some information such as Terms, Collection, Parent Info and Birth Type will always be the same for this type of accession. You create a favorite accession template to set some fields as default.
In this example the information highlighted in red is always the same and we don’t want to have to enter it for each accession so we are saving it as a Favorite Accession Template by selecting the Save icon.
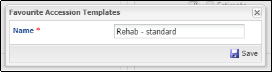
Give it a unique name that will identify what accessions it is for.
The Template will now appear in your list of favorites and, if selected, will prefill with the information.
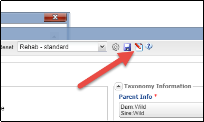
If you need to edit the Template, simply open it, make your changes, and select the Update Template icon.
The Favorite Template will only be available for the accession type it was created for. For example, this template will not appear in From Another Institution and it was created from a Rescued accession.
To delete a Template, select the wheel icon, highlight the desired Template and select Delete Selected.
Back to Accessions Covered
Revised 5 March 2025
It is the mission of Species360 to facilitate international collaboration in the collection and sharing of information on animals and their environments for zoos, aquariums and related organizations.
www.Species360.org – Global Information Serving Conservation