


My Transactions Tab for Individuals
The My Transactions tab can be found on any animal record. To view the My Transactions tab, open the Animals Module, search for and open your desired animal, then click the My Transactions Tab.
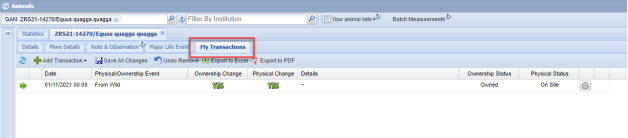
The My Transactions tab will show any transfers the animal has in common with your institution. If you are looking at an animal that has previously been at your institution, the tab will display the transfers the animal has undergone at your institution, for example arriving at or departing from your institution. If you are looking at an animal that has never been at or owned by your institution, then there will be no transactions for you to see.
From the My Transactions tab, several actions can be carried out for an individual animal:
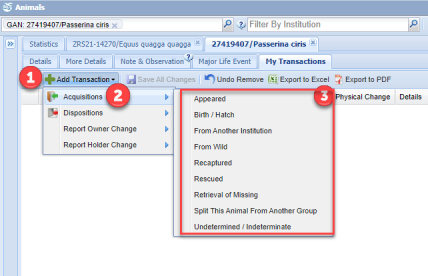
- Acquisitions – When the animal arrives at your institution
- Dispositions – When the animal departs your institution
- Report Owner Change – When animals which are on loan/lease to you change ownership
- Report Holder Change – When animals you have out on loan/lease change holder
Acquisitions and Dispositions have several options which can then be chosen depending on the type of transaction, e.g. From Wild, From Another institution; Release to Wild, To Another Institution.
Acquisition of an Already Accessioned Animal
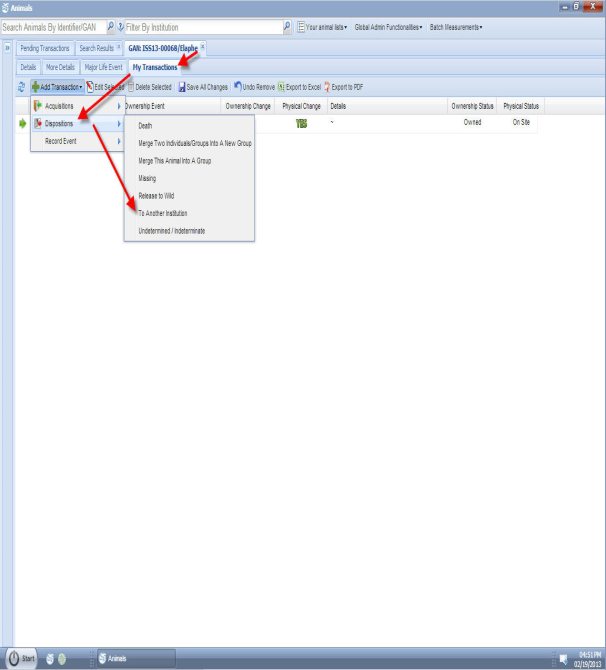
To record the arrival of an animal into your collection that is already in ZIMS, search for and open the animal in the Animals Module, and open the My Transactions tab.
Click the Add Transaction button (1), hover over Acquisition (2) then choose the appropriate acquisition, in this case From Another Institution.
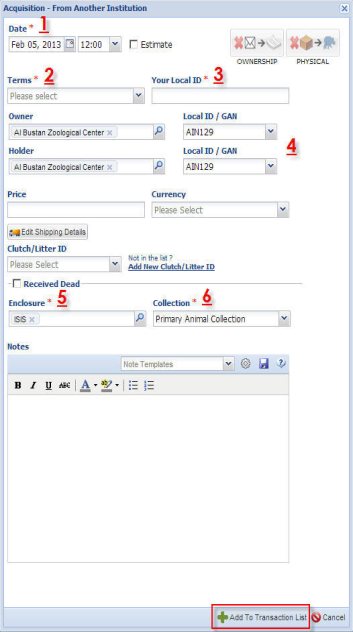
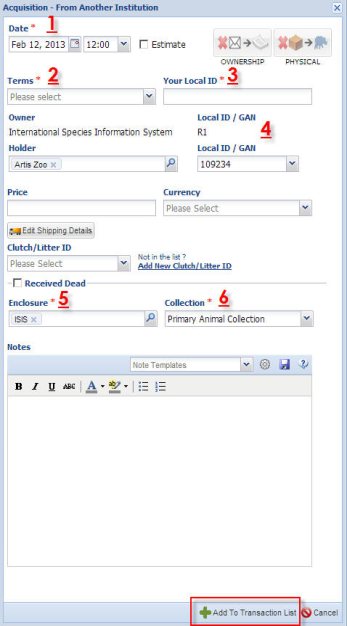
Acquisition - From Another Institution -> Date -> Terms -> Your Local ID -> Sender/Owner/Holder -> Enclosure -> Collection
From the My Transactions click on 'Add Transaction', select acquisition and define you wish to get the animal from Another Institution.
In the Acquisitions From Another Institution the following fields are required:
Date: Fill in the date of the transfer
Terms: Fill in the agreed term, like donation/trade/loan in
Your local ID: Fill in your local ID for the animal transferring (should be unique)
Sender/Owner/Holder: Fill in the institution(s) involved in the transfer
Enclosure: Fill in the enclosure in which the new animal will be placed
Collection: Fill in the collection in which the new animal will be placed
Acquisition of a local animal that left your institution
Animals -> My Transactions -> Acquisitions -> From Another Institution
Acquisition - From Another Institution -> Date -> Terms -> Your Local ID -> Sender/Owner/Holder -> Enclosure -> Collection
From the My Transactions click on 'Add Transaction', select acquisition and define you wish to get the animal from Another Institution. This is very similar to the above situation, however as this animal was out on a loan you will see that Owner is already filled in by your own institution, as the animal is returning from a loan in this example.
In the Acquisitions From Another Institution the following fields are required:
Date: Fill in the date of the transfer
Terms: Fill in the agreed term, should be loan return here
Your local ID: Already filled in, because it is a return of loan
Holder: Prefilled in, but editable. Fill in the institution(s) involved in the transfer
Enclosure: Fill in the enclosure in which the new animal will be placed
Collection: Fill in the collection in which the new animal will be placed
Disposition of a local animal
Animals -> My Transactions -> Dispositions -> To Another Institution
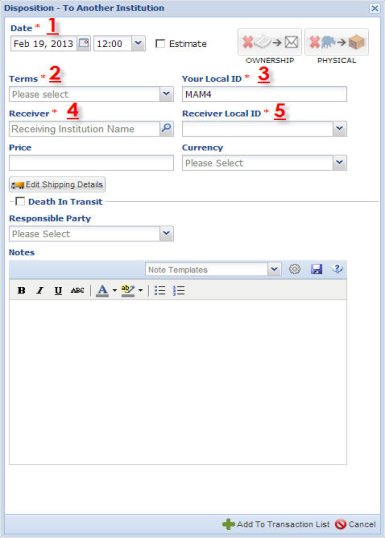
Disposition - To Another Institution -> Date -> Terms -> Your Local ID -> Receiver -> Receiver Local ID
From the My Transactions click on 'Add Transaction', select disposition and define you wish to move the animal To Another Institution. As you are moving your animal your own local ID will already be prefilled in.
In the Disposition To Another Institution the following fields are required:
Date: Fill in the date of the transfer
Terms: Fill in the agreed term, donate/loan out/trade
Your local ID: Already filled in, because it is your animal moving
Receiver: Fill in the receiving institution involved in the transfer
Receiver Local ID: Fill in the Local ID of the receiving institution, if unknown use the dropdown menu to select UNDETERMINED. You can edit the local ID of the receiving institution at a later stage.
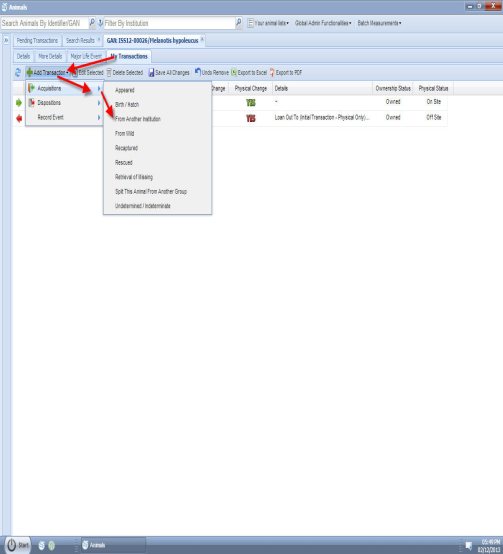
Record an event
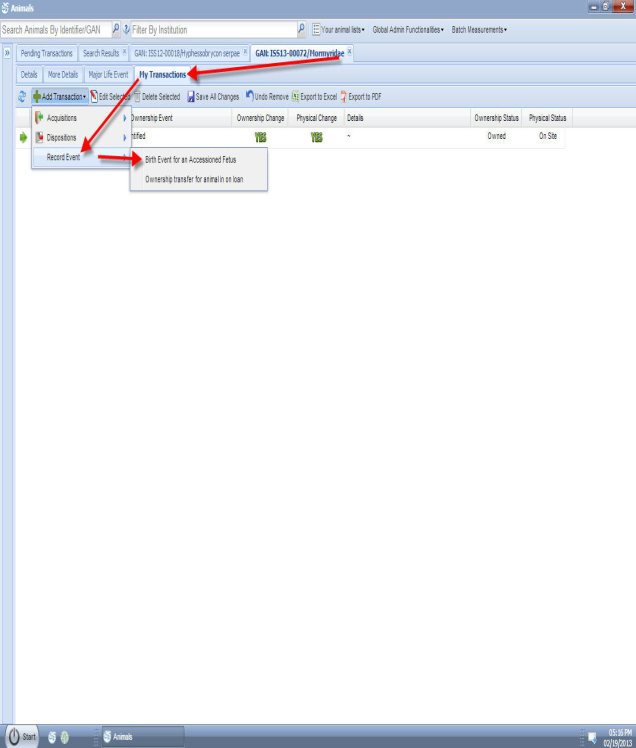
Animals -> My Transactions -> Record Event -> Birth Event for an Accessioned Fetus
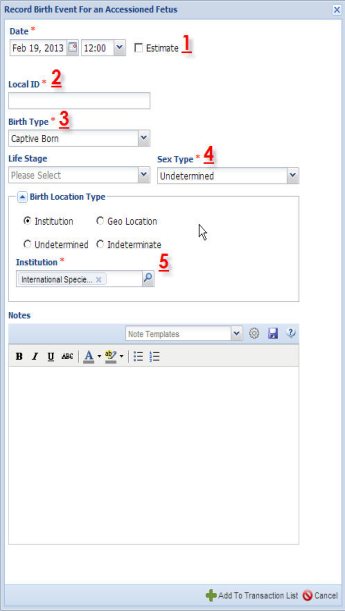
Record Birth Event For An Accessioned Fetus -> Date -> Local ID -> Birth Type -> Sex Type -> Institution
From the My Transactions click on 'Record Event', select Record Birth Event for an Accessioned Fetus (in this example). ZIMS will ask some minor details to record the birth of the already entered fetus.
In the Record Birth Event For An Accessioned Fetus the following fields are required:
Date: Fill in the date of the transfer
Local ID: Fill in your local ID as non was filled in yet
Birth Type: Fill in what type of birth it is
Sex Type: Fill in the sex type if already known, else select UNDETERMINED. This can be edited later.
Institution: Fill in the institution that the animal is born at. Most of the time this is your own institution.
Best Practices Advice
The above are only a few examples of the transactions that are possible in ZIMS depending on the actual situations and recorded data. Please view the detailed How-to sections on a specific transaction type if you are looking for more explicit information.
Revised 5 March 2025
* Species360 Organizational name change added on 07/18/2016
It is the mission of Species360 to facilitate international collaboration in the collection and sharing of information on animals and their environments for zoos, aquariums and related organizations.
www.Species360.org – Global Information Serving Conservation