


Animals – Accessions
How to accession individual animals into ZIMS. Animals are Accessioned only once into ZIMS. If the animal is already in the ZIMS database a Visit should be created. See: Recording Visits help . This document details the fields for creating the initial Accession into ZIMS.

Topics Covered
EntitiesAccession ModesTime Saving AccessionsFrom Another InstitutionCollected From Wild
|
RescuedAppearedBirth HatchUndetermined/IndeterminateFavourite Accession Templates
|
For general Best Practices regarding Accessions see Best Practices in Accessions
Entities
You must first select the entity. There are seven different entities that can beaccessioned into ZIMS:
- Individual Animal - a single, individually identifiable animal (this document covers individual animals)
- Group of Animals - many animals, usually same species and not individually identifiable, managed as a single unit. See Aquatics Index - Simple Group Management.
- Egg - a single egg. See Managing Eggs
- Egg Mass - many eggs, usually of a number that is difficult to count, often held together with a gelatinous substance. See Managing Eggs
- Fetus - a developing animal still within the uterus. See Recording a Fetus
- Group of Eggs - many eggs, managed as a single unit. See Managing Eggs
- Incomplete Accessions – bare bones accession. See Incomplete Accessions
Back to Topics Covered
Accession Modes
You then select the accession mode. There are nine modes of accession:
- From Another Institution - received from another facility or individual such as a member of the public
- Collected From Wild - removed from the wild specifically to add to your collection
- Rescued - injured or orphaned wild animal often with the intent to release, or removal of an animal from an unsustainable living situation
- Appeared - unplanned addition to your collection, deposited by someone or entered facility on their own
- Birth Hatch - animal born or hatched
- Undetermined/Indeterminate - accession mode is not known at this time
Back to Topics Covered
Time Saving Accessions
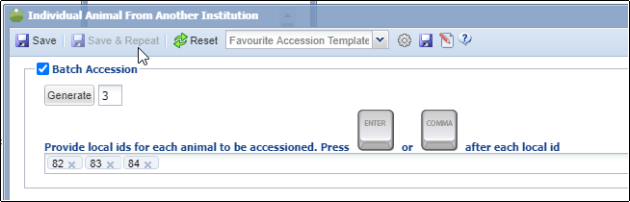
If you want to accession multiples of the same entity you have two choices. If the information on the animals is the same or very similar, for example you receive a litter and birth dates and parents are identical, you can check the Batch Accession box and enter the appropriate number of Local IDs. Remember to press Enter or Comma after each entry. If you have selected to Auto-increment Local IDs you will be asked for the number you want to generate and they will pre-fill. When doing a Batch Accession all information will be duplicated in all records but can be edited after you Save. All the GANs will be displayed after you Save.
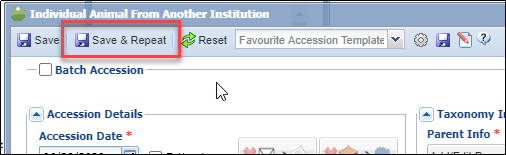
The other option is to enter one animal and select Save and Repeat. The record will Save but the screen will remain open for you to record the data on the next animal. For example, you receive six flamingos but their birth dates and parents are different. When you record the last animal, select to Save. Only the GAN for this last record will display.
Back to Topics Covered
From Another Institution
Accession Details
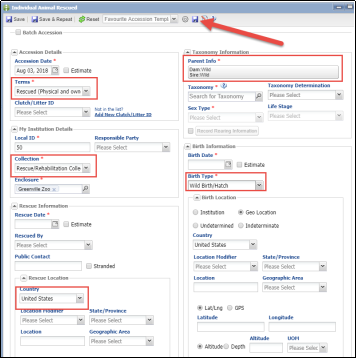
- Accession Date - This should always be the date you either received the animal physically, received ownership of it, or both.
-
Terms
– Read the hover over definitions to make sure you select the correct Term. What you select here will drive what fields display next.
- Sender (Ownership) – The institution that gave you legal title to the animal.
- Sender (Physical) – The institution that physically sent you the animal.
- Owner – The institution that retains legal title to the animal.
- Sender – The institution that physically sent you the animal.
- Holder – The institution that is physically holding the animal.
- Local ID/GAN – If you do not know the other institution’s Local ID record Undetermined (if you may know it later) or Indeterminate (if it will never be known or if they did not assign one).
NOTE: Once an institution and its Local ID have been entered, ZIMS will look in the database for any matching records. If a match is found you should record a Visit instead of a new Accession. See: Recording Visits help .
- Price – If you are purchasing the animal you can record the cost.
- Currency – This default can be set as an Institution or My Preferences.
- Edit Shipping Details – This opens a screen to capture information regarding the transport. The only searchable field is Shipping Company.
- Clutch/Litter ID – Local list of Clutches/Litters recorded. You can add a new Clutch/Litter by selecting Add New Clutch/Litter ID hyperlink. If a Clutch/Litter is selected, the Parent and Taxonomy information will prefill.
Received Dead – Check this box if the animal arrived deceased. This will open the Death fields (see Dispositions for details). The death will not appear in your inventory or display as a death at your institution, but the record will remain searchable if “Include Dead” is selected in the animal search. It will also appear on transaction reports, which include filters for deaths in transit.
My Institution Details
- Local ID – Enter the next available Local ID. You can select to auto-increment Local IDs in Institution Preferences. See Auto-increment Local ID .
- Responsible Party – Record the Staff, Team or Department that is responsible for the animal. You can select for this to default to either the logged in User or a specified Staff member in Institution or My Preferences.
- Collection – Enter the Collection the animal is in. You can set a default for this in Institution or My Preferences.
- Enclosure – Record the Enclosure the animal will occupy. The Move In Reason will be Acquisition Event. You can set a default for this in Institution or My Preferences.
Taxonomy Information
-
Parent Info
- If a Clutch/Litter has been recorded the Parents will prefill.
- If parent is Undetermined. Indeterminate or Wild select the appropriate button.
-
Add new dam/sire parent
-
If the parent is recorded in ZIMS you can search by Identifier or Taxonomy.
- Check the appropriate record > Pick Selected Animal
- Select to Re-Adjust the Percentages (this is percentage possibility that it is the Parent)
- If a possible second (or more) dam or sire is added continue to Re-Adjust Percentages as needed
- Use the Add/Edit hyperlink under Description to add Notes about the Parent, possibly how Percentages was determined
- If you know the Parent is not in ZIMS select the I Know the Parent is not in ZIMS option.
-
If the parent is recorded in ZIMS you can search by Identifier or Taxonomy.
- Remember to Save the record when done adding Parents.
-
Taxonomy
- This will prefill if a Clutch/Litter has been identified and if Parents have been identified. It will default to the lowest common denominator of the Parental Taxonomies.
- If Undetermined, Indeterminate or Wild Parents have been recorded you will need to record the Taxonomy manually.
- Taxonomy Determination – Select how the Taxonomy was determined from the drop down list.
- Sex Type – Select the appropriate Sex Type.
- Life Stage – Select the appropriate Life Stage. IMPORTANT NOTE: This field will not automatically update as the animal ages. Use this field ONLY if you intend to keep it updated.
-
Rearing – Although not a mandatory field in Husbandry, it is mandatory in Studbooks. Best Practices are that Rearing is recorded when appropriate.
- Start Date should be the Birth Date.
- Rearing Type – Select from the drop down list
- This can be updated later should it change
Birth Information
- Birth Date – Record the Birth Date.
- Birth Type – Select the appropriate Birth Type from the drop down list.
-
Birth Location
- If an Institution is selected, the Institution field is mandatory.
- If a Geo Location is selected at least a Country is mandatory.
- If Undetermined or Indeterminate is selected, no further information is required.
Notes – Record any further details not captured or provide further interpretation of the data recorded.
Back to Topics Covered
Collected From Wild
Accession Details
- Accession Date – Best Practices are that this is the date the animal was captured as you took responsibility for it on that date. However, some institutions use the date the animal arrived at their institution as the Accession Date.
- Terms – Read the hover over definitions to make sure you select the correct Term. By-catch refers to an animal that you captured unintentionally but decided to keep.
- Clutch/Litter ID – Local list of Clutches/Litters recorded. You can add a new Clutch/Litter by selecting Add New Clutch/Litter ID hyperlink. If a Clutch/Litter is selected, the Parent and Taxonomy information will prefill.
Collection Information
- Collection Date – Record the date the animal was Collected. In most cases this should also be the Accession Date.
- Collection Method – This is a single select cascading drop down list to select from.
- Collection Trip – If you have a Collection Trip recorded you can associate this animal with it. See Collection Trips .
- Collection Location – You can record general information such as Country down to very specific data such as GPS coordinates and Altitude or Depth. If you have associated the animal with a Collection Trip this information may already be captured there.
My Institution Details
- Local ID – Enter the next available Local ID. You can select to auto-increment Local IDs in Institution Preferences. See Auto-increment Local ID .
- Responsible Party – Record the Staff, Team or Department that is responsible for the animal. You can select for this to default to either the logged in User or a specified Staff member in Institution or My Preferences.
- Collection – Enter the Collection the animal is in. You can set a default for this in Institution or My Preferences.
- Enclosure – Record the Enclosure the animal will occupy. The Move In Reason will be Acquisition Event. You can set a default for this in Institution or My Preferences.
Taxonomy Information
-
Parent Info
- Unless the animal is known to be a descendent of animals previously in the ZIMS database, you would select the Wild button for both Parents. If you have associated the animal with a Clutch/Litter, the Parents will prefill.
-
Taxonomy
- This will prefill if a Clutch/Litter has been identified.
- If Wild Parents have been recorded you will need to record the Taxonomy manually.
- Taxonomy Determination – Select how the Taxonomy was determined from the drop down list.
- Sex Type – Select the appropriate Sex Type.
- Life Stage – Select the appropriate Life Stage. IMPORTANT NOTE: This field will not automatically update as the animal ages. Use this field ONLY if you intend to keep it updated.
-
Rearing – Although not a mandatory field in Husbandry, it is mandatory in Studbooks. Best Practices are that Rearing is recorded when appropriate.
- Start Date should be the Birth Date, most likely estimated in a wild caught animal.
- Rearing Type – Select from the drop down list. In most cases wild caught animals would be Parent or Autonomous Reared.
- This can be updated later should it change
Birth Information
- Birth Date – Record the Birth Date, most likely estimated in a wild caught animal.
- Birth Type – Birth Type would be Wild unless the animal was known to have been previously released to the wild. If the animal was released from a ZIMS institution you should be creating a Visit and not a new Accession.
-
Birth Location
- If a Geo Location is selected at least a Country is mandatory
- If Undetermined or Indeterminate is selected, no further information is required.
Notes – Record any further details not captured or provide further interpretation of the data recorded.
Back to Topics Covered
Rescued
A new version of rescue accessions is now available here:
Accessions
.
ZIMS Desktop Version:
Accession Details
- Accession Date – Best Practices are that this is the date the animal was rescued as you took responsibility for it on that date. However, some institutions use the date the animal arrived at their institution as the Accession Date.
- Terms – Read the hover over definitions to make sure you select the correct Term.
- Clutch/Litter ID – Local list of Clutches/Litters recorded. You can add a new Clutch/Litter by selecting Add New Clutch/Litter ID hyperlink. If a Clutch/Litter is selected, the Parent and Taxonomy information will prefill.
My Institution Details
- Local ID – Enter the next available Local ID. You can select to auto-increment Local IDs in Institution Preferences. See Auto-increment Local ID .
- Responsible Party – Record the Staff, Team or Department that is responsible for the animal. You can select for this to default to either the logged in User or a specified Staff member in Institution or My Preferences.
- Collection – Enter the Collection the animal is in. You can set a default for this in Institution or My Preferences.
- Enclosure – Record the Enclosure the animal will occupy. The Move In Reason will be Acquisition Event. You can set a default for this in Institution or My Preferences.
Rescue Information
- Rescue Date – This date should be the same as the Accession Date unless someone other than your Staff performed the Rescue.
- Rescued By – Sourced from your Staff list.
- Public Contact – Free text field to enter who contacted you about the need to rescue the animal.
- Stranded – This checkbox was meant to apply to stranded marine animals but this is not a searchable field at this time.
-
Rescue Location
- You can enter the rescue location from as general as the Country down to GPS coordinates and Altitude or Depth.
Taxonomy Information
-
Parent Info
- If the animal is Rescued from the wild, unless the animal is known to be a descendent of animals previously in the ZIMS database, you would select the Wild button for both Parents. If the animal is in an unsustainable living situation and possibly captive born, you should select Indeterminate. If you have associated the animal with a Clutch/Litter, the Parents will prefill.
-
Taxonomy
- This will prefill if a Clutch/Litter has been recorded or Parents identified.
- If Wild Parents have been recorded you will need to record the Taxonomy manually.
- Taxonomy Determination – Select how the Taxonomy was determined from the drop down list.
- Sex Type – Select the appropriate Sex Type.
- Life Stage – Select the appropriate Life Stage. IMPORTANT NOTE: This field will not automatically update as the animal ages. Use this field ONLY if you intend to keep it updated.
-
Rearing – Although not a mandatory field in Husbandry, it is mandatory in Studbooks. Best Practices are that Rearing is recorded when appropriate.
- Start Date should be the Birth Date, most likely estimated in a Rescued animal.
- Rearing Type – Select from the drop down list. In most cases wild caught animals would be Parent or Autonomous Reared, for other animals select Undetermined or Indeterminate.
Birth Information
- Birth Date – Record the Birth Date, most likely estimated in a Rescued animal.
- Birth Type – If Rescued from the Wild, Birth Type would be Wild unless the animal was known to have been previously released to the wild. If the animal was released from a ZIMS institution you should be creating a Visit and not a new Accession. If Rescued from a non-Wild situation, for example an anaconda removed from an empty building, Birth Type could be Captive, Undetermined or Indeterminate.
-
Birth Location
- If an Institution is selected the Institution field is mandatory.
- If a Geo Location is selected at least a Country is mandatory.
- If Undetermined or Indeterminate is selected, no further information is required.
Notes – Record any further details not captured or provide further interpretation of the data recorded. For example, you could record further details on the Public Contact.
Back to Topics Covered
Appeared
Accession Details
- Date Found – The date the animal appeared at your facility.
- Found Location – A free text field. Keep it short, you can add details using Notes.
- Terms – Read the hover over definitions to make sure you select the correct Term.
- Appeared – An Unassisted Appeared means it walked, hopped, slithered or flew into your institution. A Deposited Appeared means a person dropped it off in a container or right into an exhibit. If you have any signed paperwork from the person it would be From Another Institution and not an Appeared.
- Clutch/Litter ID – Local list of Clutches/Litters recorded. You can add a new Clutch/Litter by selecting Add New Clutch/Litter ID hyperlink. If a Clutch/Litter is selected, the Parent and Taxonomy information will prefill.
My Institution Details
- Local ID – Enter the next available Local ID. You can select to auto-increment Local IDs in Institution Preferences. See Auto-increment Local ID .
- Responsible Party – Record the Staff, Team or Department that is responsible for the animal. You can select for this to default to either the logged in User or a specified Staff member in Institution or My Preferences.
- Collection – Enter the Collection the animal is in. You can set a default for this in Institution or My Preferences.
- Enclosure – Record the Enclosure the animal will occupy. The Move In Reason will be Acquisition Event. You can set a default for this in Institution or My Preferences.
Taxonomy Information
-
Parent Info
- In most situations the Parents would be recorded as Undetermined or Indeterminate. If you have associated the animal with a Clutch/Litter, the Parents will prefill.
-
Taxonomy
- This will prefill if a Clutch/Litter has been identified.
- If Undetermined or Indeterminate Parents have been recorded you will need to record the Taxonomy manually.
- Taxonomy Determination – Select how the Taxonomy was determined from the drop down list.
- Sex Type – Select the appropriate Sex Type.
- Life Stage – Select the appropriate Life Stage. IMPORTANT NOTE: This field will not automatically update as the animal ages. Use this field ONLY if you intend to keep it updated.
-
Rearing – Although not a mandatory field in Husbandry, it is mandatory in Studbooks. Best Practices are that Rearing is recorded when appropriate.
- Start Date should be the Birth Date, most likely estimated in an Appeared animal.
- Rearing Type – Select from the drop down list. In most cases select Undetermined or Indeterminate.
Birth Information
- Birth Date – Record the Birth Date, most likely estimated in a Rescued animal.
- Birth Type – You may need to make some assumptions here. For example, if a ferret was dropped off in a box it is probably Captive Born. But if an injured native species is dropped off in a box it is probably Wild Born.
-
Birth Location
- If an Institution is selected the Institution field is mandatory.
- If a Geo Location is selected at least a Country is mandatory.
- If Undetermined or Indeterminate is selected, no further information is required.
Notes – Record any further details not captured or provide further interpretation of the data recorded. For example, you could record further details the circumstances of the appearance or why you selected the Birth Type that you did.
Birth Hatch
Accession Details
- Accession/Birth Date – The date the animal was born. Do not wait to see if it survives!
- Birth Type – Most animals will be Captive Born unless you are monitoring a population in the wild. Because you are recording the Birth, Undetermined and Indeterminate should rarely be used.
- Terms – Read the hover over definitions to make sure you select the correct Term.
- Nest ID – This is a free text field and, unlike Clutch/Litter ID, ZIMS does not keep track of these in a local drop down. You can search by Nest ID in Animal Advanced Search.
- Clutch/Litter ID – Local list of Clutches/Litters recorded. You can add a new Clutch/Litter by selecting Add New Clutch/Litter ID hyperlink. If a Clutch/Litter is selected, the Parent and Taxonomy information will prefill.
My Institution Details
- Local ID – Enter the next available Local ID. You can select to auto-increment Local IDs in Institution Preferences. See Auto-increment Local ID .
- Responsible Party – Record the Staff, Team or Department that is responsible for the animal. You can select for this to default to either the logged in User or a specified Staff member in Institution or My Preferences.
- Collection – Enter the Collection the animal is in. You can set a default for this in Institution or My Preferences.
- Enclosure – Record the Enclosure the animal will occupy. The Move In Reason will be Acquisition Event. You can set a default for this in Institution or My Preferences.
Taxonomy Information
-
Parent Info
- If a Clutch/Litter has been recorded previously the Parents will prefill.
- If parent is Undetermined. Indeterminate or Wild select the appropriate button.
-
Add new dam/sire parent
-
If the parent is recorded in ZIMS you can search by Identifier or Taxonomy.
- Check the appropriate record > Pick Selected Animal
- Select to Re-Adjust the Percentages (this is percentage possibility that it is the Parent)
- If a possible second (or more) dam or sire is selected continue to Re-Adjust Percentages as needed
- Use the Add/Edit hyperlink under Description to add Notes about the Parent, possibly how Percentages was determined
- If you know the Parent is not in ZIMS select the I Know the Parent is not in ZIMS option.
-
If the parent is recorded in ZIMS you can search by Identifier or Taxonomy.
- Remember to Save the record when done adding Parents.
-
Taxonomy
- This will prefill if a Clutch/Litter has been identified or if Parents have been identified. It will default to the lowest common denominator of the Parental Taxonomies.
- If Undetermined, Indeterminate or Wild Parents have been recorded you will need to record the Taxonomy manually.
- Taxonomy Determination – Select how the Taxonomy was determined from the drop down list.
- Sex Type – Select the appropriate Sex Type.
- Life Stage – Select the appropriate Life Stage. IMPORTANT NOTE: This field will not automatically update as the animal ages. Use this field ONLY if you intend to keep it updated.
-
Rearing – Although not a mandatory field in Husbandry, it is mandatory in Studbooks. Best Practices are that Rearing is recorded when appropriate.
- Start Date should be the Birth Date
- Rearing Type – Select from the drop down list. In most cases it will be Captive Born.
Birth Information
- Conception Type – Select as appropriate from the drop down list.
- Conception Date – This is activated only if Conception Type is entered.
-
Birth Location
- If an Institution is selected the Institution field is mandatory.
- If a Geo Location is selected at least a Country is mandatory.
- If Undetermined or Indeterminate is selected, no further information is required.
Notes – Record any further details not captured or provide further interpretation of the data recorded. For example, you could record further details regarding the Birth.
Back to Topics Covered
Undetermined/Indeterminate
Radio Buttons – Select Undetermined (do not know at this time) or Indeterminate (will never know).
Accession Details
- Accession – This should always be the date you either received the animal physically, received ownership of it, or both. In this Accession mode it will often need to be estimated.
- Terms – The only option is Undetermined or Indeterminate (sourced from the selected radio button) Physical and Ownership.
- Clutch/Litter ID – Local list of Clutches/Litters recorded. You can add a new Clutch/Litter by selecting Add New Clutch/Litter ID hyperlink. If a Clutch/Litter is selected, the Parent and Taxonomy information will prefill.
My Institution Details
- Local ID – Enter the next available Local ID. You can select to auto-increment Local IDs in Institution Preferences. See Auto-increment Local ID .
- Responsible Party – Record the Staff, Team or Department that is responsible for the animal. You can select for this to default to either the logged in User or a specified Staff member in Institution or My Preferences.
- Collection – Enter the Collection the animal is in. You can set a default for this in Institution or My Preferences.
- Enclosure – Record the Enclosure the animal will occupy. The Move In Reason will be Acquisition Event. You can set a default for this in Institution or My Preferences.
Taxonomy Information
-
Parent Info
- If a Clutch/Litter has been recorded previously the Parents will prefill.
- For this Accession mode the Parents will most likely be Undetermined or Indeterminate. If you do know the Parents, follow as for Parent Info in From Another Institution.
- Remember to Save the record when done adding Parents.
-
Taxonomy
- This will prefill if a Clutch/Litter has been identified and if Parents have been identified. It will default to the lowest common denominator of the Parental Taxonomies.
- If Undetermined, Indeterminate or Wild Parents have been recorded you will need to record the Taxonomy manually.
- Taxonomy Determination – Select how the Taxonomy was determined from the drop down list.
- Sex Type – Select the appropriate Sex Type.
- Life Stage – Select the appropriate Life Stage. IMPORTANT NOTE: This field will not automatically update as the animal ages. Use this field ONLY if you intend to keep it updated.
-
Rearing – Although not a mandatory field in Husbandry, it is mandatory in Studbooks. Best Practices are that Rearing is recorded when appropriate.
- Start Date should be the Birth Date
- Rearing Type – Select from the drop down list. In most cases select Undetermined or Indeterminate.
Birth Information
- Birth Date – This will most likely have to be estimated.
- Birth Type – This will default to Undetermined or Indeterminate as selected but can be edited.
-
Birth Location
- This will default to Undetermined or Indeterminate as selected and no further information is required.
- If an Institution is selected the Institution field is mandatory.
- If a Geo Location is selected at least a Country is mandatory.
Notes – Record any further details not captured or provide further interpretation of the data recorded. For example, you could any information you have in hopes of being able to create a more informed Accession.
NOTE: If Accession details are later found you can change the Accession mode:
- From My Transactions add a new Accession in the correct mode and Add to Transaction list.
- It should appear as a conflict (in red) in the My Transaction List. Do NOT try to Save All Changes.
- Delete the Undetermined/Indeterminate transaction.
- Save All Changes.
Back to Topics Covered
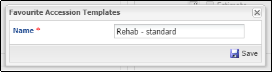
Favorite Accession Templates
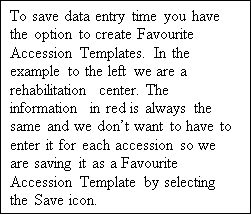
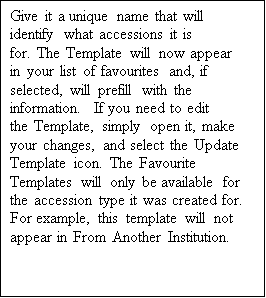

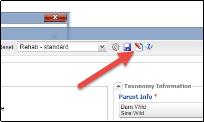
To delete a Template, select the wheel icon, highlight the desired Template and select Delete Selected.
Revised 6 April 2026