


Group Transactions
The My Transactions tab will show any transactions the group has had with your institution and is also where you perform actions to acquire or disposition animals from your collection (including births, deaths and change of ownership). If the group has never been at, or owned by, your institution, no transactions will display. If the group has been at, or owned by, your facility, any transactions regarding the group will display.
Topics
|
|
||
|
|
||
|
|
Addition (Merge) of new group members from outside your facility |
|
|
|
Addition (Merge) of new group members from within your facility |
|
|
|
||
|
|
||
|
|
||
|
|
||
|
|
||
|
|
||
|
|
||
|
|
|
|
|
|
|
Finding My Transactions
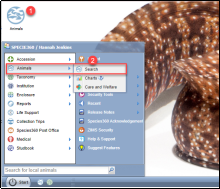
Open the Animals module by double clicking on the Animals desktop icon (1), or clicking the Start Menu, then Animals, Search (2).
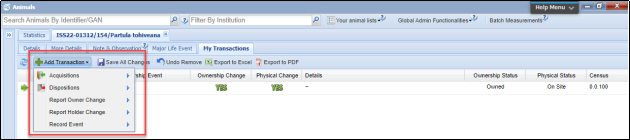
Search for a group record in the top left search box (1) (see here for more help on searching for animals), then navigate to the My Transactions tab (2).

Transactions
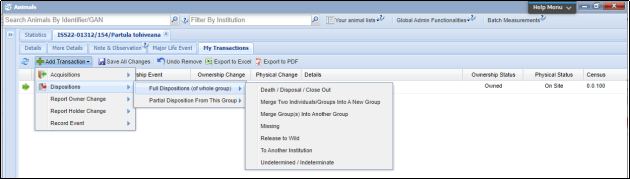
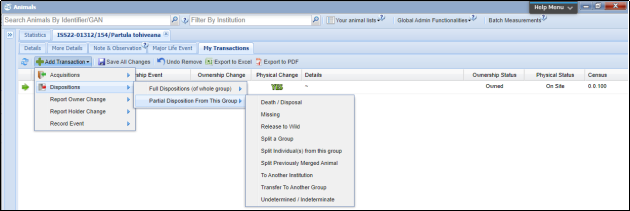
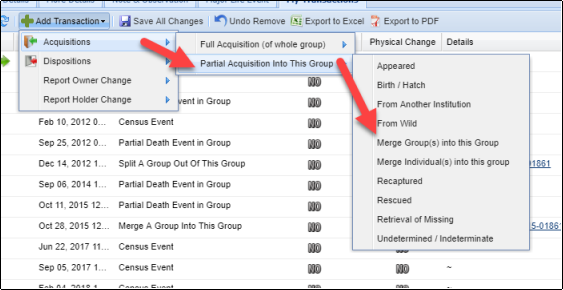
There are five main types of transaction you can perform: Acquisition, Disposition, Report Owner Change, Report Holder Change and Hatch Event (for egg records only. Acquisitions and Dispositions are split into Full Acquisitions/Dispositions and Partial Acquisitions/Dispositions. All Transactions are found within the Add Transaction menu.
All transactions recorded in the My Transaction tab must have a unique day and time, e.g. you cannot have two transactions on 01/01/2020 00:00. To record two transactions on the same day, make sure to change the time of the most recent transaction to at least 1 minute later. It is important in groups that transactions and census counts are always recorded in the correct order to prevent incorrect numbers.
E.g., the following two scenarios contain the same transactions, but result in different ending numbers depending on the order of transactions and census counts:
- Starting number = 5 animals, Census count = 7 animals, disposition of 3 animals, ending number = 4
- Starting number = 5 animals,disposition of 3 animals, Census count = 7 animals, ending number = 7
Note that all transactions added to the My Transactions tab are not saved until you click Save All Changes.
Acquisitions
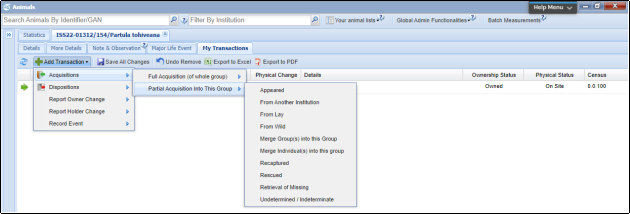
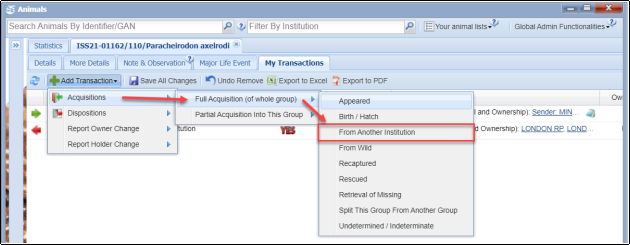
Acquisitions are performed in the My Transactions tab when you are recording the acquisition of animals from or to a pre-existing group in ZIMS. There are two types of Acquisition, Full Acquisition (of a whole group) and Partial Acquisition Into This Group.
Full Acquisition
Full Acquisitions are performed when you are acquiring an entire group which is already accessioned in ZIMS. This group may be coming from another institution or be recaptured after release/missing. Every group in ZIMS must have an original Acquisition Transaction. Full Acquisitions are also performed here when resolving historical transactions, for example recording the original acquisition transaction for a record where another institution has recorded a disposition from your collection. 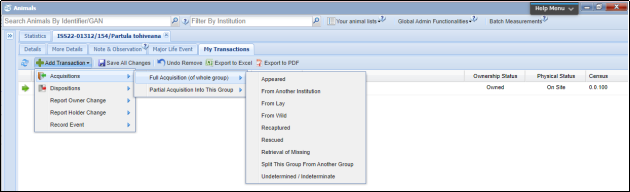
For examples see:
- Re-acquisition of a group that left your institution
- Acquisition of a group from another institution
Partial Acquisition
Partial Acquisitions are performed when you are adding individuals/groups to your established group, for example receiving animals from another institution and placing them in your group, retrieval of missing animals or recaptured animals, or merging animals from another group into this group.
For examples see:
- Addition (Merge) of new group members from outside your facility
- Addition (Merge) of new group members from within your facility
Dispositions
All Dispositions are performed in the My Transactions tab, including animals sent to other collections and deaths. There are two types of Disposition, Full Disposition (of a whole group) and Partial Disposition From This Group.
Full Disposition
Full Dispositions are performed when you are removing all animals from a group. These animals may have died, be leaving to go to another collection, moving to another group in your institution, or being released to the wild.
For an example see:
Partial Disposition
Partial Dispositions are performed when you are removing only some animals from your group, for example a single or few deaths, sending out part of the group to another collection, moving some animals to another group, splitting a new group or individuals out of the group, or releasing part of the group to the wild.
For examples see:
- Disposition of part of a group to another institution
- Transfer part of a group to another group
- Split out a new group from your existing group
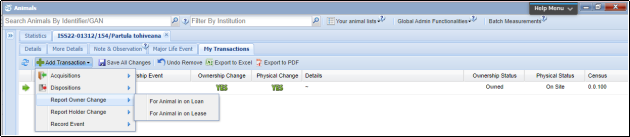
Report Owner Change
Report Owner Change is used when you have a group in on loan or lease, and the group has a change in ownership. E.g. the group is held by your institution (ZooA) and owned by ZooB. ZooB hands ownership over to ZooC, but the group physically remains at your institution.
For an example see:
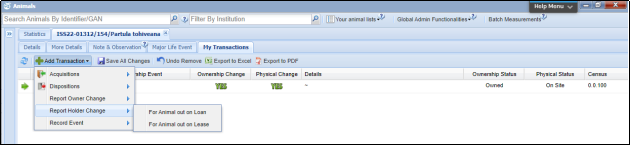
Report Holder Change
Report Holder Change is used when you have a group out on loan or lease, and the group has a change in holder. E.g. the group is owned by your institution (ZooA) and held by ZooB, and the group physically moves to ZooC while still being owned by your institution.
For an example see:
Record Event
Record Event only appears when managing the transactions of a group of eggs or egg mass (and single egg). Record Event allows you to perform a hatch event and hatch the eggs into a group of animals.
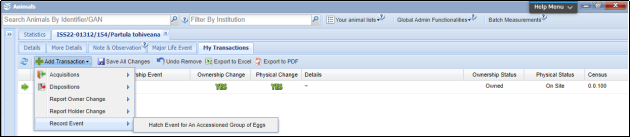
For an example see:
Example Scenarios for Transactions
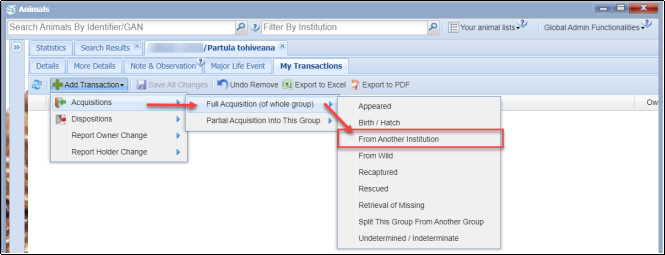
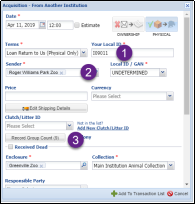
Acquisition of a group from another institution
Scenario: You have received a new group form another ZIMS institution.
Action: Perform a Full Acquisition (of whole group), From Another Institution.
Note: You should only perform this action if you know you have received the entire group, if you are only receiving a portion of the group you should wait for the sending collection to split the group and send to your institution.
Search for the group using the GAN or Local ID provided, and open the My Transactions Tab. Select Add Transaction, Full Acquisition (of whole group), From Another Institution.
Fill in the required information in the pop-up screen. Mandatory fields are marked with a red star, which have been numbered and defined below.
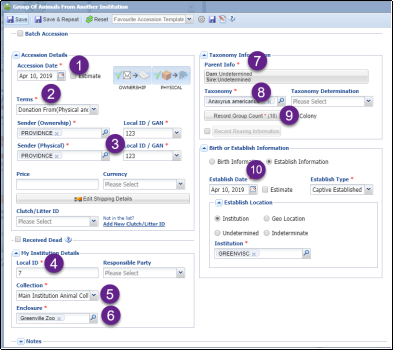
The following information is mandatory:
- Date: Fill in the date of the transfer
- Terms: Fill in the agreed terms, like donation/trade/loan in
- Sender/Owner/Holder: The field labels here are driven by the Terms selected. Because you are recording a group already in the ZIMS database these fields will prefill
- Your local ID: Fill in your local ID
- Enclosure: Fill in the enclosure in which the new animal will be placed
- Collection: Fill in the collection in which the new animal will be placed
- Parent Info: Because the group is in the database this will prefill
- Taxonomy: Will also prefill
- Record Group Count: Record the number of members of the group
- Birth/Established Information: Birth Information should only be used if you are recording a birth/hatch of a group at your institution or if the sender knows the date when ALL members of the group were born/hatched. For this scenario record an Established Date (when the group came together as a group) as of the acquisition date.
Best practices:
If you are receiving a new group from another ZIMS institution and recording a Receiver Initiated transaction (meaning they have not yet recorded sending the group so there is no Pending to accept), record UNDETERMINED for the sending institution’s ID unless you are certain that you are receiving all the members of their group. They may be splitting out some members that would require them to create a new Local ID before sending to you.
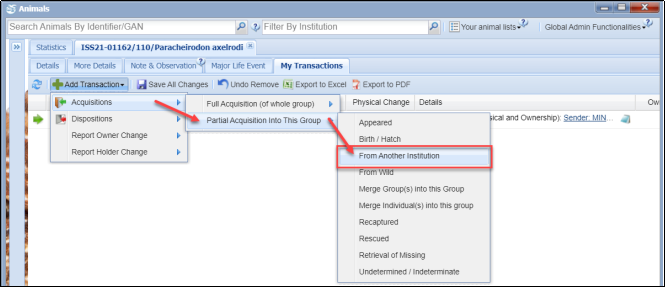
Addition (Merge) of new group members from outside your facility
Scenario: You have received a group of animals from a non-ZIMS institution that you are adding directly to your existing group.
Action: Perform a Partial Acquisition Into This Group, From Another Institution.
Search for the group you want to add the new animals into. Select Add Transaction, Acquisitions, Partial Acquisition Into This Group, From Another Institution
Fill in the required fields. Mandatory fields are marked with a red star, and are numbered and defined below.
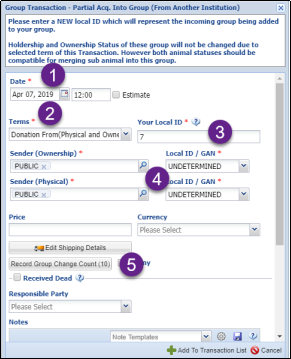
- Date: Fill in the date of the addition
- Terms: Fill in the agreed term, this will drive the Physical/Owner fields below
- Local ID: Even though you are adding this group to an existing group, a Local ID is required
- Owner and Physical information and their Local ID
- Record Group Change Count: This is the number of members of the group you are adding to your existing group
Addition (Merge) of new group members from within your facility
Scenario: You are adding all the members of an existing group in your collection into another group in your collection.
Action: Perform a Acquisition, Partial Acquisition Into This Group, Merge Group(s) into this Group.
Open the My Transactions tab of the target group. Select Add Transaction, Acquisition, Partial Acquisition Into This Group, Merge Group(s) into this Group.
Fill in the required fields. Mandatory fields are marked with a red star, and are numbered and defined below.

- Date: The date you merged the groups
- Groups: Select the group(s) you are merging into the group in focus
- Reason For Merge: a data standard list
- Look at the graphics to make sure they depict what you are doing. The Owner and the Holder of each group must be the same.
You can also perform this action from the group you want to merge rather than the target group. For this action, you would perform a Full Disposition, Merge This Group Into Another Group.
Re-acquisition of a group that left your institution
Scenario: You sent a whole group to another facility and now you are getting all of the group back.
Action: Perform an Acquisition, Full Acquisition (of whole group), From Another Institution
Open your original record and open the My Transactions tab. Select Add Transaction, Acquisition, Full Acquisition (of whole group), From Another Institution.
In the pop-up, fill in the required information. This is the same screen as the first scenario. Some things to note:
- Your Local ID will prefill.
- The Sender and their Local ID will prefill.
-
You need to record the group count as it may have changes while at the other facility.
Disposition of a full group
Scenario: You are sending the entire group to another institution.
Action: Perform a Disposition, Full Disposition, To Another Institution
Open the record of the group you want to send and open the My Transactions tab. Select Add Transaction, Disposition, Full Disposition (of whole group), To Another Institution. 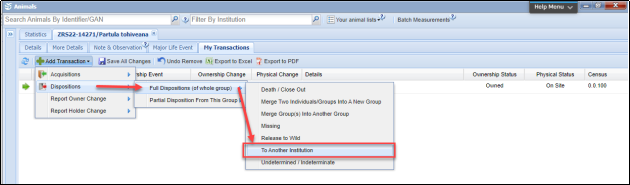
Fill out the required fields. Mandatory fields are marked with a red star, and are numbered and defined below.
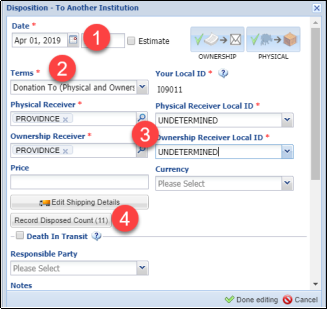
- Date: Fill in the date of the transfer
- Terms: Fill in the agreed terms
- Receiver Physical/Ownership: Fill in the receiving institution. If you do not know the Local ID they will assign enter UNDETERMINED. You can edit the local ID of the receiving institution at a later date.
- Record Disposed Count: You need to record the group member count. When you open the screen, the count will default to the most recent census count.
Disposition of part of a group to another institution
Scenario: You are sending only some members of a group to another institution.
Action: Perform a Disposition, Partial Disposition From This Group, To Another Institution.
Open the record of the group you want to send and open the My Transactions tab. Select Add Transaction, Disposition, Partial Disposition From This Group, To Another Institution.
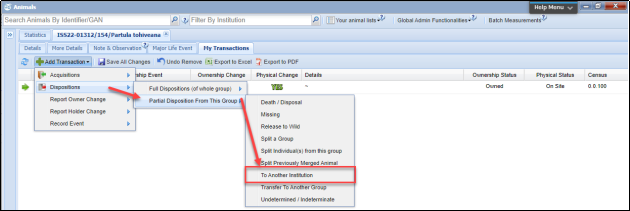
Fill in the required fields. Mandatory fields are marked with a red star, and are numbered and defined below.
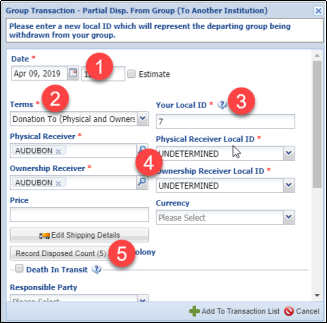
- Date: Record the date of the Disposition
- Terms: Record the appropriate Terms
- Your Local ID: A new Local ID for the split group is required
- Physical and Ownership Receiver and their Local ID. Use UNDETERMINED if you don’t know it yet
- Record Disposed Count: The number of members of the group that you are dispositioning
Transfer part of a group to another group
Scenario: You are moving animals from one group to another within your institution.
Action: Perform a Disposition, Partial Disposition From This Group, Transfer To Another Group.
Open the record of the group you want to move animals from and open the My Transactions tab. Select Add Transaction, Disposition, Partial Disposition From This Group, Transfer To Another Group.
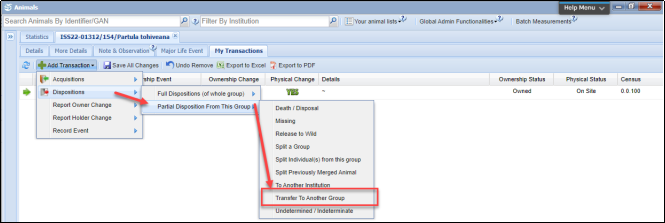
Fill in the required fields. Mandatory fields are marked with a red star, and are numbered and defined below. When transferring to another group, you can use the “Add & Repeat” button to quickly add multiple transactions without leaving the screen.
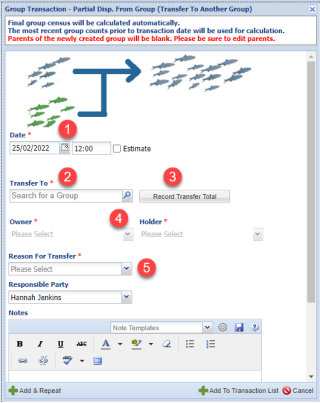
- Date: Record the date of the Disposition
- Transfer To: Record the group you are moving animals to
- Record Group Count: The number of members of the group that you are dispositioning
- Owner/Holder: These will pre-fil once a group is selected and will display the owner/holder information for that group.
- Reason For Transfer: The reason why you are moving the animals between groups.
Split out a new group from your existing group
Scenario: You have a large group that you are splitting into two smaller groups (one new group and keeping existing group)
Action: Perform a Disposition, Partial Disposition From This Group, Split a Group.
Open the record of the group you want to split and open the My Transactions tab. Select Add Transaction, Disposition, Partial Disposition From This Group, Split a Group.
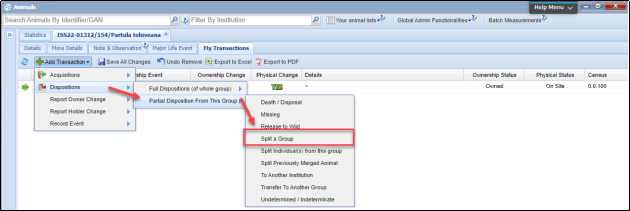
Fill in the required fields. Mandatory fields are marked with a red star, and are numbered and defined below.
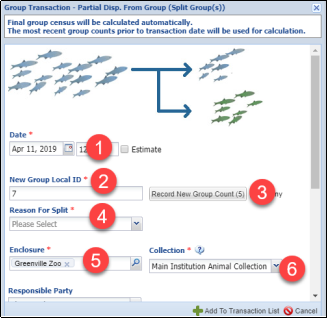
- Date: The date of the Split.
- Local ID: A new Local ID is required.
- Record New Group Count: The number of group members you Split out.
- Reason for Split: Why you Split the group, a data standard.
- Enclosure: Defaults to your Preference.
- Collection: Defaults to your Preference.
Split out an individual from your existing group
Scenario: You have an individual in the group that is now individually recognizable (i.e markings, injury, sexually dimorphic) and you want to manage as an individual now.
Action: Perform a Disposition, Partial Disposition From This Group, Split Individual(s) from this group
Open the record of the group you want to split and open the My Transactions tab. Select Add Transaction, Disposition, Partial Disposition From This Group, Split Individual(s) from this group.
![]()
Fill in the required fields. Mandatory fields are marked with a red star, and are numbered and defined below.
![]()
- Date: The date of the Split.
- Batch Split: Tick this box to split more than one individual from a group.
- Local ID: A new Local ID is required.
- Reason for split: Select a reason from the drop-down menu.
- Birth Date: If you have more accurate birth date information for this individual it can be updated here, otherwise it will default to the birth date assigned for the group.
- Sex Type: Update a sex type for this individual.
- Enclosure: Defaults to your Preference but can be updated.
- Collection: Defaults to your Preference but can be updated.
- Add to the Transaction List.
Finally, click Save All Changes to update the Transaction List. The individuals record can be accessed through the new GAN.

Record change in ownership
Scenario: You have a group in on loan which has changed ownership.
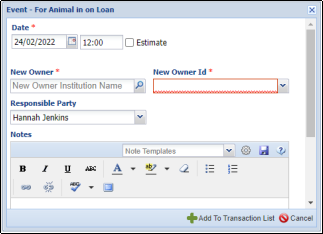
Action: Perform Report Owner Change, For Animal in on Loan.
Open the record of the group you need to change the ownership of and open the My Transactions tab. Select Add Transaction, Report Owner Change, For Animal in on Loan.
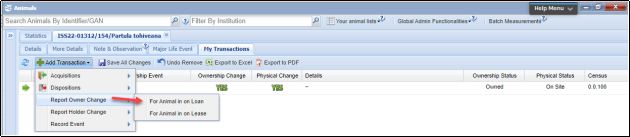
Record the Date, New Owner and New Owner ID. Add a responsible party and any notes as required then click Add To Transaction List.
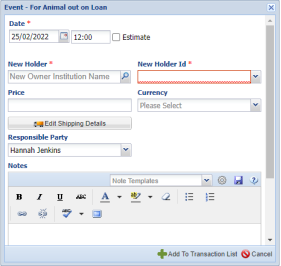
Record change in holder
Scenario: You have a group out on loan which has been transferred to another holder.
Action: Perform Report Holder Change, For Animal out on Loan.
Open the record of the group you need to change the holder of and open the My Transactions tab. Select Add Transaction, Report Holder Change, For Animal in on Loan.
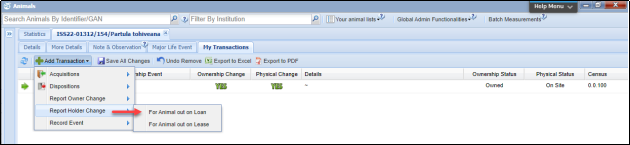
Record the Date, New Holder and New Holder ID. Add responsible party and any notes as required then click Add To Transaction List.
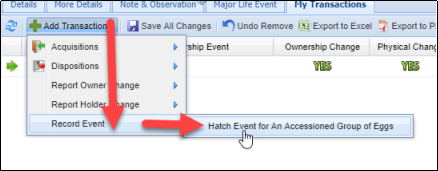
Record hatch event in group of eggs
Scenario: You have a group of eggs which hatch.
Action: Perform Record Event, Hatch Event for An Accessioned Group Of Eggs.
Fill in the required information. Mandatory fields are marked with a red star and are numbered and defined below.
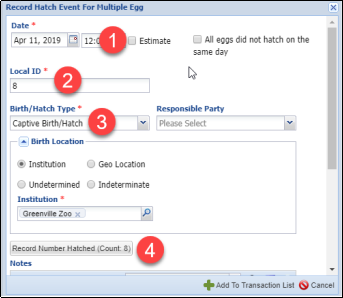
- Date: The date the eggs hatched. If they did not all hatch on the same day check the box and you can enter a date range.
- Local ID: If you did not record a Local ID for the group of eggs you will need to do so now.
- Birth/Hatch Type: The type of birth/hatch.
- Record Number Hatched: Since not all eggs may have hatched a count is required here.
Revised 5 March 2025
It is the mission of Species360 to facilitate international collaboration in the collection and sharing of information on animals and their environments for zoos, aquariums and related organizations.
www.Species360.org – Global Information Serving Conservation